Phoenix provides many configurable settings for the user to manage via the Preferences dialog. There is also a configuration file containing options that can be adjusted as necessary for local environments (see “Phoenix Config file”).
Select Edit > Preferences to set Phoenix defaults using the Preferences dialog.
Set location of saved Phoenix projects and copy Examples directory.
Licensing options
Activate and retrieve a license, and add a licensing server. See “Licensing of Phoenix software”.
Set up Global Contexts and identify column names to associate with specific variables. Set up Context Associations to automatically map variable names with specific data inputs in Phoenix operational objects.
PKS
Default Save Options: See the PKS “Configuring default save options” section.
Instances: See the PKS “Setting up a PKS connection” section.
Remote Execution
JMS: Enable the Phoenix Job Management Service (JMS).
RPS: Enable many third party objects to be executed remotely.
Compute Grid: Add, modify settings, delete grids. The grids listed are the ones presented on the Execute on menu in the Run Options tab.
Watson Import
Configure the server, set up business rules for the import and specify the content for the resulting sample and dosing worksheets. See “Setting up preferences” for details.
AutoPilot
Open the AutoPilot Toolkit Administrator Module to configure business rules, system settings, and output, including formatting. See the “Administration Module”.
Control the default model for a 2x2 average bioequivalence crossover design involving nonreplicated data. When Default for 2x2 crossover set to all fixed effects is unchecked, the default fixed effects model is Sequence+Formulation+Period and random model is Subject(Sequence). When the option is checked, the fixed effect model becomes Sequence+Formulation+Period+Subject(Sequence) and the random effects model becomes unspecified. See “Nonreplicated crossover designs”.
NONMEM, PsN, R, Reporter, SAS
Set the paths to access the external programs, define output directories, and set up development environments for modifying scripts for the third party programs from within Phoenix. See NONMEM’s “Setting up preferences”, PsN’s “Setting up preferences”, R’s “Setting up preferences”, Reporter’s “Setting up preferences”, and SAS’ “Setting up preferences” for more details.
NLME
In the NLME root run folder field, type a path to the default temporary folder for NLME runs or click Browse to use the Browse For Folder dialog to select a new folder. The default is C:\Users\<username>\AppData\Local\Temp\Phoenix.
Object Settings
Manage saved object settings files. The list is grouped by operational object. Set the default file to use for object settings, delete saved files, import/export settings files to and from Phoenix. See “To set object settings preferences for operational objects” in the Operational Objects section.
Manage the default display settings for plots.
Select the top-level Plug-ins item to view and control the status for installed Phoenix plug-in modules. Select a specific plug-in page to view the plug-in version and description.
In the Preferences dialog, click the (+) sign beside General to expand the menu tree.
Select General > Projects to display the Project Settings page.
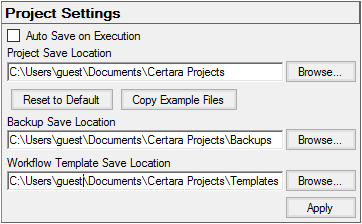
Project Settings preferences
Check the Auto Save on Execution box to have Phoenix save a back up copy of the project every time a workflow or operational object is executed.
In the Project Save Location field, type a path to the directory in which to save Phoenix project files (the use of environment variables when defining the path is supported) or click Browse to use the Browse For Folder dialog to select a new directory. The default is C:\Users\<username>\My Documents\Certara\Phoenix Projects.
Click Reset to Default to change the project save location back to its default location.
Click Copy Example Files to create a copy of the Examples directory installed with Phoenix in your project save location.
In the Backup Save Location field, type a path to the directory in which to place automatically saved projects or click Browse to use the Browse For Folder dialog to select a new directory. The default is C:\Users\<username>\My Documents\Certara\Phoenix Projects\Backups.
In the Workflow Template Save Location field, type a path to the directory in which to place saved templates or click Browse to use the Browse For Folder dialog to select a new directory. The default is C:\Users\<username>\My Documents\Certara\Phoenix Templates.
Click Apply to apply the changes.
Note:For large projects, the autosave option can decrease performance as the benefits of saving automatically after every object execution may be far outweighed by the time it takes. In those cases, this option is not recommended and users should manually save their projects.
Mapping contexts are used to associate inputs into operational objects with columns in a dataset. There are two mapping context pages: the Global Contexts page and the Context Associations page.
The Global Contexts page is used to specify potential columns in a dataset that belong to a particular data input. Potential column names are columns in a worksheet that are typically associated with a mapping context. For example, ID is a potential column name for Subject, and Hour is a potential column name for Time.
The global contexts are then used to map the columns to operational object inputs in the Context Associations page.
To identify column names typically used for a particular data input
Click the (+) sign beside Mapping Contexts.
Select Global Contexts in the menu tree.
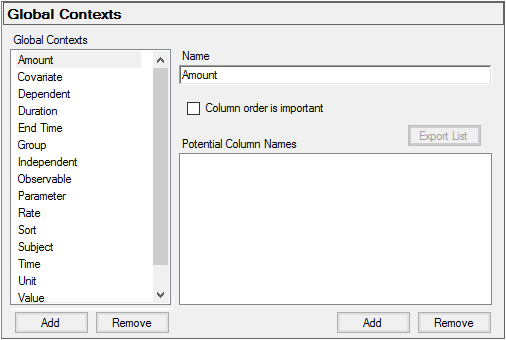
Global Contexts preferences
Check the Column order is important box to maintain order of columns.
Select a context in the list.
To add/remove a global context
To add to the list of global contexts, click Add underneath the Global Contexts list and type the global context name in the list.
To remove a global context, select the context in the Global Contexts list and click Remove below the list.
To add/remove a column name
To add to the list of potential column names, click Add underneath the Potential Column Names field and type the name of the column in the Potential Column Names field.
To remove a potential column name, select the name in the Potential Column Name field and click Remove below the field.
To map columns to specific inputs in each operational object
Select Context Associations in the menu tree.
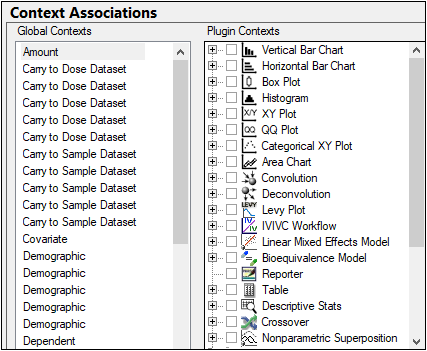
Context Associations preferences
Select a context in the Global Contexts list.
In the Plugin Contexts list, click the (+) sign beside an operational object to view a list of its data inputs.
Check the box(es) to associate that operational object’s input with the dataset column(s) specified in the Global Contexts list.
When a dataset with a column that matches the global context is mapped to that operational object, the column is automatically mapped to that input.
Suppose a user always wants the subject identifier column in a dataset to map to the Sort context in the NCA object. The user would do the following:
-
Select Global Contexts.
-
Select Subject in the Global Contexts list.
-
In the Potential Column Names box, add any column names used to contain subject identifiers, such as ID or Subject.
-
Select Context Associations.
-
Select Subject in the Global Contexts list.
-
Click the (+) sign beside NCA to view all NCA data inputs.
-
Check the box beside Sort.
The subject identifier column is now associated with the Sort context in the NCA object. -
Click OK to close the Preferences dialog.
-
Import a dataset that contains subject identifiers. (The subject identifier column must have a name specified in the Global Contexts dialog.)
-
Insert an NCA object and map the dataset to the object.
The subject identifier column is automatically mapped to the Sort context in the NCA object’s Main Mappings panel.
The Job Management dialog allows users to specify the address and protocol used by the Phoenix Job Management System™ (JMS™), how often to send data packets to the JMS, and setting the address for viewing remote jobs via the RPS web UI.
To set preference options for JMS
In the Preferences dialog, expand Remote Execution and select JMS.
Check the Remote Submit Enabled box to use the JMS.
In the Job Queue Server (JQS) field, enter the JQS network address.
In the Port field, enter the JQS port number.
In the Protocol menu, select TCP or HTTP.
In the Polling Interval box, type or select the number of times per second that Phoenix sends data packets to the JMS.
In the RPS Queue Address field, enter the fully qualified address of the RPS queue (e.g., http://myserver:8080/PhoenixServer).
To use RPS from Phoenix, users must have an RPS license, and they must enable RPS in the Phoenix configuration. (Refer to “Remote Processing Server”.)
To set preference options for RPS
In the Preferences dialog, expand Remote Execution and select RPS.
Check the Enable Remote Execution box.
Click Define to specify the location of the RPS queue.
In the server definition dialog enter the server name, the root context, and the port.
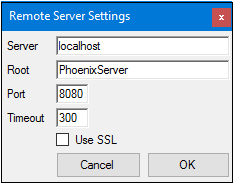
Server definition dialog
Click OK.
At this point the information provided will be validated by attempting to communicate with the server.
Select the object types for which remote execution is to be enabled by checking the box in the Execute Remotely column next to the object type.
Phoenix is capable of implementing parallel computing in two distinct ways to optimize the use of computational grids and multicore computers. A description of these two methods and the advantages and challenges will help the user select the optimal method for each project.
The first is called parallelizing by model (PBM), in which individual NLME models are sent to individual computation cores for execution. One example of PBM would be a 200 replicate bootstrap, which requires 200 independent NLME models to be run. Using PBM, each of the 200 models would be sent to 200 separate compute nodes, with each model running on a single compute node from initial estimates to final parameters. PBM is extremely useful to simultaneously execute many NLME models.
The second method is called parallelizing within model (PWM), in which an individual NLME model is spread across multiple computation cores for execution. One example of PWM would be a simple estimation of a single PK/PD model. Using PWM, the one model would be spread across 50 computation cores, allowing successful minimization to be done more quickly than if the local computer was used. PWM is extremely useful with models that have long run times to achieve convergence.
Phoenix supports both PBM and PWM and even supports a combination of the two. An example of combining PBM and PWM can be seen in a stepwise covariate search. During the first step, let’s assume there are 8 models to be run (base + 7 possible covariates). Phoenix will run all 8 models simultaneously (PBM) with each model using 20 computation cores (PWM). Combining PBM and PWM can be extremely powerful to reduce overall run times with complex PK/PD model development activities.
The following outlines the parallelization method implemented for each run mode and each computation platform supported in Phoenix NLME 8.1:
Simple: Run None PBM PWM None PWM PBM PWM None PWM
Windows: MultiCore (PBM), MPI (PWM)
Linux: MultiCore (PBM), MPI (PWM), SGE_MPI/LSF_MPI/TORQUE_MPI (PWM)
Scenarios Run:
Windows: MultiCore (PBM), MPI (PWM and PBM)
Linux: MultiCore (PBM), MPI (PWM and PBM), SGE_MPI/LSF_MPI/TORQUE_MPI (PWM and PBM)
Stepwise Cov Search Run:
Windows: MultiCore (PBM), MPI (PWM and PBM)
Linux: MultiCore (PBM), MPI (PWM and PBM), SGE_MPI/LSF_MPI/TORQUE_MPI (PWM and PBM)
Shotgun Cov Search Run:
Windows: MultiCore (PBM), MPI (PWM and PBM)
Linux: MultiCore (PBM), MPI (PWM and PBM), SGE_MPI/LSF_MPI/TORQUE_MPI (PWM and PBM)
Profile Run:
Windows: MultiCore (PBM), MPI (PWM and PBM)
Linux: MultiCore (PBM), MPI (PWM and PBM), SGE_MPI/LSF_MPI/TORQUE_MPI (PWM and PBM)
Predictive Check Run: No parallelization method implemented.
Simulation Run: No parallelization method implemented.
Selection of the desired grid mode in the Phoenix Preferences dialog is critical to achieving the desired type of parallelization for the submitted run mode. For example, a user who submits an NLME model in Simple run mode to a compute grid set to Linux/SGE will result in the model running on a single core of the grid. However, that same model submitted to a compute grid set to Linux/SGE_MPI will be parallelized using PWM.
There are two methods for setting up grids to run parallel executions in Phoenix. The Compute Grid page of the Preferences dialog, see “Compute Grid preferences” is one method. The other is editing the configuration files directly (either as an administrator or a user), see “Configuration files”.
Phoenix supports the following modes of parallelization:
-
MultiCore (Windows, Linux): Parallelize (single models) across multiple cores on a single machine (i.e., 32-core Linux or Windows computer).
-
MPI (Windows, Linux): Parallelize (single models and/or single model parallelized by subject) across multiple cores on an MPI Cluster.
-
LSF (Linux): Parallel execution of single model runs (e.g., bootstrap and shotgun covariate search) on an LSF grid. Individual models are not parallelized across multiple cores.
-
LSF_MPI (Linux): Parallel execution and parallelization across multiple cores of all model runs on a LSF grid. All models are run simultaneous and are parallelized across multiple cores. Phoenix determines the optimal parallelization strategy for each model run. Supports all Phoenix run modes.
-
SGE (Linux): Parallel execution of single model runs (e.g., bootstrap and shotgun covariate search) on an SGE grid. Individual models are not parallelized across multiple cores.
-
SGE_MPI (Linux): Parallel execution and parallelization across multiple cores of all model runs on a SGE grid. All models are run simultaneous and are parallelized across multiple cores. Phoenix determines the optimal parallelization strategy for each model run. Supports all Phoenix run modes.
-
TORQUE (Linux): Parallel execution of single model runs (e.g., bootstrap and shotgun covariate search) on a TORQUE grid.
-
TORQUE_MPI (Linux): Parallel execution and parallelization across multiple cores of all model runs on a TORQUE grid. All models are run simultaneous and are parallelized across multiple cores. Phoenix determines the optimal parallelization strategy for each model run. Supports all Phoenix run modes.
Example grid definitions for different parallel modes can be found in the PhoenixParallelExecutionSettings.txt file and modified with company-specific settings. (See “Configuration files” for details on modifying this file.)
Note:When a grid is selected for executing an NLME object, loading the grid can take some time and it may seem that the application has stopped working.
Make sure that there is adequate disk space on the grid for execution of all jobs. A job will fail on the grid if it runs out of disk space.
In the Preferences dialog, expand Remote Execution and select Compute Grid.
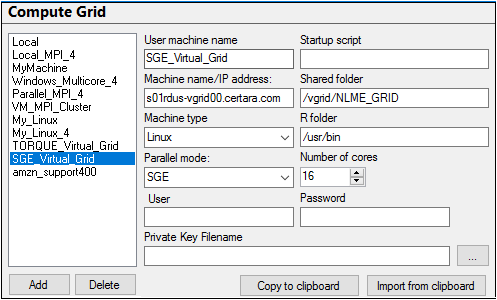
The Compute Grid page allows users to add, modify, or delete the setup for a grid. The list of grids on the left of the page is the list you will see in the Execute on pull-down menu in the Run Options tab for an NLME object.
To set up a new grid
Click Add and enter all of the following information for the new grid:
User machine name: Name to appear in the selection box on the Run Options tab of Phoenix models.
Startup script: Script to execute on the remote host to setup the run environment.
Machine name/IP address: Actual machine name or its IP address.
Shared folder: Location where the application can write results/temporary files on the remote machine.
Machine type: Choose from Windows or Linux.
R folder: Path to R on the remote machine.
Parallel mode: If the machine type is Windows, choose from None, MultiCore, MPI, LSF. If the machine type is Linux, choose from None, MultiCore, MPI, TORQUE, SGE, SGE_MPI, TORQUE_MPI, LSF, LSF_MPI.
Number of cores: Number of computational cores available on this grid.
User: Username for logging into the host. This is required to use the grid, unless using a private key file.
Password: Password for logging into the host. This is required to use the grid unless using a private key file.
Private Key Filename: As an alternative to entering a username and password, enter the name of the private key file to use for ssh private keyfile authentication or use the ellipsis button to display a file browser for selecting the file. See “Setting up an ssh private key file”.
To modify grid settings
Select the grid from the list.
Adjust the settings in the page as described.
Press the Enter key.
Changes are automatically updated in the user’s custom PhoenixParallelExecutionSettings.txt file.
To delete a grid platform:
Select the grid from the list.
Click Delete.
The grid is automatically removed from the user’s custom PhoenixParallelExecutionSettings.txt file.
There are two system-wide files that are used in the configuration of grids: PhoenixParallelExecutionSettings.txt and PhoenixParallelExecutionSettings.xml, located in <Phoenix_install>/application. The list of grids shown in the “Compute Grid preferences” figure above comes from the PhoenixParallelExecutionSettings.txt file that is installed with Phoenix, after removing the comment syntax from all of the definitions in the file. (Initially, all but the first two platforms are commented out.)
Administrators can modify the PhoenixParallelExecutionSettings.txt and PhoenixParallelExecutionSettings.xml files to be site-specific. Each user can also customize the grids by placing copies of these files in: C:\Users\<username>\AppData\Roaming\Certara\Phoenix\ and customizing them.
Setting up an ssh private key file
On the server Linux system, generate keys.
mkdir ~/.ssh /* if you do not have this directory already */
chmod 700 ~/.ssh
ssh-keygen -t rsa
Take default location and press Return key for passphrase
Generating public/private rsa key pair.
Enter file in which to save the key (~/.ssh/id_rsa):
Enter passphrase (empty for no passphrase):
Enter same passphrase again:
Your identification has been saved in ~/.ssh/id_rsa.
Your public key has been saved in ~/.ssh/id_rsa.pub.
Transfer key to remote system.
Simply copy ~/.ssh/id_rsa to a secure location on windows. You will specify this file in the Remote Execution > Compute Grid settings page in the Preferences dialog.
Add public key to server list.
cp ~/.ssh/authorized_keys ~/.ssh/authorized_keys_Backup
cat ~/.ssh/id_rsa.pub >> ~/.ssh/authorized_keys
Make keys secure.
chmod 600 ~/.ssh/authorized_keys
Test that you can connect to remote Linux system without a password.
– Open PuTTY.
– Enter the hostname in the PuTTY Configuration dialog.
– Go to the SSH > Auth category.
– Enter the keyfilename (that was transferred) in the Private key file for authentication field.
– Click Open.
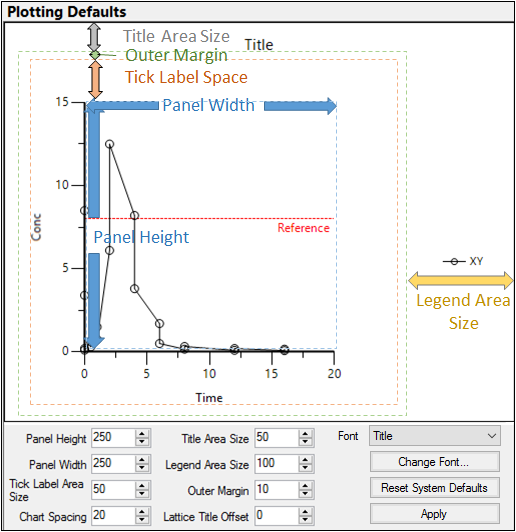
The Plotting Defaults page of the Preferences dialog allows users to adjust a number of display settings that will be used as the defaults for plots. The settings in this dialog apply to the output of Plotting objects, as well as to any plots created from other operational objects, such as NCA. They do not override any user-specified settings in projects.
Plotting Defaults preferences
Panel Height and Panel Width: The size of the plot drawing area.
Tick Label Area Size: How wide the tick label area is from the axes.
Chart Spacing: The distance between multiple graphs.
Title Area Size: How wide the area is where the title is displayed.
Legend Area Size: How wide the area is for the legend.
Outer Margin: The size of the space between the graph title and the tick label area.
Lattice Title Offset: Distance to shift the Lattice Title from the graphs in the lattice.
Font: Select the item whose font is to be changed.
Change Font: Display the Font dialog for modifying the selected item’s font, size, style, etc.
Reset System Defaults: Resets all of the values in the Plotting Defaults page to the Phoenix system defaults.
Apply: Click to save the settings as the plot defaults.
Note:When saving a project, only those plot settings that have been changed in the user interface will be saved with the project. Any settings that have not been modified in the interface will not be saved with project, as the default plot settings will be applied when the project is reopened.
The Plugins menu is used to view the status of Phoenix plug-ins and add new plug-ins. Phoenix plug-ins are listed in three groups: General, System, and Non-Loaded. Each group has its own tab in the Plugins menu. Plug-ins can be viewed individually by expanding the Plugins menu.
The Plugins menu provides the following information on Phoenix plug-ins: the name, version number, and state, either started or not started.

Plugins preferences
Plug-ins in the General tab are operational objects. These plug-ins are responsible for providing Phoenix functions such as drug modeling, charting, and dataset manipulation. The General tab displays the name, version number, and state of each operational object plug-in.
Plug-ins in the System tab are used to provide Phoenix framework functions. The name, version, and state of each framework plug-in is listed.
The Non-Loaded tab displays information on why a plug-in failed to load. If a plug-in fails to load its state is listed as “FailedToStart.” If it has not yet been loaded, the state is listed as “Not Loaded.” Select the failed plug-in to display any details on the failure in the Reason field.
To add a new plug-in
Select Plugins in the Preferences dialog and click  (Load Plugin icon) .
In the Load Plugin dialog, select a plug-in manifest or plug-in assembly.
A plug-in manifest is a file that describes the plug-in.
A plug-in assembly is the plug-in DLL.
The plug-in is added to the General or System tab, depending on the type of plug-in selected.
In the file Phoenix.exe.config (or Phoenix32.exe.config) there are two path properties that can be configured, if necessary, for your local environment.
-
tempDirectoryRoot: Users can use this property to specify where Phoenix writes temporary files. The path must be fully qualified, and it does not support the use of environment variables. For example, to have Phoenix use the Phoenix application data folder for the temporary storage, you might specify a path like this:
tempDirectoryRoot="C:\Users\UserName\AppData\Roaming\Certara\Phoenix\Temp"
The default value is <blank> which will cause Phoenix to use the default system temporary directory.
-
repositoryDirectory: This property is used to specify the location that Phoenix uses as a working folder for open projects. Use a fully qualified path name to enter an alternate path. This property supports the use of environment variables. For example, to use the system temporary file location, you could specify a path like this:
repositoryDirectory="%TEMP%\ScratchRepository"
The default value is "%APPDATA%\Certara\Phoenix\ScratchRepository".
