The PsN Shell object builds commands against Perl Speaks NONMEM and executes against multiple model files and datasets. The results are then returned to Phoenix.
Users build a list of command-line strings against these interfaces in the Phoenix UI and submit the strings of commands as a batch process to PsN on execution.
Note:Phoenix program plugins, such as the PsN Shell object, assume that the corresponding third party software is installed and running properly.
For PsN installation, consult the PsN installation documentation (https://uupharmacometrics.github.io/PsN/install.html). Guides on managing multiple versions of PsN, submitting to computer cluster environments, and general configuration of PsN can be found in the Documentation link on the PsN homepage (https://uupharmacometrics.github.io/PsN).
Use one of the following to add the object to a Workflow:
Right-click menu for a Workflow object: New > External Software > PsN Shell.
Or Main menu: Insert > External Software > PsN Shell.
Or right-click menu for a worksheet: Send To > External Software > PsN Shell.
Note:To view the object in its own window, select it in the Object Browser and double-click it or press ENTER. All instructions for setting up and execution are the same whether the object is viewed in its own window or in Phoenix view.
Additional information is available on the following topics:
Setting up preferences
User interface description
Importing/Writing the code to access the external program
Executing a third party tool object
Results
PsN examples
Global preferences are available to the user. Some third party tool objects require certain global settings to be specified prior to use. There are optional settings to enable editing of scripts in external programs from within Phoenix. Some optional preferences can streamline the workflow by automatically filling in or setting options in the object’s UI with information entered by the user in the Preferences dialog.
Setup access to the external program
Define a default working directory and output location
Setup access to the external program
Select Edit > Preferences.
In the Preferences dialog, select PSN in the menu tree.
Enter the directory path to the PsN configuration file in the first field or click Browse to locate and select the directory.
Upon selection, the file is parsed and the other fields are automatically populated if the information is present in the file. Otherwise, the user needs to specify the location of the Perl executable, PsN Utilities directory, and (optionally) the R executable.
To view and/or edit the PsN configuration file in a text editor, click Open/Edit.
For more information on the text editor, see http://www.syncfusion.com/products/user-interface-edition/windows-forms/edit/overview.
Click Test to make sure the correct file is selected.
In the PsN preference page, turn on the Use Log Viewer checkbox to display log information in a separate window during execution.
The NONMEM Configuration(s) list in the PsN page shows all of the configurations of NONMEM available for use as defined in the PsN configuration file.
Define a default working directory and output location
Setting the working directory or output folder in the Preferences dialog eliminates the need to enter the information in the Options tab for each run. The fields will automatically be filled with the paths entered here.
For PsN, enter the directory path in the Default Working Directory field.
Or click Browse to locate and select the directory.
Enter the directory path in the Default Output Folder field or use the Browse button.
Note:If the user specifies a default output location, the user must ensure that they have write access.
Turn on the Create a unique subfolder for each run checkbox to generate and then store the output from each run in a new subfolder of the output folder.
Setup tab
Options and other tabs
Result Filters tab
The Setup tab allows mapping of model files to the object. The Mappings panel simply lists the columns found in the dataset. The Text panel allows users to map a model file to the object and view the contents.
The Options tab for the PsN Shell object is distinct in its functionality, relative to the other third party tool objects. The PsN Shell object also has a number of additional tabs related to specific commands that can be submitted to the PsN program.

To identify the model files
Access the model files using one of the following methods:
-
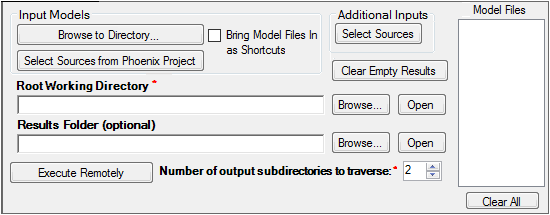
To load model files from the file system, click Browse to Directory Containing Model Files to locate and select the folder containing the model file(s). The path to the model file cannot have spaces.
Files with an extension of .ctl and .mod are recognized as model files. All models are brought into the Code folder of the Phoenix project and mapped to the PsN shell. -
If you want to create shortcuts to the model files in the file system instead of loading them into Phoenix, check the Bring Model files In as Shortcuts checkbox. (Turn off the checkbox to import the full model file as mentioned above.)
-
If model files are already available in the project’s Code folder, click Select Sources from Phoenix Project to select the desired model file.
The $DATA record for each model is parsed for the dataset name. The input specified for each unique dataset is published in the object. The names of the model files are added to the Model Files list on the rights side of the Options tab.
Caution:Clicking Clear All below the list of model files clears all of the entries in the Setup tab. All mappings to datasets, commands, and models are removed.
After the model file is parsed, the Setup tab will show a list of items that need to be mapped. Once the model files and dataset are specified and mapped, you can start building the command lines.
To start building the command lines
-
Enter the path to the working directory in the Root Working Directory field or click Browse to locate and select the directory. (Click Open to display the contents of the directory in a separate window.)
-
Enter the path to the folder where results are to be stored in the Results Folder field or click Browse to locate and select the folder. (Click Open to display the contents of the folder in a separate window.)
-
Set the Number of output subdirectories to traverse field to identify the level of output subdirectories from which to retrieve results. The higher the number, the deeper into the output directories Phoenix will go to retrieve output.
Note:Setting the working directory and/or output folder in the Preferences dialog eliminates the need to enter the information in the Options tab for each run. The fields will automatically be filled with the paths entered as preferences. See “Define a default working directory and output location”.
-
Click Select Sources (under the Additional Inputs heading) to include additional files along with the mapped input. As an example, if a user wanted PsN to use a different configuration file than the default, they would:
Import their configuration file into the project (it will be placed in the Code folder).
Edit the commands so the -config_file option points to the name of their configuration file.
Use the Select Source button in the Options tab to add their configuration file to the list in the Setup tab.
When the object is executed, the user’s configuration file will get copied to the working directory and the command that references that file will execute using that specified configuration file. -
Click the Clear Empty Results to remove any results published by the object that are empty.
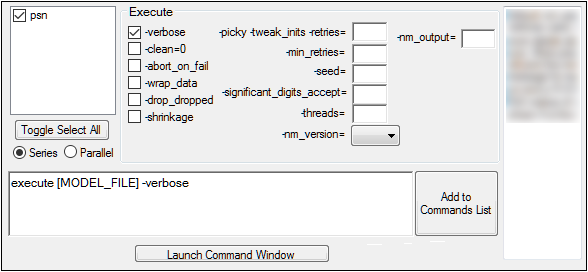
Use the Execute tab and the CDD, LLP, Bootstrap, SCM, SSE, VPC, and MCMP tabs to build the commands that will be submitted to PsN.

Execute tab for a PsN Shell object
Note:Spaces may be entered in the text entry fields, however, they must be enclosed in single or double quotes. If the space is not enclosed in quotes, the text is colored red and is not added to the command.
All of the tabs contain the following elements:
List of Available Models: Use the checkboxes to indicate which models to run the commands against. (Use the Toggle Select All button to quickly turn on or off all model checkboxes.)
Command Line Options: Turn on or off the checkboxes for the various tags to add/remove them from the command line. For options with fields, enter an appropriate value to add that option and its value to the command line. Clear the field to remove it. Invalid values will be colored red and not passed to command line.
Tooltip Viewer: Displays information regarding the item the cursor is hovering over.
Command Field: Displays the command line, with all of the options that have been checked or entered on that tab. The field itself is not editable.
Add to Commands List: Click this button to accept the command line as shown in the field and add it to the list of commands shown in the Setup tab. (Click the Commands node in the Setup tab to show list of commands as they will be submitted to PsN when the Execute button is clicked.)
If the Series option below the model list on the Execute tab is selected, then the command is added once for each model selected in the list.
If the Parallel option is selected, then the command is added once and contains all of the selected models explicitly listed in the command. NONMEM executes all the model files in parallel with this type of command.
Launch Command Window: Click this button to open a separate command line window for executing commands interactively.
-
Turn on the checkboxes for the models to include in the execution.
-
Make the desired selections and value entries for the options on each command tab.
-
When finished building a command, click Add to Commands List.
The list of commands as they will be submitted to PsN when the Execute button is clicked can be viewed in the Commands List panel (click the Commands node in the Setup tab). The commands listed in this panel are directly editable.
-
Type the commands directly in the panel or modify existing commands.
Changes made directly in the panel are not automatically included in the execution. They must be applied first. A yellow bar at the beginning of a line indicates that a change has been made, but has not yet been applied.
-
Click Apply to accept the changes made to the commands.
Allows specification of how different results files from the external program should be imported. Phoenix first looks for the first rule to match a file and uses that rule to import the object. The order of the rule matching is: Always Import (using normal import methods), Max File Size (will create a shortcut), Shortcut Files, Binary Files (using normal import methods). The user creates filter criteria based on filename patterns. If a maximum file size is specified, any file larger than the entered value will always be imported as a shortcut (unless the file matches filter criteria in the Always Import list).

Importing/Writing the code to access the external program
The PsN Shell object must have code that will allow it to initiate the external program and submit jobs. The code can be stored as a model file, imported into the project, and mapped to the object, or the code can be directly entered into the object.
Import and map file containing code
Write code in the Text panel
Filtering results by size
Import and map file containing code
-
Select a project or workflow in the Object Browser and then select a third party tool object from the Insert menu.
-
In the Options tab, click Browse to Directory Containing Model Files.
-
In the Browse for Folder dialog, locate and select the directory containing the model file(s).
Imported PsN model files are added to the Code folder in the Object Browser and mapped to the PsN Shell. The $DATA record in each file is parsed for the name of the dataset and is added to Inputs in the PsN Shell.
Instead of importing and mapping a file, users can write their own code or copy and paste code from another source. (For more information on the text editor, see http://www.syncfusion.com/products/user-interface-edition/windows-forms/edit/overview.
-
To enter the code manually, check the Use internal Text Object checkbox. If a script/control file is already mapped, a message is displayed that asks if the mapped file should be copied to the internal text editor.
Click Yes to allow editing of the currently imported file.
Click No to remove the imported control file.
-
Type the code directly in the field.
-
When entry or modifications are complete, click Apply.
Some important things to consider when entering code in the Text panel versus importing and mapping a script/control file are:
Apply must be clicked for the code entered or modified to be accepted.
Changes made in the Text panel are not applied to the file on the disk.
The script can be modified either in the Code folder or in the object itself and these are kept in sync.
Once the user switches to Use Internal Text, any subsequent changes are not kept in sync with the script in the Code folder.
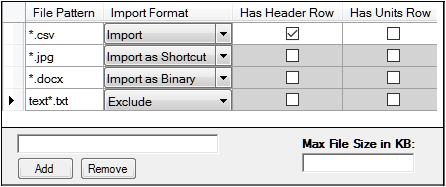
The Result Filters tab allows users to define filters that determine whether files of a certain name or size are returned to Phoenix as a shortcut, a binary file, a complete copy, or returned at all.

-
Type the file pattern to serve as a filter into the field near the bottom of the tab and click Add. (Enter full file names or use the wildcard “*”, e.g., *.txt.)
-
To remove a pattern from the list, select it and click Remove.
-
For each pattern, select how files matching the pattern are to be handled:
Import: Default file handling for imported data of that file type is used to import the file
Import as Shortcut: The file itself is not imported, however, a shortcut is created that points to the complete file
Import as Binary: The file is imported as a binary object, with no conversion to any specific Phoenix type
Exclude: The file is not imported
Should a file match several specified patterns, the precedence of processing is: Exclude, Import, Shortcuts, Binary.
For .csv and .dat output files, check the Has Header Row box to indicate that files matching the file pattern have a header row.
-
For .csv and .dat output files, select the Has Units Row option to indicate that files matching the file pattern have a units row.
-
Enter maximum size that an imported complete file can be in the Max File Size in KB field.
Any file that exceeds this size is imported as a shortcut (unless the file matches a File Pattern whose Import Format is set to Import).
Executing a third party tool object
Click ![]() (Execute icon).
(Execute icon).
Or, to run the job remotely, click Execute Remotely in the Options tab.
Executing a third party tool object remotely sends the job to the server that is defined in the Preferences dialog (Edit > Preferences > Remote Execution). See “Phoenix Configuration” for instructions. The project is saved automatically.
The project must have been saved at least once prior to executing on RPS, otherwise execution will not pass validation and a validation message will be generated.
At this point, the step being executed on RPS, along with any dependent objects, has been locked. It is now safe to close the project or to continue working in Phoenix.
In Phoenix, some objects in a workflow allow the user to click and execute the last object in a chain and it will re-run any necessary objects earlier in the workflow. This is true for the PsN Shell object.
Note:When executing PsN on JMS, the working folder must exist both on the client and on the JPS server or PsN will fail validation. Use a standard working folder location on all clients and make sure that the standard path also exists on all JPS servers.
Recovering from a failed PsN run
If a PsN run fails, do the following to attempt a restart of the job.
-
In the Command List panel, type ::RECOVER at the end of the command line whose execution failed. For example:
1 bootstrap “psn3” -verbose -sample=1000 ::RECOVER
Note:Do not change anything else in the command, just add the keyword.
-
Click Apply and then execute the object .
PsN will go into the working directory and locate the latest output folder whose name matches the command signature (e.g., bootstrap_psn3_-verbose_sample_1000_…) and attempt to continue the processing that was done before.
The results are displayed on the Results tab. The output falls into the following categories:
Output Data: Datasets in tabular form
Text Output: Settings files, log files, and other text output
Other: Other kinds of files, for example: documents, export files, binary files, etc.
Images: Graphs or other images in recognized image formats (jpg, tiff, emf, etc.)
During execution, the Log Viewer is displayed (if the Use Log Viewer checkbox in the PsN Preference page was turned on) and shows the standard output and standard errors from PsN. Click the Pause button to pause refreshing of the log so it can be reviewed at a particular point. The Pause button is renamed to Resume and clicking the button continues refreshing of the log. Click the checkbox to toggle showing and hiding the line numbers.
In the working directory, every command executed by PsN from Phoenix has a separate folder. The folder is named according to the signature of the command line followed by the date/time stamp (e.g., bootstrap_psn3_-verbose_sample_1000_20120210103030).
Output Data: Datasets in tabular form
Text Output: Settings files, log files, and other text output
Other: Other kinds of files, for example: documents, export files, binary files, etc.
Images: Graphs or other images in recognized image formats (jpg, tiff, emf, etc.)
Some results are duplicated in the Output Data and Text Output categories to allow users to view output in Phoenix Worksheet format as well as pass raw files to downstream objects.
