Studies are the fundamental unit of PKS organization. A PKS study stores raw data to be modeled and analyzed in one or more scenarios.
A study can be created from a project loaded in Phoenix (PKS > Save Project as PKS Scenario) or from scratch (PKS > Create Study). In either case, the Create Study dialog is used to define the study components.
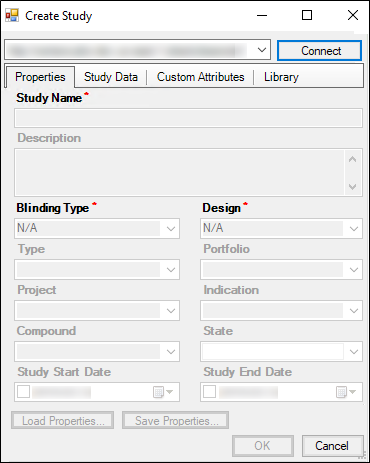
If a connection to an instance of PKS is not established, the fields and menus are unavailable in the Create Study dialog.
To establish a PKS connection, select a PKS instance in the instance menu in the Create Study dialog. The selected PKS instance is used to create a new study.
If no instance is available, configure the PKS connection settings as described in “Setting up a PKS connection”.
Press Connect and enter your username and password in the Connect to PKS dialog and press OK.
If the Prompt option for credentials is selected in the PKS Configuration dialog, the Connect to PKS dialog will display prompting for the PKS username and password and a username and password for the proxy connection.
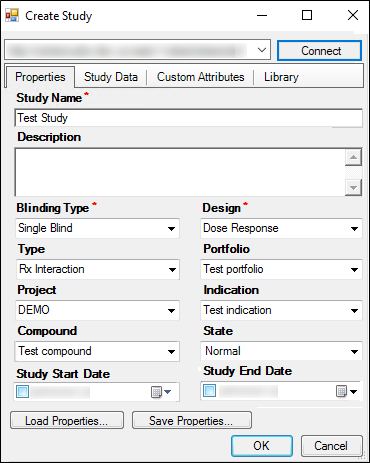
The metadata fields in the Create Study dialog are made available:
Study Name: Used to identify and locate a study in PKS; must be unique within the PKS database; typed entry; 50-character max. (Required field)
Description: Text describing the study; press Ctrl+Enter for line breaks; typed entry; 2000-character max.
Blinding Type: Blinding level for the study; typed or selected from list of prior values; 30-character max. (Required field)
Design: Experimental structure, e.g., parallel or crossover; typed or selected from list of prior values; 30-character max. (Required field)
Type: Type of study; typed or selected from list of prior values; 30-character max. (Required field)
Portfolio: Development portfolio to which the study belongs; typed or selected from list of prior values; 50-character max.
Project: Development project to which the study belongs; typed or selected from list of prior values; 100-character max.
Indication: Primary indication(s) for the study; typed or selected from list of prior values; 50-character max.
Compound: Main drug compound(s) under development; typed or selected from list of prior values; 50-character max.
State: Whether the study will be locked against changes or not; selected entry: normal or locked.
Study Start Date: Date on which the study began; typed or selected from the calendar popup; YYYY.MM.DD format.
Study End Date: Date on which the study concluded; typed or selected from the calendar popup; YYYY.MM.DD format.
In the Properties tab, enter the study name and a description of the study.
Use the menus in the Create Study dialog to select blinding type, design type, study type, portfolio, etc.
To save the study properties, press Save Properties.
Type a name in the File name field and press Save.
The study properties are saved as a .map file.
Load study properties from a file
1. Press Load Properties. The Open dialog is displayed.
2. In the Open dialog, select the directory that contains the study properties file.
3. In the Files of type menu, select one of three study property file types:
Map (*.map)
XML (*.xml)
WNL Map (*.pks)
4. Select the file and press Open to load saved study properties.
To learn more about creating and loading properties, see “PKS study properties”.
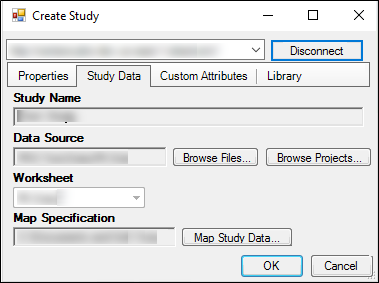
5. Select the Study Data tab.
6. Press Browse Files to select a data source from a file.
Column names in the data source cannot include an apostrophe as it can lead to errors when the data is added to the mapped columns.
7. Press Browse Projects to select a data source from an open Phoenix project.
8. Use the Select Source dialog to navigate to a data source in Phoenix.
For more on Study Data, see “Selecting a data source”.
If the selected data source contains multiple worksheets, use the File Import Wizard dialog to select the worksheet to use as the source for creating the study.
Additional worksheets can be appended to the study using the Append/Update feature.
9. Press Map Study Data and then:
Create a new study mapping as detailed in “Creating and saving a .map file”.
Load a map from file as detailed in “Loading a study map from a file”.
Load map from PKS as detailed in “Loading a study map from PKS”.
10. Press OK, which saves the map settings with the study.
11. Select the Custom Attributes tab and check the boxes of the custom study attributes to include in the study.
12. Check OK in the Create Study dialog to display the PKS Save dialog.
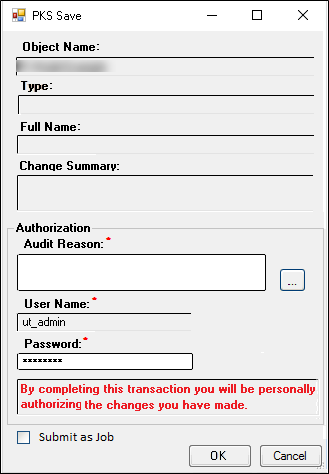
13. Enter an Audit Reason in the Audit Reason field.
14. Enter your password in the Password field.
15. Press OK, which displays the PKS Process Manager.
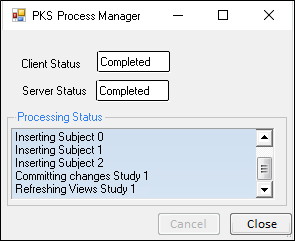
16. Press Close, which saves the study to the PKS.
The study can also be submitted as a job after which the Phoenix session can be terminated and the processing will continue on the server.
Select the Submit as Job checkbox to process.
When the PKS has received the job information the PKS Process Manager can be closed.
Use the PKS Job Viewer to monitor the processing status.