Projects contain all imported binary objects and all operational objects that are used to perform an analysis. Two of the benefits of Phoenix projects is that they allow analysis work to be easily organized and saved. Users can save projects as Phoenix project files (*.phxproj) or save them to Integral.
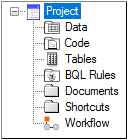
Phoenix projects contain the following items:
•Data folder for worksheets and other datasets
•Code folder for PML, ASCII, and NONMEM code
•Tables folder for HTML formatted tables
•BQL Rules folder for BQL rules
•Documents folder for binary objects not placed in the other folders
•Shortcuts for Pointers to input data files that have been imported as shortcuts
•Workflow object that is used to group operational objects
A Phoenix project is the workspace in which workflows, operational objects, and worksheets are combined to perform an analysis. A Phoenix project can contain one or more independent or connected workflows, operational objects and worksheets.
Phoenix projects are designed to be easily updated and shared, which allows for better data management. Projects can be saved locally or to a database and transferred between multiple users. A project file contains all the datasets, such as study data, that were imported into a project so project files can be exchanged between users without also having to exchange external data sources. Sharing Phoenix projects has two main advantages:
•multiple users can review the steps and processes used in an analysis
•the amount of time needed to validate the results of an analysis is decreased.
Phoenix project files might be rejected by some email servers since they are password protected, in which case the user will need to adjust permissions to allow the .phxproj files.
Phoenix does not automatically save projects. Users must choose to save the project. Phoenix also prompts users to save projects when the application is closed. By default, Phoenix project files are saved in C:\Users\<user name>\My Documents\Certara\Phoenix Projects.
Note:Certain operations in Phoenix may occasionally generate “out of memory” errors. Merging in large datasets, generating plots with a large number of pages or lattices, running covariate shotgun on an NLME model, and saving multiple projects on the close of Phoenix are some examples of cases where a user’s computer may not have enough free memory to complete the operation. Many times the error only results in the offending object not displaying properly, while the remainder of output is unaffected.
To reduce the occurrence of memory errors while working with Phoenix: ensure that only the active Phoenix project is open; close any other applications that are open on the computer (email, web browsers, etc.); work with only relevant subsets of very large datasets so as not to carry around unused data in the workflow; create multiple plot or table objects to subset a large dataset. Of course, it is always a good working practice to save projects at regular intervals.
Phoenix is started by double-clicking a project file, then Phoenix starts with that project open in the Object Browser. This section covers the following topics:
•“Creating or opening a project”
For a brief, step-by-step example of using the Phoenix interface, see “Quick Tour of Phoenix”.
To create a project in Phoenix
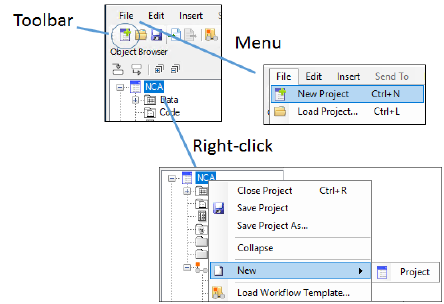
Click ![]() in the toolbar.
in the toolbar.
Or select File > New Project.
Or right-click any object in the Object Browser and select New > Project in the menu.
To open a saved Phoenix project
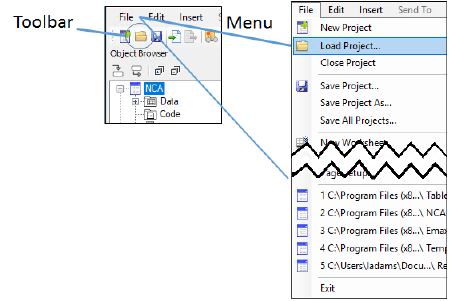
Click ![]() in the toolbar.
in the toolbar.
Or select the project from the bottom of the File menu, if it was one of the last five projects opened in Phoenix
Or select File > Load Project, choose the project file (.phxproj) and click Open.
(If the project file is in a different location, use the Load Project dialog to browse to the location.
Or outside of Phoenix, double-click a Phoenix project file (.phxproj).
By default, Phoenix project files are saved in C:\Users\<user name>\My Documents\Certara\Phoenix Projects.
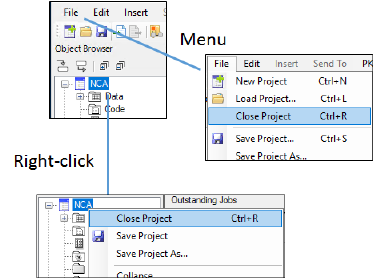
Right-click the project in the Object Browser and select Close Project.
Or select File > Close Project.
In the message dialog, click Yes to confirm that changes to the project should be saved and use the Save Project dialog to specify a directory and file name for the saved project.
Or click No to not save changes. A warning message is displayed stating that all project changes will be lost if the project is not saved. Click Yes to close the project or No to keep it open.
Note:Should a Named User Server license become disconnected while there are still unsaved projects open, you must ensure that a license is retrieved before attempting to close Phoenix. Otherwise, there will be no ability to save the project, and all changes will be lost.
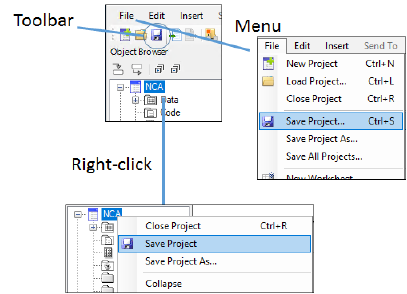
To save a project
Click ![]() in the toolbar.
in the toolbar.
Or select File > Save Project.
Or type CTRL+S.
Or right-click a project in the Object Browser and select Save Project.
If a project has not been previously saved then Phoenix displays the Save Project dialog.
Accept the default directory or select a new one in the Save Project dialog.
Accept the default file name or type a new one in the File name field.
Click Save to save the project.
To save a project under a new name
Select File > Save Project As.
Or right-click a project in the Object Browser and select Save Project As.
In the Save Project dialog, type a new file name in the File name field.
To save all open projects
Select File > Save All Projects.
If a project has not been previously saved, Phoenix displays the Save Project dialog. Type a new file name in the File name field
Saving multiple versions of the same project
Phoenix cannot open two projects with the same project name. Users have the option of reusing a project by renaming the project and saving the project with a different file name.
If a project is renamed and saved using a different file name, then opened in Phoenix, a message is displayed that states “The project has some conflicting identifiers that could cause problems reading the project. Click Yes to update the project’s identifiers and load the project.
However, if it is the workflow that will be reused in other projects, the recommended way is to save the project workflow as a template. See “Saving and loading Workflow Templates”.
Occasionally, after resolving conflicts, if a change is made to the source data and the object re-executed, the error “The GetRows methods cannot be called while the view is inactive” may be encountered. Save, close, and re-load the project and the object will execute successfully.
