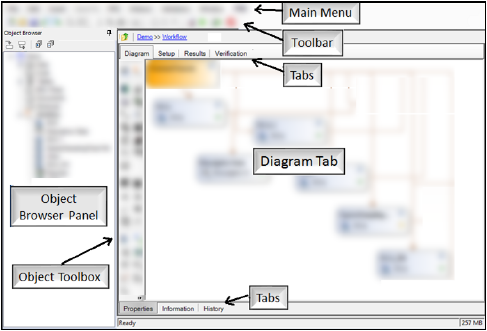
The Phoenix interface lets users control and organize multiple projects, workflows, operational objects, and data sources. The following image highlights the major components of the interface.
Additional information is available for the following:
•History tab and Settings file
For a brief walk-through of the Phoenix user interface, try the “Quick Tour of Phoenix”.
Note:The Phoenix interface is best rendered when there is no display scaling. If you are unable to select some buttons or tabs, or if parts of the interface overlap, try changing the scaling of text, applications, and other items to 100% (right-click on the Desktop and choose Display). A computer restart may be required to apply changes.
To set the scaling only for the Phoenix application on a high DPI display, browse to the Phoenix installation folder (by default, C:\Program Files (x86)\Certara\Phoenix\application), right-click on Phoenix.exe, select Properties menu item, and choose the Compatibility tab. For Windows 7, select [x] on Disable display scaling on high DPI settings option. For Windows 8 or Windows 10, select [x] on Override high DPI scaling behavior. Scaling performed by: option, and then select Application or System (Enhanced) in the drop-down menu. Then restart your computer to apply the changes.
The Phoenix main menu allows users to create and save projects, import datasets, export operational objects and worksheets, and connect to databases.
Note:All menu options are not always active and, therefore, are unavailable. Some options are only available when a user selects a certain part of the interface, such as a cell in a worksheet. For example, the Insert menu is only available when a project, workflow, or operational object is selected. The Send To menu is only available when a worksheet is selected.
-
File: Create, load, save, and close projects, create worksheets, load and save templates, import and export data, and print results.
-
Edit: Undo and redo worksheet edits, cut, copy, paste, find, and sort data, insert and delete rows and columns, freeze panes, locate a cell by column/row number, edit worksheet in Excel, and access the Preferences dialog.
-
Insert: Add operational objects to a workflow. This menu is only available when a project, a workflow object, or an operational object is selected.
-
Send To: Send worksheets to an operational object. The Send To menu is only available when a worksheet is selected.
-
Integral: Connect to Certara Integral, create and edit studies.
-
Watson: Import data from Watson LIMS into a Phoenix project as either a study Workbook or as a study in Integral.
-
Validation: Execute validation test packages, display results, and generate validation reports.
-
Window: View job status, display/undisplay the Object Browser, arrange open windows.
-
Help: Access PDF files of the Phoenix User’s Guides, as well as information about support, training, and the installed version of Phoenix, and view log files. (To view the PDF files, you must have pdf viewer software available on the client.)
-
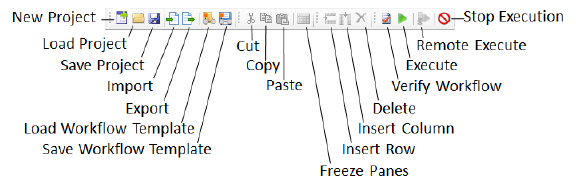
Load Workflow Template and Save Workflow Template are only available when a workflow is selected.
-
Cut, Copy, Paste, Freeze Panes, Insert Row, Insert Column, and Delete are only available when a cell in a worksheet is selected.
-
Verify Workflow, Execute, Remote Execute, and Stop Execution are only available when a workflow or operational object is selected.
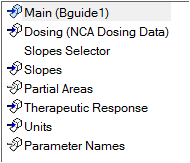
The Object Browser displays all the operational objects inserted into a project or a workflow.
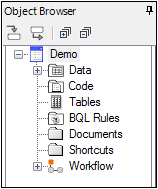
The Object Browser contains the following items:
-
Project: All the operational objects inserted into a project. Also contains the Data and Library folders.
-
Data folder: Imported datasets and user-created worksheets and workbooks.
-
Code folder: Imported PML, legacy ASCII model code, NONMEM scripts, SAS scripts, and any imported text or rich text format (*.rtf) files.
-
Tables folder: Imported or internally created output tables.
-
BQL Rules folder: Rules for importing datasets with uselessly low concentration data.
-
Documents folder: Any binary objects that do not belong in the other folders.
-
Shortcuts folder: Pointers to input data files that have been imported as shortcuts.
-
Workflow object: Any object that allows users to group operational object and nest workflows within a project.
-
Operational object: Any object that receives input, performs an operation, and produces results. An example is the NCA (noncompartmental analysis) object.
Select a folder object to display a list of the contents in the main panel area.
The objects in the tree can be re-ordered. Click and drag the item to the new location. The cursor will change to a blue arrow when it is possible to move the item to that location. Moving items to a different workflow will require re-execution; however re-ordering within a workflow will not require re-execution. Items cannot be moved after a workflow, as it is not possible to determine if the user intends to place it at the end of the workflow or after it. Consequently, move the workflow instead.
The Object Browser toolbar contains icons for the following:
-
Show Sources shows which data is mapped to an operational object.
-
Show Dependents shows all objects which depend on the selected object for data input.
-
Expand all expands all of the nodes in the Object Browser.
-
Collapse all collapses all of the nodes in the Object Browser.
See Using the Object Browser for more information.
Part of the Properties tab, the Diagram tab is only available when a Workflow object is selected in the Object Browser. Use the Diagram tab to visualize the flow of data between objects in your workflow.
Right-clicking in an open area of the diagram display area presents a menu with the following options:
-
Execute: Execute an object or workflow locally, depending on which is selected in the Object Browser.
-
Lock/Unlock Workflow: Enter the username and password to lock/unlock the workflow. (Note that passwords must be recorded by users as they are not maintained by Phoenix. If a password is lost, the workflow will need to be recreated.)
-
Insert: Add an object to the workflow.
-
Load Workflow Template: Adds a new workflow to the project along with the operational objects and settings that were saved within the Workflow Template.
-
Save Workflow Template: Save a workflow as a Workflow Template, in order to reapply an analysis on new data.
-
Paste: Add the object from the clipboard to the diagram.
-
Connect External Sources to Data Links: Create a data link object for every worksheet coming into the workflow.
-
Disconnect External Data Links: Remove data link objects from the workflow.
-
Copy Diagram to Clipboard: Place a copy of the diagram on the clipboard.
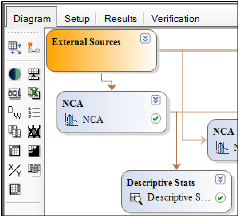
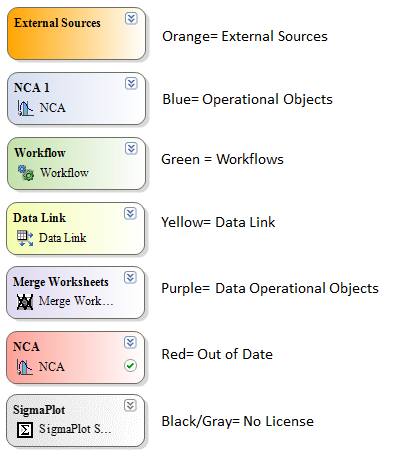
The Diagram tab contains the operational objects in a workflow, color-coded as shown in the following image.
The Object Toolbox allows users to insert objects into a project by clicking the buttons in Object Toolbox. The objects in the Object Toolbox are grouped in the same way as they are in the Insert menu.
The Setup and Results tabs are sub-tabs of the Properties tab.
The Setup tab is the default view of any newly inserted operational object. This tab contains a list of the panels and options tabs that are used to set up the object. Through the Setup tab, users can map datasets and other worksheets to an object.
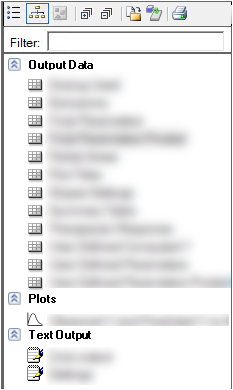
The Results tab displays the results of an executed object grouped by type. Result types are text, worksheets, and graphs.
The toolbar contains icons that perform the following functions:
-
Do not group lists results in alphabetical order.
-
Group by type organizes the results in three groups: tables, plots, and text output.
-
Group by executable groups the results of each executable together.
-
Expand all results expands all of the groups to make all results visible in the list (use when results are grouped).
-
Collapse all results displays only the groupings, hiding the list of individual results.
-
Copy to Data Folder copies results to the Data folder.
-
Export exports the results.
-
Print prints the results.
The Results tab of all Phoenix objects allows filtering. The filtering is not case sensitive and when a filtering string is entered, only results containing that string within their name are displayed in the Results tab. The filter persists until the object is closed or the filter is changed.
The list of results can also be simplified by collapsing/expanding the groups (i.e., results types) using the chevrons next to the group name.

A plot can be viewed and modified in its own window by selecting it in the Results list and double-clicking it or pressing ENTER.
Re-execute the object by clicking ![]() in the toolbar of that separate window.
in the toolbar of that separate window.
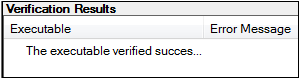
Part of the Properties tab, the Verification sub-tab displays operational object status and execution error messages.
 in the main menu verifies that the selected operational object can be executed.
Phoenix displays a popup indicating the success or failure of verification. The Verification tab will also indicate the verification results. If there is a failure, options in the operational object that need to be specified or any other problems will be listed in the Error Message column.
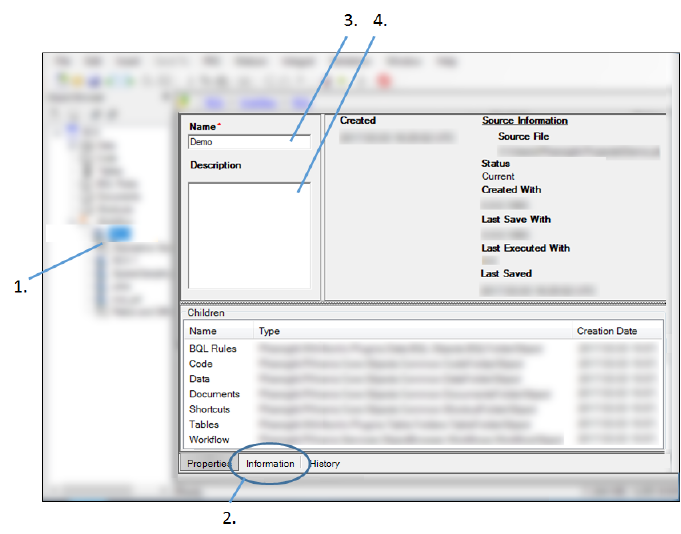
The Information tab displays information about a selected object. Depending on the object selected, the following information may be available: the name, date created, status, Phoenix version used to create the object, Phoenix version used when last saved, the last date executed, and the last date saved. When a project is selected, the tab also includes the full path of the source file.
All Information tabs have two editable fields: the Name and the Description fields.
-
Select any item in the Object Browser.
-
Select the Information tab, located at the bottom of the right viewing panel.
-
To edit the item’s name, type a new name in the Name field.
-
Add a description of the item in the Description text box.
The bottom portion of the tab lists any children of the selected item. The object type and creation time of each child is also listed. Children can be deleted from this list by selecting them and using either the Delete key or the right-click menu Delete option. If any of the selected children cannot be deleted, then pressing the Delete key will do nothing and the right-click menu Delete option will be disabled. Deleting a child from this list also removes them from the Object Browser.
Phoenix provides two methods to track data analyses and manipulation. Operational objects, except for plot objects, create a text file called Settings that lists the options selected at the time of an object’s last execution. The Settings files are located in the Results tab.
Every item in the Object Browser also has a history worksheet that tracks changes made to that item. The history worksheet for each item is located on the History tab. Information recorded for each action includes a timestamp, the user who performed the action, the name of the action, and a description. Although the automatically recorded information cannot be edited, notes can be added using the Annotation field (double-click in the cell or click in the cell and press the F2 key).

The automatic history worksheet entries cannot be edited.
The events that the history worksheet records change depending on the item. The table below lists the events recorded in the History tab for each item.
|
Item |
Recorded event |
|
Projects |
creation, name change |
|
Data folder |
creation |
|
Workbooks |
creation, name change, copy and paste |
|
Worksheets |
creation, name change, column and row creation and deletion, cell value changes, copy and paste, column data type changes, and column unit changes, skipped worksheets on import, opening (including path and filename), fill-down event (including source and destination cell ranges). |
|
Code folder |
creation |
|
Code files |
creation, name change, copy and paste |
|
Tables folder |
creation |
|
HTML tables |
creation, name change, copy and paste |
|
BQL Rules folder |
creation |
|
BQL rules |
creation, name change, copy and paste |
|
Documents folder |
creation |
|
Document files |
Varies based on the type of object imported. |
|
Workflow object |
creation, execution, name change, copy and paste, copy from template |
|
Operational object |
creation, execution, name change, copy and paste, copy from template |
The date-time values recorded in the History tab are Coordinated Universal Time and are displayed with the “UTC” designation to indicate the time zone. This standard time is implemented in the History tab to prevent confusion if Phoenix projects are shared across time zones. There is no option in Phoenix for the user to change the time zone used for recording times in the History worksheet. Settings, NCA, and modeling core text outputs will use the local time and timezone designation of the machine where Phoenix is installed; these do not conflict with the times in the History tab since the time zone being utilized is clearly indicated in each case.
Phoenix creates several log files that are primarily useful for network administrators and customer support. These files are accessed using the Help > View Log menu item.
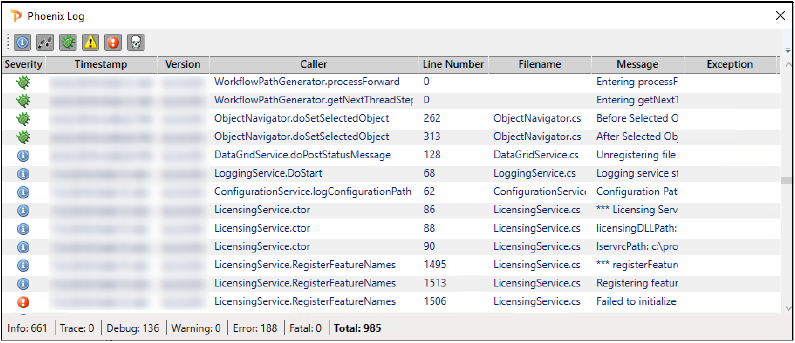
Use the buttons above the list to show/hide log entries of different severity. By default, entries for all levels of severity are displayed. The total number of entries for the different severity levels are reported at the bottom of the window. Severity levels include:
![]()
The following hotkeys are available for use within Phoenix:
|
F1: Help |
Ctrl+N: New project |
|
F2: Rename an object |
Ctrl+R: Close project |
|
F3: Find next |
Ctrl+L: Open project |
|
F7: Execute |
Ctrl+S: Save project |
|
F8: Validate |
Ctrl+W: Save workflow template |
|
F9: Edit in Excel |
Ctrl+P: Print |
|
|
Ctrl+I: Import |
|
Ctrl+E: Export |
|
|
|
Ctrl+F: Find |
|
|
Ctrl+H: Replace |
|
|
Ctrl+J: View jobs |
|
|
Ctrl+O: Orphan model |
