Steps for plasma-urine data clean up and NCA settings
The Column Derivations and Transformations page allows you to create a new column or update data within an existing column using expressions. For this example, IntervalDuration and NCADose variables are blank and we want to insert a value for each of these variables.
Select PK Submit > Analysis Wizard.
For a new analysis, the Analysis Wizard is immediately displayed. Otherwise, you are asked whether to reset the analysis using the updated Merge Result worksheet (refer to the “Analysis Preparation” section).
Click the + button.
In the new row, enter IntervalDuration as the Column Name and
IIF(IntervalEndTime is NOT NULL, IntervalEndTime-IntervalStartTime, NULL)
as the Expression.
Click the + button.
Enter NCADose as the Column Name, and Dose as the Expression.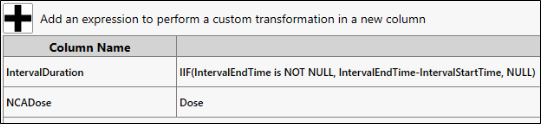
Expressions can be saved and loaded for future use, if desired.
Click Execute and review the updated results in the lower table.
Once all expressions have been applied successfully, click Next.
Define analysis profiles
In this step, profile identifiers are selected, which will group the data into appropriate profiles for use by the NCA object (NCA Sort Keys).
Select and order the identifiers as shown in the following image.
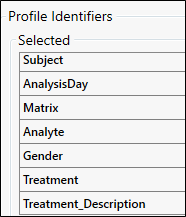
Review the grouped data to the right by selecting each row in the Profiles table and previewing the data belonging to that profile in the Profile Data table.
Even though this is a MAD study, there is no need to flag trough samples since we changed Day 2 to Day 1 in the adjustment tool during data preparation. Also the Serial sampling design is already selected, no change is needed.
Click Next.
Define BLQ rules
This step generates three types of concentration columns.
PKConcentration – used for NCA
PlotsConcentration – used for generation of statistics, tables, and plots
DisplayConcentration – used for generating listings for a report
Verify the settings are correct for concentration (Concentration), time (AnalysisNominalTime), and LLOQ (LLOQ) columns.
In this example, PK Submit recognized “<1.00” as nonnumeric code in the Concentration column and prefilled part of the Rules table.
Define the rule to perform an unconditional substitution for both trough and non-trough data.
In the Rules table, enter 0 (zero) under Trough and Non-trough for first two rows.
Clear any values in the Before and After Condition columns.
In the third row, change BLQ to < LLQ in both columns.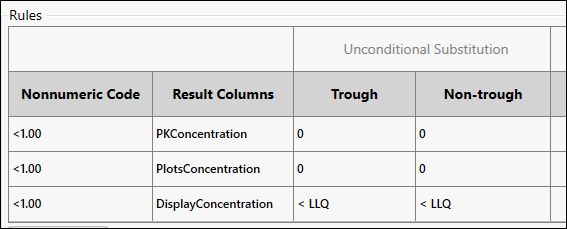
You can save and load these rules for future use, if desired.
Click Execute and review changes in bottom table.
Click Next.
Set up dosing
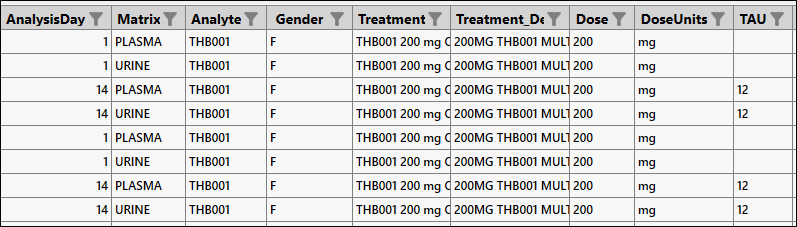
Change the DoseType to Extravascular for both Plasma and Urine.
Enter 150 for the THB001 analyte’s molecular weight.
Entering a molecular weight for an analyte is optional. You can also manually change dosing information in the lower table.
Since we want single dose results for Day 1 and steady-state results for Day 14, enter 12 as the Tau value only for Day 14.
Click ![]() in the AnalysisDay column header.
in the AnalysisDay column header.
Check only the box for 1 and OK in the popup.
Clear the value for each cell in the TAU column.
Click the ![]() again in the AnalysisDay column header.
again in the AnalysisDay column header.
Click Clear Filter to show all rows.
Click Next.
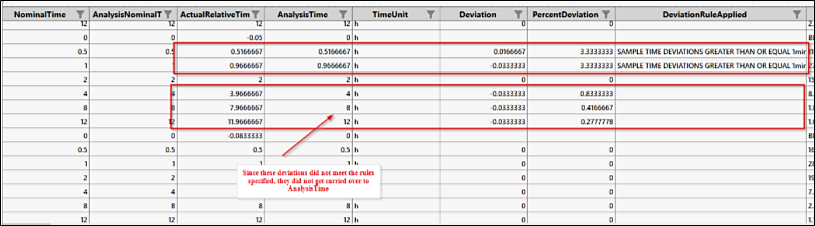
Define time deviation rules
From the Calculations page you can calculate actual times, flag samples outside collection window, and do baseline corrections. For this example, we will create two rules. The first will be applied to samples collected from 0 to 6 hours and a second rule for samples collected from 8 to 72 hours.
Define first rule.
In the Time Deviations tab, change None to Specified for both Lower and Upper ranges.
For Lower, change the time units to hr and the operator to Greater Than Or Equal.
For Upper, enter 6.00, change units to hr, and operator to Less Than Or Equal.
In the last column, enter 1.00 min for Deviation and uncheck Percentage.
Click Add Rule.
Define second rule.
Change None to Specified for both Lower and Upper ranges.
For Lower, enter 8.00, change units to hr and operator to Greater Than Or Equal.
For Upper, enter 72.00, change units to hr, and operator to Less Than Or Equal.
In the last column, enter 10.00 min for Deviation and uncheck Percentage.
Click Execute.
This generates a variable called AnalysisTime that sets all predose samples collected early to 0 and carries over any time deviations that meet the rules stated above. AnalysisTime can now be used for NCA.
Click Next.
Duplicate samples
Sample duplicates are not needed for this example.
Click Next.
Identify data to exclude and add comments
Since there are no control groups (Dose = 0) or any outliers, there is no need to perform exclusions for this example.
Click Next.
Set up the NCA analysis
The options are already set:
ModelType = Plasma (200-202) for Matrix = Plasma
ModelType = Urine (210-212) for Matrix = Urine
NCA Method = Linear Trapezoidal Linear Interpolation for PLASMA and URINE Model Type
Time Column = AnalysisNominalTime
Time Unit Column = TimeUnit
Concentration column = PKConcentration
Concentration Unit Column = ConcentrationUnits
Dose column = Dose
Interval Start Time = IntervalStartTime
Interval End Time = IntervalEndTime
Interval Volume = SampleVolume
Define a partial area
To perform an accumulation ratio later in the analysis, we need to add a partial area for Day 1 based on the Tau value entered for Day 14.
Click the Partial Area button.
Click the Add AUC_TAU Day 1 button.
A label column is added showing “AUC_TAU” for the involved rows.
Click Add CLr Areas to create the partial area needed to calculate renal clearance for urine parameters later in the analysis.
Click OK.
Set up conversion of units
We need to convert the ng/mL concentration units to mg/L.
Click Unit Conversion.
Click to select PLASMA and URINE under Matrix.
Select m (milli) from the Target Unit first dropdown and select <blank> from the last dropdown.
Click Add.
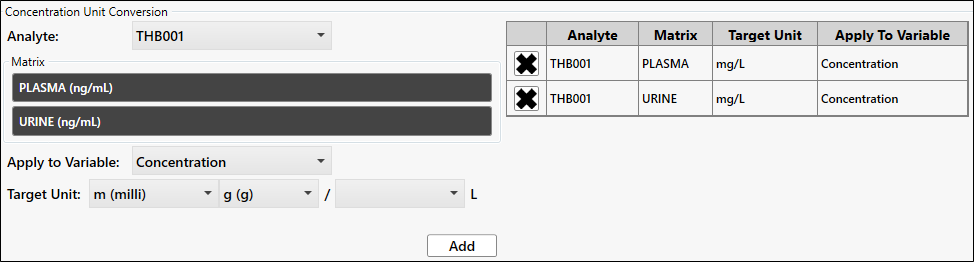
Click OK.
Specify carry alongs
Click Carry Alongs.
PK Submit has already selected some non-required carry along.
To the existing variables listed under Additional Carry Alongs, add SUBJID.
Click OK.
Click Submit.
PK Submit generates the following:
MasterConcentration (source for the following worksheets and for CDISC domains)
MasterCO (source for CDISC CO domain)
NCA object within the Phoenix workflow, which is automatically connected to the PK worksheets
PK worksheets (source for NCA object):
NCA_DOSING
NCA_PLASMA_SERIAL
NCA_URINE_SERIAL
PartialArea
PartialAreaSerial