Getting Started with AutoPilot Toolkit
This section contains the following topics:
Workflows and AutoPilot Toolkit objects
Language settings for non-unicode programs
Third-party application requirements
Note: AutoPilot Toolkit should be run using Phoenix32 as opposed to Phoenix when running on 64-bit operating systems. The Phoenix desktop icon should be replaced with one that references the Phoenix32 executable as well.
This application is not intended to provide the technical controls required for a 21 CFR Part 11 compliant implementation.
Workflows and AutoPilot Toolkit objects
An AutoPilot Toolkit object can be incorporated into Phoenix workflows as with other Phoenix objects. However, when a Workflow object is selected and ![]() is clicked, all operational objects in that workflow, except AutoPilot Toolkit objects, are run. This is done to avoid very long run times.
is clicked, all operational objects in that workflow, except AutoPilot Toolkit objects, are run. This is done to avoid very long run times.
This default behavior can be changed through a preferences option available in the Phoenix Preferences dialog (Edit > Preferences, select AutoPilot in the list).

Check the Execute as Part of Workflow checkbox to include AutoPilot Toolkit objects in workflow execution.
Note: This checkbox does not control an AutoPilot Toolkit object that is in a nested sub-workflow.
In the special situation where a custom XML settings file is used and saved with an AutoPilot Toolkit object as part of a template in a workflow, it is recommended that the AutoPilot object be disconnected, the custom settings file selected again, and the input reconnected. Save the project, close it, and load it again. This ensures that the template settings will refresh and the columns in the input source will be accessible through the template.
Language settings for non-unicode programs
In Chinese and Kanji (Japanese) versions of Windows, the language setting for non-Unicode programs must be set to English (United States). If English is not selected for non-Unicode programs, then the PK_Stats.xls and Summary_PK_Text.doc files are not created.
AutoPilot Toolkit comes pre-configured and ready to use “out-of-the-box” with default settings. Designated AutoPilot Toolkit administrators (authenticated by username and password) can modify these settings and adjust them to meet a company's or working group's SOPs. The administrator-defined settings, or configuration settings, define the default options available for automation and comparison projects.
The settings are stored in an XML file that can easily be transferred from one computer to another, or made part of an internal distribution for consistent implementation across an organization. The file content is altered using the Administrator Module. This file can be selected in AutoPilot Toolkit’s General tab.
When a non-administrator starts AutoPilot Toolkit for an Automation or Comparison run, the available settings are governed by the configuration settings and the default settings. Configuration settings take priority over the default settings. For many AutoPilot Toolkit features, selections for a specific run will override the administrator-defined configuration settings, allowing flexibility and control over specific analyses and output.
Conversely, there are also several cases in which the settings defined in the Administration Module cannot be modified in the User Module, where formats and business rules are considered to be part of SOPs. See the “Administration Module” section for a description of features that are user- or administrator-configurable.
Third-party application requirements
The following options must be set before using AutoPilot Toolkit.
The AutoPilot Toolkit supports SigmaPlot versions 11.1, 12.2, and 12.5. However, for the AutoPilot Toolkit to work properly, the SigmaPlot spw.ini file must be modified prior to running the application for the first time.
1. Change the MaxNumberAutoLegends value in the spw.ini file to 600.
By default, SigmaPlot installs this file in C:\Users\<username>\My Documents\SigmaPlot\SPW<version>
2. In SigmaPlot, select Options in the Tools menu and select the Page tab.
3. Clear the Graph objects resize with graph checkbox.
Excel numerical values stored as text
The appearance of small green triangles in the cells of an AutoPilot Toolkit generated Excel spreadsheet indicates that numbers are stored as text in the spreadsheet. These triangles are only displayed on the screen and not when printed.
To disable the display of the small green triangles:
1. Press Office and select Excel Options.
2. Select the Formulas panel.
3. In the Error check rules section, clear the Numbers formatted as text or preceded by an apostrophe checkbox and press OK.
If the SigmaPlot plug-in for Microsoft Excel is installed for Excel 2010, 2013 or 2016, then the following error may be encountered when opening an Excel worksheet created by AutoPilot Toolkit:
The file you are trying to open 'excelint.exe’ is in a different format than specified by the system.
If this error message is displayed, either re-install SigmaPlot without Microsoft Excel integration or close Excel and move the integrated files to a new subfolder in the XLSTART folder.
If Excel 2010 is installed. then go to C:\Program Files\Microsoft Office\Office14\XLSTART.
If Excel 2013 is installed. then go to C:\Program Files\Microsoft Office\Office15\XLSTART.
If Excel 2016 is installed, then go to C:\Program Files\Microsoft Office\Office16\XLSTART.
The XLSTART folder contains three files: excelint.exe, sigmaplot.xla, and spRemove.xla.
Word and appendix generation requests
When using Microsoft Word, the installed copy of Word needs to be personalized for AutoPilot Toolkit to correctly finish the creation of Word documents. Otherwise, when requesting the generation of Appendix documents, an error stating “Not all texts created” may appear at the end of the run.
To personalize the copy of Word:
1. Press Office in the upper left corner of the Word window and press Word Options at the bottom of the dialog.
2. In the Word Options dialog, enter a User name and Initials to personalize the copy of Word and press OK.
To test that the AutoPilot Toolkit installation has been successful, create table, graph, and appendix output using sample AutoPilot Toolkit project files.
Note: This is not a full validation of the AutoPilot Toolkit.
1. Start Phoenix by double-clicking the desktop icon ![]() or selecting Phoenix 32 from your computer’s Application list.
or selecting Phoenix 32 from your computer’s Application list.
2. Load the project …\Examples\AutoPilot\AutoPilot Crossover Demo.phxproj.

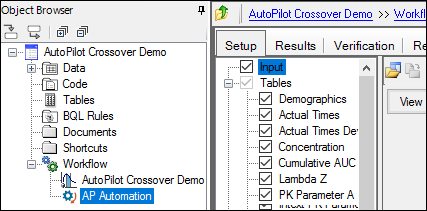
3. Select AutoPilot Crossover Demo _ Carterolol in the Object Browser to review the NCA model.
The NCA model is a default plasma model with twelve subjects and oral drug administration. Select AP Automation in the Object Browser to review the automation project.
4. Select individual tables and graphs, such as Demographics, PK Parameter A, Time Concentration, or Continuous Demographic in the Tables and Graphs nodes to view the selected variables and statistics.
The General, Stratification/Normalization, Display, and Ordering tabs are used to choose study design, configuration settings, variable stratification, and output display options.
Because an AutoPilot Toolkit run can take a long time, only two output types are going to be created.
5. In the Setup tab, clear the Tables checkbox to remove all table selections.
6. Check only the box for Intext PK Parameter I.
7. Clear the Graphs checkbox to remove all graph selections.
8. Check only the box for Categorical Standard.
9. Clear the Appendix checkbox to remove all appendices.
10. Click ![]() to run the automation project.
to run the automation project.
AutoPilot Toolkit output is listed in the Results tab.
1. Start the 32 bit version of Phoenix
2. Load the project …\Examples\AutoPilot\AutoPilot Comparison Demo - Stacked Data.phxproj.

3. Select AUTOPILOT CROSSOVER DEMO _ CARTEROLOL Stacked in the object browser to review the NCA model.
The NCA model is a default plasma model with twelve subjects and oral drug administration. The input data contains two treatments and two analytes for use in the comparison.
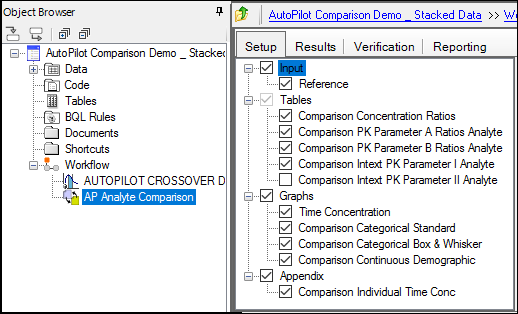
4. Select AP Analyte Comparison in the Object Browser to review the comparison project.
5. Select individual tables and graphs, such as Comparison Concentration Ratios, Comparison PK Parameter A Ratios Analyte, Time Concentration, or Comparison Continuous Demographic in the Tables and Graphs nodes to view the selected variables and statistics.
The General, Stratification, Display, and Ordering tabs are used to choose study design, configuration settings, variable stratification, and output display options.
6. Execute the comparison project.
AutoPilot Toolkit output is listed in the Results tab.