The Phoenix Job Management System (JMS) provides features to facilitate remote execution of workflows. These features allow you to: submit long running processes without tying up your desktop, shut down your desktop or Phoenix while the processes are running remotely, and reclaim the results at a future time.
The following topics are discussed in this section:
Installing JMS
Configuring JMS
Troubleshooting
JMS Admin Tool
Using JMS from within Phoenix
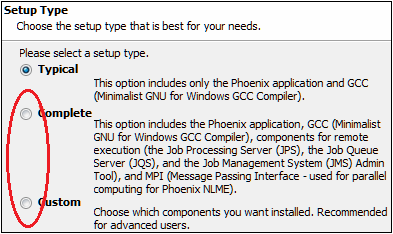
During the installation of Phoenix the user will have access to installation of the JMS components via selection of either a Complete installation or Custom installation type.

Setup page
-
Select the Complete option to install all components (MPI: Message Passing Interface and JMS servers: Job Queue Server and Job Processing Server).
-
Click Next > and, if desired, change the installation directory.
No further selections are needed to setup JMS in the remainder of the installation. -
Click Next > to review the installation settings.
-
Click Next > to install the components.
-
When the installation is complete, use the Restart now checkbox to indicate whether or not to reboot the computer at this time or not and click Finish.
Note:To complete the installation, the system on which the JMS component(s) are installed must be rebooted.
After rebooting, the installed Server parts will start as a Windows Service. Below is a representation of both JMS Servers installed on a single PC.
 [
[
Windows Services dialog listing both JMS servers
Note:For third-party applications compatible with Phoenix to be utilized for Remote Execution, the Job Processing Service must be run as an existing user on the JPS system, and not just the default Local System account. The supported third-party applications are R, SAS, and NONMEM, which must be installed and have working folders on the JPS and configured via the Phoenix Preferences on this system. The deployed Phoenix installation on the JPS has no need to be licensed as its sole purpose is to configure the third-party applications for use by the JPS.
-
Select the Custom installation type to choose individual components for installation.
This is useful in an environment where components will reside on multiple computers, for example Job Queue Server on one server and the Job Processing Server on another server. This configuration will facilitate distributing the load of processing for the Queue and the Engine(s) for processing. -
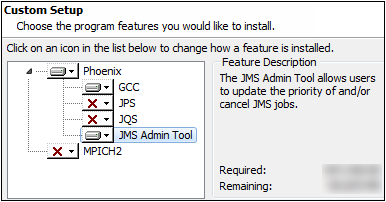
Click Next > to display the Select Features page listing the optional components available for installation.
-
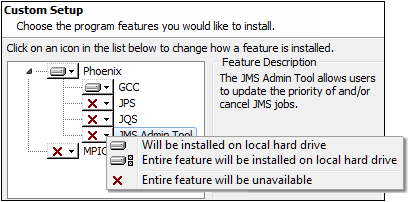
Select a component using its drop-down menu and choose from the available options.
-
Click Next > and, if desired, change the installation directory.
-
Click Next > to review the installation settings.
-
Click Next > to install the components.
-
When the installation is complete, use the Restart now checkbox to indicate whether or not to reboot the computer at this time or not and click Finish.

Select Features page

Custom Setup page
It is preferred to select the option Entire feature will be installed on local hard drive.
Note:To complete the installation, the system on which the JMS component(s) are installed must be rebooted.
Instructions for configuring JMS follow. For more information on the configuration files mentioned, see “Descriptions of configuration files in Phoenix”.
To configure the jqs.exe.config to set the processing options
-
Open <Phoenix_install_dir>\application\jqs.exe.config.
-
Go to the jobqueue and configure the following options.
isLocalJobQueue: Leave as false.
maxHistory: Set the maximum number of finished/canceled jobs to keep on the queue. When this number is exceeded the oldest jobs will be removed from the queue.
jobTimeoutInSeconds: Set the amount of time in seconds that the queue waits to determine if a JPS machine has gone down while processing a job. If the queue does not get a heartbeat back from the processing machine continuously within this time frame, the job will be put back on the queue. Any results from the machine that timed out will not be accepted.
To configure the jobManagement.xml file to point to the correct JQS
-
Stop JPS.
-
Using a text editor, open <Phoenix_install_dir>\application\jobManagement.xml.
-
Modify the machineName attribute to point to the JQS machine. This value can be an IP address or a resolvable hostname.
-
In the channels section, modify the port attribute for HTTP and/or TCP.
-
In the server section, set default=true for the channel you wish to use (HTTP or TCP).
-
Restart the server.
Console mode can be used to verify that the service is setup properly and processing jobs.
To configure jps.exe.config to set the processing options
-
Open <Phoenix_install_dir>\application\jps.exe.config.
-
Go the jobProcessingSection and configure the following options:
-
Configure the HTTP/TCP channels to pick the port that will be used to communicate with Phoenix clients and JPS nodes.
-
To have JPS use a named user license server, remove the comment “<!--” before and after the <appSettings> section. Change the default IP address to the named user license server’s IP address.
<add key=”floatLicenseServer” value=”127.0.0.1”/>
The Job Processing Server Sandbox directory is defined by jps.exe.config. The default location is C:\Phoenix.JPS. Some users might need to define another location if the default location is not acceptable. The directory name must be \Phoenix.JPS for the system to correctly function. -
Users can change the sandbox directory drive letter to the letter of any local drive. The sandbox cannot be located on a networked hard drive.
The sandbox location is defined in the following two areas in jps.exe.config:
maxProcessingThreads: Set to the maximum number of concurrent JPS jobs to process on the machine. Factors to consider when setting the value include the number of available cores and whether or not MPI is also being used.
useLocalConfigurationFile: Leave as true.
configurationFilePath: Leave as empty.
threadPollInterval: Set how often in seconds the JPS will ask the queue for a job if it is not already processing one.
gridAvailable: Leave as false.
heartbeatTimeInSeconds: Set how often in seconds JPS will talk back to the queue to report that it is still processing a job. This is used in conjunction with the time out option in the queue to determine if a processing machine has gone down and the job should be returned to the queue for processing.
jobSandboxDirectory="C:\Phoenix.JPS"
repositoryType="Certara.Phoenix.Services.\
ObjectBrowser.FlatRepository.FlatRepository,\
Services.ObjectBrowser"
repositoryDirectory="c:\Phoenix.JPS"
repositoryFormatType="Binary"
To configure the JPS to use the RPS
The other part of the process is to configure the JPS machine to send NONMEM executions to the RPS Queue.
-
Stop the JPS.
-
Using a text editor, open PhoenixRemoteSettings.xml which is located in the Phoenix application folder on the JPS machine.
-
Modify the server element so that it references the RQS server.
-
Set executeRemotely to true for all process types you wish to be executed by the RPS. All other process types would be false.
-
After saving your changes to PhoenixRemoteSettings.xml, restart JPS.
Descriptions of configuration files in Phoenix
Phoenix has various configuration files that are used to configure the Job Management System and set default configurations for the Phoenix desktop application. The configuration files are for the servers that process jobs submitted for remote execution. The content of these files are described in the following sections.
Desktop application and job processing servers
The Phoenix desktop application stores its settings in binary files that can only be modified in the Phoenix user interface. These files are stored in the users’ %APPDATA%\Certara\Phoenix directory. For example, C:\Users\<user name>\AppData\Roaming\Certara\Phoenix\Configuration. The files can be moved to other computers and are only computer-specific in the areas of configuration files related to mapped drives. The items that can be configured are Autosave, SAS, NONMEM, R, Certara Integral, and Licensing. These settings are configurable in the Phoenix user interface by selecting Preferences in the Edit menu. This displays a dialog with configurable items. Once the settings are modified, the files can be redistributed to other computers.
The Job Management System consists of the client (Phoenix desktop application) that submits jobs for remote execution, the Job Queue where jobs are stored for processing, and the Job Servers, which processes the jobs in the queue.
The client configuration file jobManagement.xml is used to point the client to the Job Queue. This file allows users to configure the Job Queue location and the port number to use. This file is located in the same directory as the application data configuration files mentioned earlier.
The Job Queue configuration file jqs.exe.config is used to set the ports to listen to and except for the license location is generally not modified.
The Job Server configuration file jps.exe.config is used to define the connection between the Job Server and the Job Queue. It has other settings that typically do not need modification.
All these *.config files are in the application root directory. For example, %INSTALL_FOLDER%\Phoenix\application.
Execution of AutoPilot Toolkit objects using JMS
Phoenix projects that contain AutoPilot Toolkit objects can only be executed on JMS using the 32-bit versions of the executables named jqs32.exe and jps32.exe. The configuration files for these executable files are jqs32.exe.config and jps32.exe.config. The same instructions apply to editing of the configuration files as outlined above. The installed Windows Services for the Job Queue Server and Job Processing Server will need to be set to manual or disabled. Console mode is necessary for the execution of AutoPilot Toolkit objects on JMS. This is due to the fact that the third party tool SigmaPlot can only be used by JMS when running in Console mode. Console mode does not affect the ability to execute any of the supported Third Party Tools.
Name: Phoenix.exe.config
Format: XML
Configurable Sections: Application Settings and Logging (uses NLog: see http://nlog-project.org more information).
<appSettings>
<add key=”KEY” value=”VALUE”/>
</appSettings>
Keys and Values:
hideCommute=true/false: Toggles the ability for the user to check out commuter licenses.
useDebugDirectory: Location for NLME Debug files.
<nlog>
<…>
<\nlog>
Configurations:
<nlog globalThreshold=”Trace”>: Defines the logging level, default is Trace. Valid values include: Trace, Debug, Info, Warn, Error, Fatal
JPS and JQS configuration files
Names: jps.exe.config and jqs.exe.config
Format: XML
Configurable Sections: Application Settings and Logging (uses NLog: see http://nlog-project.org more information).
<appSettings>
<add key=”KEY” value=”VALUE”/>
</appSettings>
Keys and Values:
floatLicenseServer: States where the JPS named user license server is via IP Address.
serviceLicense: JPS/JQS license
useDebugDirectory: Location for NLME Debug files.
<nlog>
<…>
<\nlog>
Configurations:
<nlog globalThreshold=”Trace”>: Defines the logging level, default is Trace. Valid values include: Trace, Debug, Info, Warn, Error, Fatal
jqs.exe.config only:
<jobqueue isLocalJobQueue=”false” maxHistory=”25”
jobTimeoutInSeconds=”300”>
<channels>
<channel type=”tcp” port=”4000” />
<channel type=”http” port=”8000” />
</channels>
</jobqueue>
jps.exe.config only:
<jobProcessing maxProcessingThreads=”1”
useLocalConfigurationFile=”true”
configurationFilePath=“” threadPollInterval=”60”
gridAvailable=”false” heartbeatTimeInSeconds=”60” />
threadPollInterval: How often to look for a job.
heartbeatTimeInSeconds: How often to report back to the queue when running the job.
maxProcessingThreads=Ignore/Do Not Modify
gridAvailable=Ignore/Do Not Modify
maxProcessingThreads=Ignore/Do Not Modify
useLocalConfigurationFile=Ignore/Do Not Modify
configurationFilePath=Ignore/Do Not Modify
Job management configuration file
Name: jobManagement.xml
Format: XML
Configurable Sections: Users can only modify the machine name and ports.
Example:
<jobManagement defaultPollInterval=”60”
usePolling=”true”>
<channels>
<channel name=”tcp4000” type=”tcp” port=”4000”
direction=”out” />
<channel name=”http8000” type=”http” port=”8000”
direction=”out” />
</channels>
<servers localJobQueueChannelName=”tcp4000”>
<server machineName=”localhost” primary=”true”>
<serverChannel channelName=”tcp4000”
default=”true” />
<serverChannel channelName=”http8000” />
</server>
</servers>
</jobManagement>
Location: %APPDATA%\Certara\Phoenix
Summary: Binary files that contain the settings found in the Preferences dialog (Edit > Preferences). They cannot be modified manually. They can only be modified by running an instance of Phoenix on the computer. After they are set by Phoenix, they can be distributed to other computers that have Phoenix installed.
Plug-In files:
NONMEM.binconfig: NONMEM configuration information.
SAS.binconfig: SAS configuration information.
pks_config.binconfig: Certara Integral instance information.
pks_saveoptions.binconfig: Certara Integral default save options.
ObjectBrowser.binconfig: General project settings and the default save options.
If licensing configuration files are moved to another computer, the following three files must be moved together:
licensing.licenses.configuration.binconfig
licensing.server.configuration.binconfig
licensing.service.configuration.binconfig
Configuring JMS to work with RPS
In addition to being able to execute Phoenix objects, the JPS can be configured to send certain pieces of work to a remote server for execution. For instance, assume that NONMEM is already installed on a server somewhere in the organization. The JPS can be configured so that all NONMEM jobs are executed on the server where NONMEM and the Phoenix Remote Server are already installed. Phoenix objects that can be setup for remote execution include Phoenix Model, NONMEM Shell, R Shell, SAS Shell, and PsN Shell.
When JPS sends part of a job for remote execution, JPS will wait for the execution results to return before continuing with the rest of the job.
Topics in this section include:
PhoenixRemoteSettings.xml file
Configurable settings for remote execution are stored in the PhoenixRemoteSettings.xml file. The application will first look for this file in \<user_data>\Application Data\Certara\Phoenix. This is where the file will be saved if it has been updated using Edit > Preferences > Remote Settings. If the file is not found there, the copy located in <Phoenix_install_directory>\Phoenix\application will be used.
To set up log file details
-
In the PhoenixRemoteSettings.xml file, look for the following line:
<settings logLevel="prod" logPath="" enabled="false"> -
Set the amount of information to store in the log file (logLevel). Levels include:
-
Set the location in which to store the log files generated by the Remote Phoenix Server (logPath). If logPath is not specified, log files are written to \<user_data\Application Data\Certara\Phoenix\Logs.
prod: Production is the default level and the least verbose.
test: Testing reports slightly more detail than prod.
debug: Essentially a dump of information.
To set up the remote execution server
-
In the PhoenixRemoteSettings.xml file, look for the following line:
<server name="localhost" root="PhoenixServer" port="8080"
useSSL="false" timeout="300" /> -
Edit the values to reference the RQS server.
name: Server name
root: Context root
port: Server port
use SSL: true/false Whether or not to use the secure socket layer.
timeout: Server timeout value.
To set up remote execution of an object
-
In the PhoenixRemoteSettings.xml file, look for the following lines:
<ProcessTypes> -
For each object, set the executeRemotely variable to true for all process types you wish to be executed by the RPS. All other process types should be set to false.
Deploying the RPS Queue and Processor
The Remote Phoenix Server Queue (RPS Queue) is a Java servlet that runs in a Java servlet container. Tomcat must be installed on a computer that the JPS machine can ping. (Refer to the “Remote Processing Server” for more information.) The following discussion assumes that Tomcat is being used.
To deploy the RPS Queue
-
Install Apache Tomcat after the latest JDK is installed.
-
Shutdown Tomcat.
-
Copy PhoenixServer.war to %TOMCAT_HOME%\webapps.
-
Restart Tomcat.
The RPS Processor is installed on the same machine as the third party software (for NLME execution, no additional software is required). Currently, there are remote processors for NLME, NONMEM, PsN, R, and SAS. The RPS uses a plug-in architecture and it is possible to add processors not shipped with Phoenix.
Any number of RPS Processors can be configured and each one can be limited to processing specific job types.
To deploy the RPS Processor in Console mode
-
Copy PhoenixJobProcessor.zip to the machine that will perform the execution. The executing machine must be able to ping the RPS Queue machine.
-
Create a new folder where RPS Queue will be installed.
-
Unzip PhoenixJobProcessor.zip into the new installation folder.
-
Modify the serverConfig.xml file according to your needs. It must reference the RQS and have the correct executable path value specified. For example, C:\Program Files\R\R-3.6.0\bin\R.exe for R version 3.6.0. If the executing machine has multiple processors, the maxProcesses attribute can be increased to an appropriate number, and the RPS will process up to that many jobs simultaneously.
-
Valid values must be present in the serverConfig.xml for communicating with the Web server (DNS name or IP address), root (default is PhoenixServer), Web server port, SSL configuration, timeout, and pollinterval.
-
After saving changes to serverConfig.xml start the RPS Processor by opening a command window, navigating to the installation folder, and typing:
java -jar PhoenixJobProcessor.jar
To deploy the RPS Processor as an Automatic Windows Service
-
Copy PhoenixJobProcessor.zip to the machine that will perform the execution. The executing machine must be able to ping the RPS Queue machine.
-
Create a new folder where RPS Queue will be installed.
-
Unzip PhoenixJobProcessor.zip into the new installation folder at the root of this folder.
-
Modify the serverConfig.xml file according to your needs. It must reference the RQS and have the correct executable path value specified. For example, C:\Program Files\R\R-3.6.0\bin\R.exe for R version 3.6.0. If the executing machine has multiple processors, the maxProcesses attribute can be increased to an appropriate number, and the RPS will process up to that many jobs simultaneously.
-
Valid values must be present in the serverConfig.xml for communicating with the Web server (DNS name or IP address), root (default is PhoenixServer), Web server port, SSL configuration, timeout and pollinterval.
-
Edit the file install_service.bat to reflect the location of the folder created in Step 3 for the entries {setjob_processor_home=} and {job_processor.exe //IS//PhoenixJobProcessor --Install=} editing only the path statement after each of these parameters.
-
Save and close the batch file.
-
Execute the batch file as an administrative user on the target Windows system.
-
Optionally, users can edit the Windows Service to start automatically.
-
To edit the Windows Service startup option do the following:
Note:If you do not do so after each reboot, you must restart this service to enable the processing of jobs sent to the RPS Queue.
•Click Start or Start Orb and select the Run option.
•Type Services.msc and press Enter. This opens the Services Console Window.
•Find and double-click the Service named Phoenix Job Processor unless you edited the installation batch file to change this name.
•Change the Startup type for this service to Automatic and click Start.
