Objects that Phoenix can export using File > Export or the Export icon include workflows, operational objects, workbooks, worksheets, text objects, BQL rules, plots, and HTML tables.
A separate Word Export tool allows users to export worksheets, HTML tables, plots, and text objects to Microsoft Word. See Exporting to Microsoft Word.
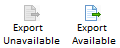
With an object selected for export, choose File > Export or click the Export icon.
If an object cannot be exported the Export button is unavailable.
In the dialog, use the Save in menu to select a directory.
Type a file name in the File name field or accept the default.
Use the Save as type menu to select the file format for the exported file.
For more details, see:
Workbooks and worksheets
HTML tables
BQL rule sets
Text objects
Plots
Workbooks in the Data folder are only exported as Excel files (.xls or .xlsx). Worksheets in the Data folder and in the Results tab can be exported as the following file types:
Excel 97-2003 Workbook (*.xls)
Excel Workbook (*.xlsx)
SAS Transport Format (XPORT) Version 5 (*.xpt)
Text (Comma delimited) (*.csv)
Text (Space delimited (*.dat)
Text (Tab delimited) (*.txt)
Caution:To export output in the Results tab, click the Export icon in the Results tab toolbar. Otherwise, the selected operational object is exported, and not the results.
To set options for Excel export
Exporting a worksheet or workbook as an Excel file displays the Excel Export Options dialog.
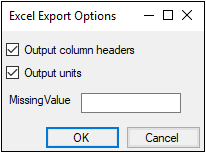
Check the Output column headers box to save the column headers in the Excel file.
Check the Output units box to save column units in the Excel file.
Type a value in the MissingValue field to have that value inserted in any blank cells in the worksheet.
Click OK to save the worksheet or workbook as an Excel file or click Cancel to cancel the export.
Worksheets saved as an Excel file have their history worksheet saved with them.
Caution:Only the Excel export format supports saving the history worksheet with the dataset.
Exporting a worksheet as a SAS Transport File displays the Rename Columns dialog.
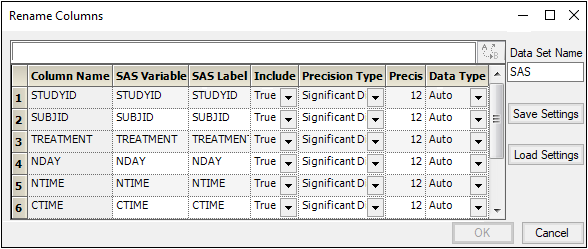
Enter information in the table that is appropriate for the data being exported:
Column Name: The column name in Phoenix; it cannot be changed.
SAS Variable: Enter the name of the SAS variable or use the default (limited to eight characters).
SAS Label: Enter the SAS column label header or use the default name (limited to 40 characters).
Include: Set to True to include or False to exclude the column.
Precision Type: Set the precision type to either Significant Digits or Decimal Places.
Precision: Enter the number of significant digits or decimal places or use the default value.
Data Type: Select the data type as Numeric or Text, or leave it set to Auto to export the column as it is in Phoenix.
Data Set Name: Enter a name for the data set.
This name is internal to SAS and independent of the actual file name.
To save the SAS export settings in the Documents folder, click Save Settings.
The settings are saved as a text file and named after the dataset name.
To load the SAS export settings from the Documents folder, click Load Settings.
In the dialog, select an SAS export settings file in the Documents folder and click Select.
Click OK to save the worksheet as an SAS Transport File.
To set up a text export
Exporting a worksheet as a text (comma, space, or tab delimited) file displays the Data Export Options dialog.
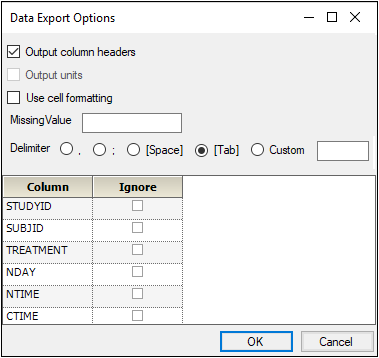
Data Export Options dialog for a .csv, .dat, or .txt data file
Check the Output column headers box to include column headers in the worksheet.
Check the Output units box to include column units in the worksheet.
Check the Use cell formatting box to preserve custom cell formatting in the worksheet.
Type the value in the MissingValue field that is to be inserted in any blank cells in the worksheet.
Select one of the Delimiter option buttons to choose how to separate values in the worksheet.
By default, .csv files use a comma to separate values, .dat files use a space to separate values, and .txt files use a tab to separate values.
Check the Ignore box beside a column name to exclude that column in the output file.
Click OK to save the worksheet as a .csv, .dat, or .txt file.
Select an HTML table in the Tables folder.
Export the selected table.
The table is exported as an HTML file.
Select a rule set in the BQL folder.
Export the rule set.
The rule set is exported as a .phxruleset file.
Text objects in the Code folder, the Documents folder, and in the Results tab are exported as the following file types:
RTF File (*.rtf)
Text File (*.txt)
Caution:To export output in the Results tab, click the Export icon in the Results tab toolbar. Otherwise, the selected operational object is exported, and not the results.
Plots in the Results tab are exported as the following file types:
Bitmap (*.bmp)
Enhanced Meta File (*.emf)
GIF (*.gif)
JPEG (*.jpg)
PNG (*.png)
Tiff (*
Caution:To export output in the Results tab, click the Export icon in the Results tab toolbar. Otherwise, the selected operational object is exported, and not the results.
To set up image export
Exporting a plot as an image file displays the Export dialog with the following additional options.
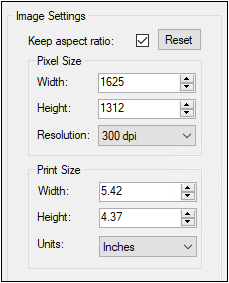
Check the Keep aspect ratio box to keep the original ratio of width to height as adjustments are made.
Click Reset to return the settings to the original values.
Adjustments to the image can be made based on pixels or print.
For pixel adjustments, use the Resolution pull-down to specify the dpi setting.
For print adjustments, select the units to use from the Units pull-down.
Make the desired changes to the Width and/or Height values.
