Phoenix can export selected worksheet columns to specific fields within a table in any ODBC-compliant database. Like ODBC import, the export requires a connection string defining the database type and location. It also requires an export definition to map columns in the source worksheet to fields in the target database table.
Database connection: Both ODBC import and export can use the same connection string to define the database type and location. This string is created in the ODBC Export wizard or loaded from a previously-saved import or export as detailed under “Establishing a connection”.
Export definition: Once the database connection is established, an export requires a mapping of columns from the Phoenix worksheet to fields in the target database table. This export definition may be created in the ODBC Export wizard or loaded from a previously-saved export as shown under “Creating a new export”.
The export definition can be saved with a connection string to an export definition file (*.exp), for later re-use. The export definition can also be saved without the connection string and loaded for use with other databases via different connection strings.
See the following topics for more information:
Creating a new export
Loading a saved export
In the Data folder, select a worksheet to export.
Select File > ODBC > Export > Legacy Wnl.
In the ODBC Export dialog, select the Create a new Export option button and click Next.
Create a new or load a connection string as detailed in “Establishing a connection”.
In the ODBC Export Definition dialog, select the Build a Definition option button and click Next.
As with the ODBC import, the schemas used to select the data variables can be specified. The Schema Filter dialog displays available schemas, if any were created by the database administrators.
If the Schema Filter dialog is displayed, select a schema and click OK.
Using schema filters can speed up export operations by using saved export files.
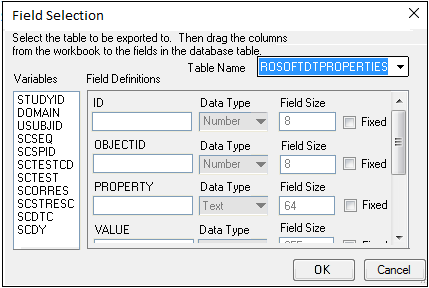
In the Table Name menu of the Field Selection dialog, select the database table to receive the exported data.

Drag the variables from the Variables list to the appropriate database fields under Field Definitions.
To export one constant value for all records in a given field, check the Fixed checkbox for a variable and enter a value in the field name.
This method can be used to differentiate one export from another. The data type and field size are set by the database administrator.
Click OK.
In the Save Export? dialog, check the Save Password checkbox to save the database username, password, and connection string in the export file.
Saving all three pieces of information in the import file allows users to connect to a database. The export definition file contains all information needed to reproduce the same export, excluding any constants in fixed fields.
Note:The import file is not encrypted, so the saved password is not secure.
Click Yes to display the Save As dialog for specifying the location and file name.
If you click Cancel in the Save As dialog, the worksheet is still exported into the database, but the export file (*.exp) is not saved.
A saved export file (*.exp) may or may not contain the connection string, depending on what options were specified during saving. The field mappings in any ODBC export definition can be re-used with any database connection, assuming the field and table names in the export file exactly match a table in the selected database.
Select the dataset to export in the Data folder.
Select File > ODBC > Export > Legacy Wnl.
In the ODBC Export dialog, select the Load an Export option button and click Next.
In the Open dialog, select the export file (*.exp) and click Open. (Log on to the data source, if necessary.)
If the Schema Filter dialog is displayed, use the Schema Filter option to narrow the set of available data tables (optional) and click OK.
Users can select All schemas in the Schema Filter dialog.
Make any adjustments needed in the Field selection dialog and click OK to complete the export.
