This section includes information on the following topics:
•Creating a worksheet or workbook
•Adding columns to a worksheet
•Changing the display format of numerical values
•Adding and deleting rows in a worksheet
•Moving cell values in a worksheet
•Editing data values in worksheets
•Replacing a cell value with a new value
•Finding a cell value in a worksheet
In addition, there are a number of operational objects specific for modifying worksheets. See “Worksheet-Related Objects”.
Creating a worksheet or workbook
To create a worksheet
Select File > New Worksheet ![]() .
.
Or right-click the Data folder and select New > Worksheet.
A new worksheet is added to the Data folder.
To rename the worksheet
Select the worksheet and press the F2 key.
Or single-clicking the worksheet name a second time.
Or right-clicking the worksheet and selecting Rename.
Type a name for the new worksheet.
To create a workbook
Right-click the Data folder and select New > Workbook.
Click the (+) sign beside the workbook to view the worksheets it contains.
To add more worksheets to a workbook, right-click a workbook and select New > Worksheet.
With the worksheet displayed, click Add under the Columns box in the Columns tab.
Or right-click in the worksheet itself and select Insert Column from the menu.
In the New Column Properties dialog, select the Numeric or Text option buttons to set the data type for the new column.
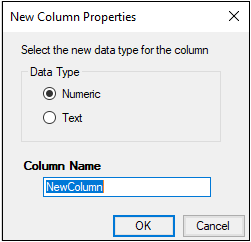
Numeric-type columns are considered by Phoenix to contain only numeric values, and the application treats the values in a numeric column as numeric data. A numeric column contains only numeric values or substitution values such as those applied by BQL rules.
Text-type columns in Phoenix can contain mixed numeric and text values. Beginning and trailing spaces in text are trimmed in Phoenix worksheets.
Note:Additional issues arising from having numeric data in a text-type column include:
– Columns with numbers as purely text will sort differently than numeric columns;
– Very large integers will lose precision due to rounding of significant digits when they exceed precision capacity (approximately 14 digits);
– Preceding 0's will be lost in the case of numeric subject identifiers that start with 0's.
Type a name for the new column in the Column Name field and click OK.
After a column is added to the Columns box its properties can still be edited.
Limitations on column names
Limitations on column names are necessary in Phoenix because certain characters can cause operational objects to either work incorrectly or not recognize a column in a worksheet.
Column names can only contain alphanumeric characters and underscores.
Column names cannot contain spaces. Spaces are converted to underscores.
Column names cannot start with a number. Column names that start with a number have an underscore added to the beginning of the column name.
Any invalid characters used in a column name are automatically converted to an underscore. For example, if a user types the column name 1 Conc%, Phoenix automatically converts it to _1_Conc_.
Note:Selecting a column in the Grid tab also selects the column in the Columns box.
To change the column header, click the name in the Columns box to make it editable and type the new name.
To remove a column, select a column header in the Columns box and click Remove underneath the Columns box.
Or right-click the cell or column header in the worksheet itself and select Delete from the menu. In the confirmation dialog, click the Selected Column(s) option button and click OK.
Note that columns cannot be deleted from a worksheet that is mapped to an operational object.
To change the order of the columns, select a column in the Columns box and click the Up Arrow and Down Arrow buttons beside the Column box to move the column up and down.
To change a column’s data type, click Change beside Data Type to display the Change Column Type dialog and select the type.
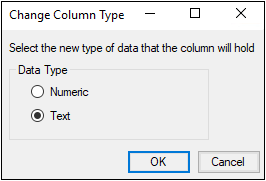
Caution:Changing a column from text to numeric deletes any non-numeric values in the column.
To add units to a column header, type the unit in the Unit field or click Units Builder to open the Units Builder dialog. See “Using the Units Builder” for more on using the Units Builder dialog.
Changing the display format of numerical values
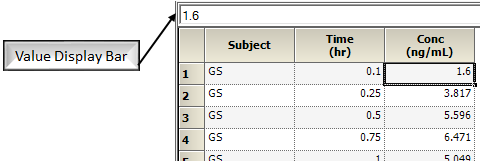
The numeric display format is only used to control how data is displayed. All operational objects use the raw data that is displayed in the Value Display bar, i.e., full precision is used in all calculations regardless of the display format.
Phoenix uses Microsoft .NET format strings to display numerical values in a worksheet.
To specify a Microsoft .NET format string
Select the Custom option button in the Columns tab.
Enter a format string in the field. The following table shows examples. The default is G8.
To specify the format as the number of decimal places
Select the Numeric option button.
In the Required Decimals box, select or type the number of required decimal places.
If a cell in the column contains less decimal values than the specified number of required decimals, then zeros are appended to the end of the value. This does not change the actual value in the cell. Only the value display is changed.
In the Optional Decimals box, select or type the number of optional decimal places.
If a cell in a column contains less decimal values than the specified number of optional decimals, no zeroed are appended to the end of the value. However, if a cell contains more decimal values than the number specified, then the decimal values are truncated. This does not change the actual value in the cell. Only the value display is changed.
Users can set the number of required and optional decimal places to make sure that all values in a cell are represented and not altered. The number of required and optional decimal places needed to do this depends on the values in the column cells.
Check the Use Thousands Separator box to place a comma between every third integer.
The time column in a worksheet is typically in numeric format. Phoenix also allows users to create worksheets that contain the date and time values in text format.
|
Format |
Example |
|
MM/dd/yyyy |
8/22/2006 |
|
dddd, dd MMMM yyyy |
Tuesday, 22 August 2006 |
|
dddd, dd MMMM yyyy HH:mm |
Tuesday, 22 August 2006 06:30 |
|
dddd, dd MMMM yyyy hh:mm tt |
Tuesday, 22 August 2006 06:30 AM |
|
dddd, dd MMMM yyyy H:mm |
Tuesday, 22 August 2006 6:30 |
|
dddd, dd MMMM yyyy h:mm tt |
Tuesday, 22 August 2006 6:30 AM |
|
dddd, dd MMMM yyyy HH:mm:ss |
Tuesday, 22 August 2006 06:30:07 |
|
MM/dd/yyyy HH:mm |
8/22/2006 6:30 |
|
MM/dd/yyyy hh:mm tt |
8/22/2006 6:30 |
|
MM/dd/yyyy H:mm |
8/22/2006 6:30 |
|
MM/dd/yyyy h:mm tt |
8/22/2006 6:30 |
|
MM/dd/yyyy h:mm tt |
8/22/2006 6:30 |
|
MM/dd/yyyy h:mm tt |
8/22/2006 6:30 |
|
MM/dd/yyyy HH:mm:ss |
8/22/2006 6:30 |
|
MMMM dd |
22-Aug |
|
yyyy'-'MM'-'dd'T'HH':'mm':'ss.fffffffK |
2006-08-22T06:30:07.7199222-04:00 |
|
ddd, dd MMM yyyy HH':'mm':'ss 'GMT' |
Tue, 22 Aug 2006 06:30:07 GMT |
|
yyyy'-'MM'-'dd'T'HH':'mm':'ss |
2006-08-22T06:30:07 |
|
HH:mm |
6:30 |
|
hh:mm tt |
6:30 AM |
|
H:mm |
6:30 |
|
h:mm tt |
6:30 AM |
|
HH:mm:ss |
6:30:07 |
|
yyyy'-'MM'-'dd HH':'mm':'ss'Z' |
2006-08-22 06:30:07Z |
|
dddd, dd MMMM yyyy HH:mm:ss |
Tuesday, 22 August 2006 06:30:07 |
|
yyyy MMMM |
2006 August |
Adding and deleting rows in a worksheet
Right-click in the worksheet and select Insert Row from the menu.
If a cell is selected, the row is inserted above the selected cell. If multiple rows are selected, the same number of rows will be inserted above the first selected row.
To delete a row, right-click a cell in the row and select Delete from the menu. In the confirmation dialog, click the Selected Row(s) option button and click OK.
Note:A row-paste operation will only appear in the history when the data to be copied is selected by highlighting the individual cells and pasted by selecting the destination row number. If the data is copied by selecting a row number or pasted by selecting the destination cells, the history entry will not be created.
To move rows, select the contiguous rows, move the cursor over the lower right corner of the selected block of rows and, when the cursor changes to a four-arrow sign, drag the block of rows to the new location.
Moving cell values in a worksheet
Use the pointer to select a horizontal range of cells or vertical range of cells in a worksheet.
Click the Cut, Copy, Paste from the right-click menu, Edit menu, or in the toolbar.
Cut moves the values in the cells to the clipboard.
Copy copies the values in the cells to the clipboard.
Paste pastes the values in the clipboard into cells, start with the currently selected cell.
Or
Move the cursor over the lower right corner of the selected block of cells and, when the cursor changes to a four-arrow sign, drag the block of cells to the new location.
Editing data values in worksheets
Click in a cell and edit the content directly in the cell or in the field above the worksheet.
Or
Use the pointer to select a cell or cells in a worksheet.
Click the Cut, Copy, Paste from the right-click menu, Edit menu, or in the toolbar.
Cut moves the value in a cell to the clipboard.
Copy copies the value in a cell to the clipboard.
Paste pastes the value in the clipboard into a cell.
If you want the same value in multiple adjacent cells, enter that value in the first cell and then drag the lower right corner of the selection box until the block of desired cells is selected. When you release the mouse button all of the selected cells will have the entered value.
Note:If you are unexpectedly unable to edit a cell value, try double-clicking in the cell or selecting the cell and then using the field above the worksheet to enter the data.
Replacing a cell value with a new value
Select Edit > Replace to display the Replace dialog.
The Replace dialog works like the Find dialog, except that it replaces text and numbers.
In the Find field, type the text or number to be replaced.
In the Replace With field, type the text or number to replace the search value entered in the Find field.
Check the Replace All box to replace all instances of the value in the Find field. Unchecking the Replace All box only replaces the first instance of the search value.
Select Edit > Undo to undo the last worksheet action.
Select Edit > Redo to redo the last worksheet action.
Note:The Undo and Redo functions have no effect on any part of Phoenix other than worksheets.
Finding a cell value in a worksheet
To find a cell by column and row
With a worksheet displayed, select Edit > Go To to display the Go To dialog.
In the Column menu, select the column in which the cell is located.
In the Row Number field, type the row number in which the cell is located.
Click OK to select the corresponding cell and scroll to that location in the worksheet.
To find a cell by its value
Select Edit > Find to display the Find dialog.
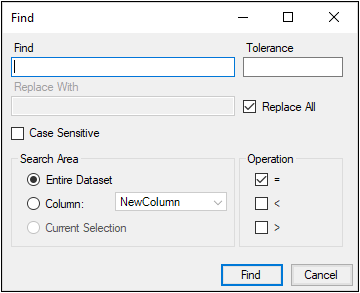
In the Find field, type the number or text to search for.
If a numerical value is entered, the Tolerance field becomes available and you can enter a tolerance value. Numeric values that are +/- the tolerance of the search value are considered to match the search value.
If text or text and numbers are entered in the Find field, then the Case Sensitive checkbox becomes available. Check the box to search for text that matches the capitalization of the search value.
In the Search Area, select the Entire Dataset, Column, or Current Selection option button to define the search range.
The Current Selection option button is only available if multiple cells are selected.
If the Column option button is selected, use the Column menu to select which column is searched.
In the Operation area, select one of the operator checkboxes to find values equal to, less than, greater than the search value.
Multiple checkboxes can be selected. Equals (=) is always the default selection. Users can select the following combinations:
|
Operator(s) |
Description |
|
= |
equal to the search value |
|
< |
less than the search value |
|
<= |
less than or equal to the search value |
|
> |
greater than the search value |
|
>= |
greater than or equal to the search value |
|
<> |
not equal to the search value |
Worksheet columns can be sorted in ascending or descending order, and the sorted column position can be further ordered in the Sort Worksheet dialog.
Any worksheet, including imported datasets and the results of an analysis, such as a Final Parameters worksheet, can be sorted. Sorting a worksheet has two different effects, depending on the type of worksheet that is sorted.
Sorting a source worksheet, such as a dataset, creates a permanent change in the way the worksheet is ordered. Sorting a dataset affects all operational objects that use that worksheet because they are marked as out of date. Source worksheets are sorted using a natural sort order.
Sorting a results worksheet only changes the order in which the data is displayed. If users want to make permanent changes to the way a results worksheet is sorted, then that worksheet can be copied to the Data folder or mapped to a Column Transformation object.
To sort a worksheet
Click the Sort Worksheet  button that is located above every worksheet.
Or select Edit > Sort Worksheet.
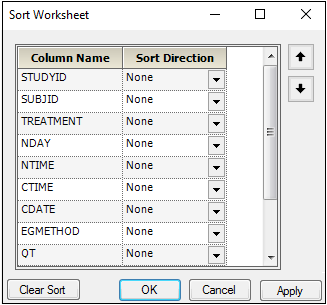
In the Sort Worksheet dialog, click the Sort Direction arrow beside a column name to select a sort direction. Sort direction options include Ascending (increasing) or Descending (decreasing).
Changing the sort direction changes the column order in the Sort Worksheet dialog, but does not change the sort order in the worksheet. Columns sorted by ascending order are listed first, columns sorted by descending order are listed second, and columns with no specified sort order are listed last.
Select a sorted column in the Sort Worksheet dialog and move it up or down by clicking the Up and Down arrow buttons.
If a column has no specified sort direction, then the column order cannot be changed in the Sort Worksheet dialog. The column order can still be changed in the Columns tab.
When finished, click OK to apply the changes and close the dialog, or click Apply to apply the changes and leave the dialog open.
Click Clear Sort to clear all specified sort orders.
If Microsoft Excel is installed users can edit worksheets and HTML tables in Excel and re-import the edited worksheet or table into Phoenix. Excel can be used to enter formulas into worksheets or change the formatting of HTML tables.
The following topics are discussed in this section:
Note:Copying and pasting from Phoenix to Excel might not retain the same number of digits or trailing zeros, since the tools could have different column formats. An alternative method is to send the data to a Table object and create a table with the specified number of decimals or significant figures for each table column. Then right-click the Table and select Copy to Tables folder. Select the copied table in the Tables folder and right-click to select Edit in Excel, which will open the data in Excel with preserved formatting.
Editing a worksheet with Microsoft Excel
If a worksheet has no dependents, which means it is not mapped or connected to an operational object, and it is located in the Data folder, then it can be edited in Excel. In order to edit a Phoenix object's result worksheet in Excel, it first must be copied to the Data folder by right-clicking the worksheet and selecting Copy to Data Folder.
-
In the Object Browser, select a worksheet in the Data folder.
-
Select Edit > Edit in Excel or right-click the worksheet and select Edit in Excel.
A dialog is displayed warning that all editing done in Excel is logged as a single, generic audit entry. -
Click OK to open the worksheet in Excel.
-
Edit the worksheet using the Excel tools.
Note:While a worksheet is being edited in Excel, it cannot be mapped to any operational object.
In addition to editing the data in a worksheet, users can edit the units associated with each column.
-
If a worksheet has a units row, edit the units in that row.
If a worksheet does not have a units row, entering units adds the units to a row in the worksheet, but not the column headers.
When the worksheet is open in Excel, it is stored in a temp directory located at C:\Users\<user name>\AppData\Local\Temp\Phoenix. The temp directory’s name starts with PhxExcel_. The rest of the temp directory name is unique identifier such as 98a32ee3-49e8-44ae-b6b6-e55315ef27fb.
Because of the way Phoenix handles its interactions with Excel, users cannot use the Save As option in Excel to save the worksheet with a different name or to a different location. The Save option must be used.
Caution:If the worksheet name or file location is changed, the Excel edits cannot be imported into Phoenix.
-
When finished, save the worksheet and close Excel. Be sure to save the worksheet before closing Excel, or all changes will be lost.
-
In the Apply Changes dialog, click Yes to apply the changes or No to ignore the changes.
If the changes are applied, an entry is written in the worksheet’s History tab noting that it was edited in Excel. -
In the Save Excel Formulas dialog, click Yes to save formulas in the worksheet or No to not save the formulas.
If formulas are saved, then the worksheet is no longer editable in Phoenix, but it can be edited in Excel and the worksheet can still be used with operational objects.
If formulas are not saved, only the formula results are saved, and the worksheet can be edited in Phoenix. However, the formulas will not be available the next time the worksheet is edited in Excel.
Note:For worksheets edited in Excel, with formulas saved, if the Refresh from Source option in the edited right-click menu is used, the worksheet is empty. To get the data back, use the Edit in Excel option again, make a change to the dataset and then save the changes back to Phoenix, the worksheet will be restored.
Editing an HTML table in Microsoft Excel
The Table object in Phoenix creates tables in HTML format. To edit a table in Excel, it first must be copied to the Table folder by right-clicking the table output and selecting Copy to Tables Folder.
-
In the Object Browser, select a worksheet in the Table folder.
-
Select Edit > Edit in Excel or right-click the worksheet and select Edit in Excel.
When the table is open in Excel, it is stored as a temp file which, by default, is located in C:\Users\<username>\AppData\Local\Temp\Phoenix.
Users must publish the table as a single HTML file to import it back into Phoenix. The following steps must be performed after the edits are done in Excel:
-
Go to the Excel Save As dialog and change the filename. Excel cannot publish to the same file that is being edited.
-
In the Save as type menu, make sure that Web Page (*.htm;*.html) is selected.
-
Click Publish in the Save As dialog.
-
In the Publish as Web Page dialog, click Publish.
-
Close Excel without saving.
-
When asked to apply the changes to the table, click Yes.
An entry is written in the table’s History tab noting that it was edited in Excel (occasionally, the entry is duplicated, ignore the duplicate) and Phoenix displays an Open file dialog.
If No is selected, then the changes are not applied and no entry is added to the table’s History tab. -
Select the renamed HTML file. The HTML file’s name is the same one entered in the Save As dialog in Excel.
-
Click Open.
The HTML table in the Tables folder now contains the edits made in Excel.
Rules for editing worksheets and HTML tables in Excel:
-
Only worksheets and HTML tables in the Object Browser can be edited in Excel.
-
Worksheet format edits (fonts, shading, etc.) are not saved when the worksheet is saved back to Phoenix.
-
HTML table format edits are saved when the table is saved back into Phoenix and the user chooses to apply the changes.
-
Only formatting available in standard Phoenix tables are supported. For non-standard tables, the HTML is passed to Excel as is.
-
Multiple worksheets and HTML tables can be edited at once.
-
If a text value is added to a Numeric-type column, then the column is changed to a Text-type when the changes are applied in Phoenix.
-
The edited worksheet and table will match any changes that Excel automatically makes to those files.
-
Formulas cannot be edited in Phoenix. If a worksheet contains formulas and the formulas are saved when the worksheet is imported back into Phoenix, then the worksheet can no longer be edited in Phoenix.
-
Worksheets that cannot be edited in Phoenix are shaded gray.
-
Detailed edits made in Excel are not recorded in the worksheet’s or table’s history tab. The History tab only records a single edit entry named “Object Edited in Excel.”
