Most interactions with PKS occur through the PKS Browser. The PKS Browser displays a list of studies in the system and their contents on the left. The table in the right panel allows sorting and searching of the studies. All of the study information on the left is available in the table on the right.
A study contains libraries, scenarios, and views. Selecting one of these “collection” nodes in the left panel will list the items in that collection in the right panel. Selecting one of the items in the list will display the properties for that item in the right panel. Selecting the study itself provides an opportunity to edit some of the study properties and post them to the system. The Custom Attributes tab lists any custom attributes that are defined for a study through the PKS Web Interface. Selecting a particular scenario displays several tabs of information: properties, custom attributes, dependencies (such as a study view, other scenario object, or global library), list of objects that are saved within the scenario.
The contents displayed in the PKS Browser are limited by the logged in user's security permissions and by any applied filters.
The PKS Browser also has a toolbar that allows users to perform several common PKS functions, including: switching between library and study views, refreshing the browser contents, setting display options, filtering PKS contents, toggling study and object property displays, creating new scenarios, study views, and new study object, and editing, appending, and updating study data.

The PKS Browser includes the following capabilities:
•Filtering based on properties
•Viewing Study and Study Object properties
•Loading existing scenarios/creating new scenario versions
•Creating a new Study Library object
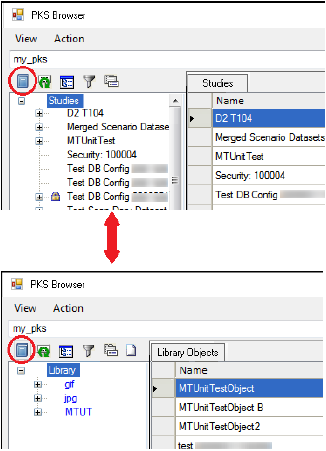
The PKS Global Library can be used to store documents, models, scripts, images, and other binary files that can be re-used across many projects or analyses. The PKS Browser can be toggled back and forth between viewing the Global Library contents and viewing the Study menu tree.
-
Click
 in the PKS Browser toolbar to toggle between the Global Library and Study views.
PKS contents can change as a result of actions from other users. The changes might not be immediately reflected in the PKS Browser.
-
Click Refresh to load the current contents of the PKS.
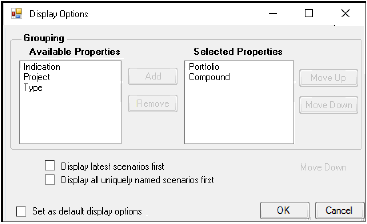
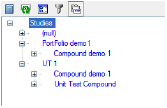
In the PKS Browser, the studies are listed in alphabetical order by default. They can also be grouped by indication, project, portfolio, compound and type.
-
Click
 to set the browser display options.
-
Use the pointer to select one or more of the properties in the Available Properties list and click Add to move properties to the Selected Properties list. (Use the Remove button to move properties back to Available Properties list.
-
Change the display order of selected properties by selecting a property and doing any of the following:
•Click the Move Up and Move Down buttons.
•Select the Display latest scenarios first checkbox (displays the scenarios in reverse order of derivation).
•Select the Display all uniquely named scenarios first checkbox (displays all uniquely named scenarios at the root level).
This option can be useful when multiple branches of a scenario, such as a new version with a different name, exist.
-
To use the current settings in the dialog as the default display options, turn on the Set as default display options checkbox.
-
Click OK to change the view of the studies and/or scenarios.
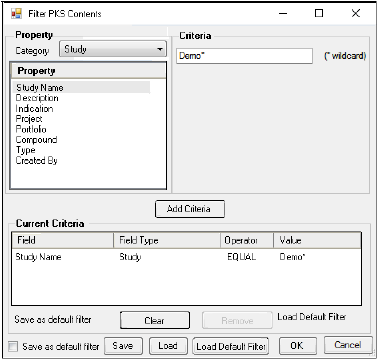
Filter criteria can be created based on the properties of a study, scenario, or Global Library objects. Filter specifications can be saved and reused, and a filter specification can be set as the default filter.
-
Click
 , which displays the Filter PKS Contents dialog.
 -
In the Category menu select Study or Scenario.
-
Select a study or scenario property in the Property List.
-
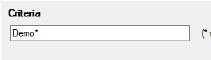
For some properties, text values must be specified in the Criteria field.
An asterisk can be added to act as a wildcard for the filter criteria.
-
For some properties users must select criteria based on existing values in the PKS database.

-
Click Add Criteria, which adds the filter criteria to the filter in the Current Criteria list.
-
Click Add Criteria to continue adding other criteria.
-
Click OK to apply the filter criteria. The
 icon is added to the PKS Browser toolbar.
•Click Clear to clear all criteria from the Current Criteria field.
•Select a criteria and click Remove to remove the selected criteria from Current Criteria field.
•Click Save to save the filter criteria as an .xml file.
•Click Load to load a saved filter criteria file.
•Select the Set as default filter checkbox before saving the filter to set the filter as the default.
•The default filter can be loaded by clicking Load Default Filter.
•To clear the default filter, click Clear to clear all filter criteria. Select the Set as default filter checkbox and click OK.
•To remove a filter applied to the PKS Browser, click  in the PKS Browser toolbar.
Viewing Study and Study Object properties
The PKS Browser allows users to view and modify the current study and scenario properties.
-
Click
 to toggle the study properties view on and off.
 -
Select a study to view its Study Properties tab.
-
Users can edit study properties by using the property menus that define the study.
-
The study description can also be edited.
-
Click Apply to save the changes to the PKS.
Each PKS Scenario is treated as a Phoenix project. Scenarios can be created containing dependencies on multiple PKS objects stored in the parent study, or in other studies or scenarios, or in the Global Library.
If a study only contains study library objects, those objects can be loaded directly into a project. However, if data is mapped to PKS data structures, then a study view must be generated before creating a scenario. When the new scenario is created, the data can be analyzed, modified and then saved to the PKS as a scenario for the selected study.
-
Select a study and then click
 in the toolbar or Action > New Scenario from the menu.
Or right-click a library or view object and select New Scenario.
-
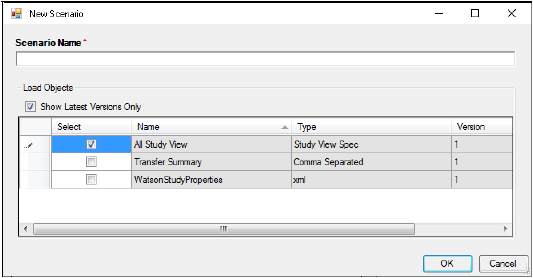
Type a scenario name in the Scenario Name field.
-
Clear the Show Latest Versions Only checkbox to display all objects that can be loaded. If the scenario being created is the first version, then no additional objects are displayed.
•Check the checkbox beside an object to include the object in the new scenario.
•Select as many objects as needed to create the new scenario.
-
Click OK to create the scenario. A message is displayed when the scenario project is created.
If any errors were encountered during scenario creation they are displayed in a separate message.
New scenarios typically contain the contents of one or more study views.
After a scenario is created, additional objects can be loaded into the scenario by opening the PKS Browser, selecting an object, and clicking .
. -
Click Close to close the PKS Browser.
-
Use Phoenix to edit data, add or update models, or make any other changes before saving the new scenario to the PKS.
See “PKS Save and Save As options” for instructions on saving the scenario to the PKS.
Study views define how to extract data from the PKS. Most commonly, views are specified to extract a subset of data (columns or rows) from the currently selected study. More complex views can be created to extract subsets of data from multiple studies.
Study views provide critical information necessary to reproduce datasets as they exist over time, and they provide for more granular status tracking of dependent analyses.
-
Select a study and click
 , which displays the New Study View dialog.
-
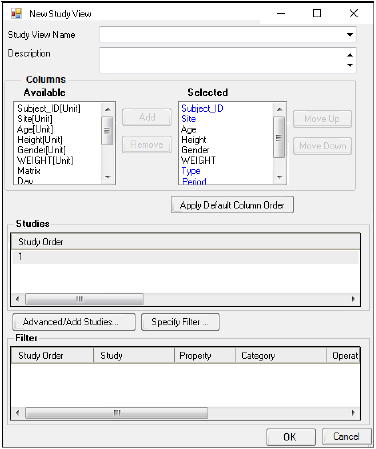
Type the study view name in the Study View Name field.
-
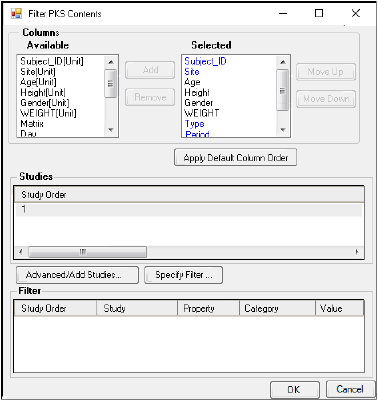
Specify the columns to include in the view and their order.
•Select a column in the Available list and click Add to move the column to the Selected list for inclusion in the study view.
(Click Remove to move the column back to the Available list).
•Select a column in the Selected list and click Move Up and Move Down.
-
Use the Advanced Study View dialog to add studies to the new view and adjust the column associations and settings.
•Click Advanced/Add Studies, which displays the Advanced Study View dialog.
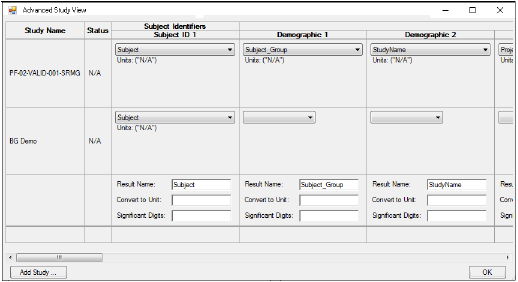
•Click Add Study to open the PKS Browser.
•Select a checkbox beside one or more studies and click Select to add them to the study view.
The new study information in displayed in the Advanced Study View dialog.
Depending on how the data source associated with a study is mapped, users can make changes to columns mapped to four areas: Subject Identifiers, Subject Demographics, Data Collection Point, and Observations.
•Use the menus in the Subject Identifiers, Subject Demographics, and Observations sections to change column mappings.
•Enter a new result name in the Result Name field or accept the default name.
•If a column has an associated unit, convert it by entering a conversion unit in the Convert to Unit field.
•Enter a new significant digit value in the Significant Digits field or accept the default value.
•In the Data Collection Point section, users can modify the nominal and relative time units, or leave the default settings.
•Click OK to close the Advanced Study View dialog.
-
Click Specify Filter, which displays the Filter PKS Contents dialog.
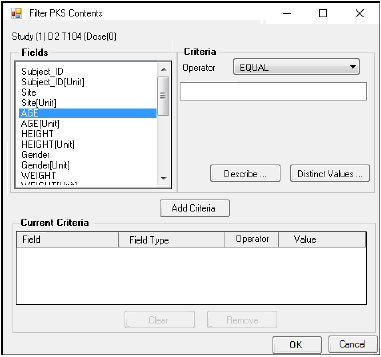
•Select a field in the Fields list.
•In the Operator menu, select boolean operator to specify the criteria.
•In the Criteria field, enter a filter criteria for the selected field.
OR
•Click Distinct Values to display all distinct values in the selected field.
•Select a value and click Select to add the value to the Criteria field.
•Click Add Criteria to add the filter criteria to the Current Criteria list.
•Select a field and click Describe to open the Data Description window.
•Click OK to close the Data Description window.
•Click Clear to remove ALL of the filter criteria in the Current Criteria list.
•Select a filter criteria and click Remove to remove only that criteria from the Current Criteria list.
-
Click OK in the Filter PKS Contents dialog to save the filter criteria. The filter criteria are displayed in the Filter list in the New Study View dialog.
-
Click OK in the New Study View dialog to display the PKS Save dialog.
-
Enter an Audit Reason in the Audit Reason field and enter your password in the Password field.
-
Click OK to have the PKS process the new study view.
Loading existing scenarios/creating new scenario versions
-
Select an existing scenario in the PKS Browser.
-
Open the scenario in one of three ways:
Double-click the scenario
Or right-click the scenario and select Load Scenario to Project.
Or click in the toolbar.
If the scenario has out of date dependencies, users are prompted to load current objects. If the latest versions are not loaded, use the Refresh from Source button to get the latest version of the dependent objects.
Users can choose to load the scenario in its existing state or to get the most recent versions of dependent objects.
Updated versions of individual PKS objects can be retrieved from the PKS. -
Select a scenario in the Object Browser. Right-click the scenario and select Refresh from Source to update the scenario from the PKS.
When work is complete on the loaded scenario, it can be saved as a new version to the PKS. -
Select PKS > Save to save the scenario.
-
Select PKS > Save As to save the scenario as a new branch.
Work can continue on scenarios between Phoenix and PKS sessions. Changes can be saved back to the PKS at any time.
Creating a new Study Library object
PKS supports storage and version history of objects, such as files or binary objects, at the study level. These objects can include documents, scripts, rule sets, or other files useful for the reporting or analysis of study data.
-
Select a study to which to add a library object and then click
 .
.
To load a file from a disk:
-
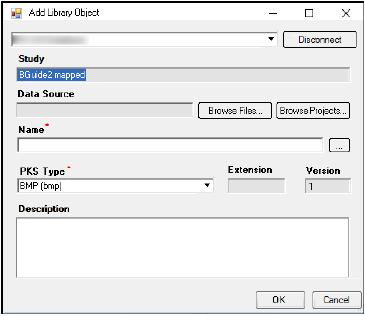
In the Add Library Object dialog, click Browse Files.
-
In the Open dialog, search for and select a file and click Open.
The directory path is displayed in the Data Source field. The file name is listed in the Name field.
Change the file name by typing a new file name in the Name field.
Or select a name by clicking to open the PKS Global Library browser.
 -
Select a library object and click Select.
-
The object name is displayed in the Name field.
To load an object from an opened project or projects:
-
Click Browse Projects to open the Select Object dialog.
-
Select an object in an open project and click Select.
-
In the Add Library Object dialog, use the PKS Type menu to assign a different type to the object.
Some objects have only one PKS type. The PKS type default and options are based on the object file type. -
Enter a description for the object in the Description field.
-
Click OK, which displays the PKS Save dialog.
-
Enter an Audit Reason in the Audit Reason field.
-
Enter your password in the Password field.
-
Click OK to create a Global Library object in the PKS.
To create a new version of an existing study library object:
-
Select the object in the PKS Browser.
-
Click
 . The Add Library Object dialog is displayed.
 -
Make any necessary changes in the Add Library Object dialog.
-
Update the library object by selecting a newer version from a saved file or an open project.
-
Click OK to update the object.
In the PKS Browser, the updated version is listed beneath the previous version.
-
Select a study to edit in the PKS Browser.
-
Click
 (or right-click the study and select Edit Study Data).
•In the Load Study Data dialog, accept the default study data columns in the Selected field.
OR
•Select a column in the Available list and click Add to move the column to the Selected list.
•Remove a column from the selected list by selecting it and clicking Remove.
•Change the column order in the Selected list by selecting a column and clicking the Move Up and Move Down buttons.
•To specify a filter to return desired subset of data, click Specify Filter to add a filter.
-
Click OK to retrieve the data and display it in the Edit Study dialog.
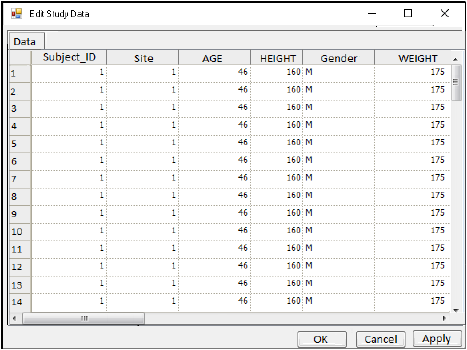
•Edit or insert values as needed.
-
Click Apply, which displays the PKS Save dialog.
-
Enter an Audit Reason in the Audit Reason field.
-
Enter your password in the Password field.
-
Click OK, which displays the PKS Process Manager.
-
Click Close in the Process Manager dialog.
-
Close the Edit Study Data dialog.
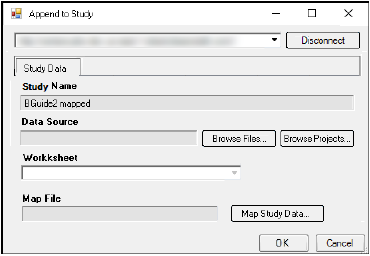
Data can only be appended to a study that already has been added to the PKS.
-
Select a study to append data to in the PKS Browser.
-
Click
 (or right-click the study and select Append/Update Study Data).
-
In the Append to Study dialog, select a data source by selecting a file or by selecting a dataset in a currently opened project.
To learn more about Study Data, see “Selecting a data source”.
•If the there are multiple worksheets, select the one to use as the source for creating the study.
If the selected data source is a workbook/worksheet, the File Import Wizard is displayed.
If a data source from a project is selected, the Select Object dialog is displayed.
•Select a worksheet in the Select Object dialog and click Select to add the worksheet as a data source.
-
Click Map Study Data.
-
In the Study Mapping dialog, assign the source columns to the appropriate tab.
See “Mapping study data” for instructions on using the Study Mapping dialog.
Users can load study mappings from a file. See “Loading a study map from a file” for instructions on loading a .map file.
Users can also load study mappings from the PKS. See “Loading a study map from PKS” for instructions on loading mappings from the PKS. -
Click OK to close the Study Mapping dialog.
-
Click OK in the Append Study dialog, which displays the PKS Save dialog.
-
Enter an Audit Reason in the Audit Reason field.
-
Enter your password in the Password field.
-
Click OK, which displays the PKS Process Manager.
-
Click Close to close the PKS Process Manager window.
The additional study data is incorporated into the first project.
