Studies are the fundamental unit of PKS organization. A PKS study stores raw data to be modeled and analyzed in one or more scenarios.
-
A study can be created from a project loaded in Phoenix (PKS > Save Project as PKS Scenario) or from scratch (PKS > Create Study). In either case, the Create Study dialog is used to define the study components.
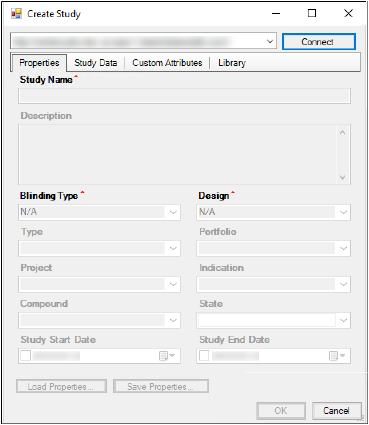
If a connection to an instance of PKS is not established, the fields and menus are unavailable in the Create Study dialog.
-
To establish a PKS connection, select a PKS instance in the instance menu in the Create Study dialog. The selected PKS instance is used to create a new study.
If no instance is available, configure the PKS connection settings as described in “Setting up a PKS connection”. -
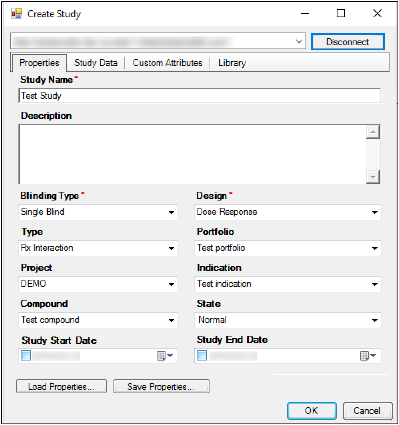
Click Connect and enter your user name and password in the Connect to PKS dialog and click OK.
If the Prompt option for credentials is selected in the PKS Configuration dialog, the Connect to PKS dialog will display prompting for the PKS user name and password and a user name and password for the proxy connection.
The metadata fields in the Create Study dialog are made available.
|
Attribute |
Description |
Data entry |
Format |
|
Study Namea |
Used to identify and locate study in PKS; must be unique within the PKS database |
Typed |
50 character max |
|
Text describing the study; press Ctrl+Enter for line breaks |
Typed |
2000 character max |
|
|
Blinding Typea |
blinding level for the study |
Typed or selected from list of prior values |
30 character max |
|
Designa |
Experimental structure, e.g., parallel or crossover |
Typed or selected from list of prior values |
30 character max |
|
Typea |
type of study |
Typed or selected from list of prior values |
30 character max |
|
Development portfolio to which the study belongs |
Typed or selected from list of prior values |
50 character max |
|
|
Development project to which the study belongs |
Typed or selected from list of prior values |
100 character max |
|
|
Primary indication(s) for the study |
Typed or selected from list of prior values |
50 character max |
|
|
Main drug compound(s) under development |
Typed or selected from list of prior values |
50 character max |
|
|
State |
Whether the study will be locked against changes or not |
Selected |
Normal or locked |
|
Study Start Date |
The date on which the study began |
Typed or selected from the calendar popup |
YYYY.MM.DD |
|
Study End Date |
The date on which the study concluded |
Typed or selected from the calendar popup |
YYYY.MM.DD |
|
aRequired field. |
-
In the Properties tab, enter the study name and a description of the study.
-
Use the menus in the Create Study dialog to select blinding type, design type, study type, portfolio, etc.
-
To save the study properties, click Save Properties.
-
Type a name in the File name field and click Save.
The study properties are saved as a .map file.
Load study properties from a file
-
Click Load Properties. The Open dialog is displayed.
-
In the Open dialog, select the directory that contains the study properties file.
-
In the Files of type menu, select one of three study property file types:
•Map (*.map)
•XML (*.xml)
•WNL5 Map (*.pks)
-
Select the file and click Open to load saved study properties.
Note:To learn more about creating and loading properties, see "PKS study properties".
-
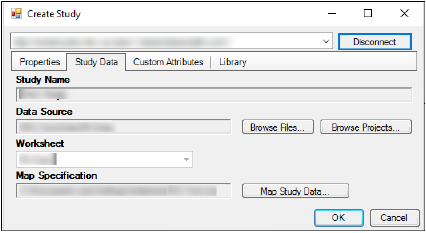
Select the Study Data tab.
-
Click Browse Files to select a data source from a file.
Column names in the data source cannot include an apostrophe as it can lead to errors when the data is added to the mapped columns. -
Click Browse Projects to select a data source from an open Phoenix project.
-
Use the Select Source dialog to navigate to a data source in Phoenix.
Note:For more on Study Data, see “Selecting a data source”.
•If the selected data source contains multiple worksheets, the File Import Wizard is displayed.
•In the File Import Wizard, select the worksheet to use as the source for creating the study.
•Additional worksheets can be appended to the study using the Append/Update feature.
-
Click Map Study Data and then:
•Create a new study mapping as detailed in “Creating and saving a .map file”.
•Load a map from file as detailed in “Loading a study map from a file”.
•Load map from PKS as detailed in “Loading a study map from PKS”.
-
Click OK, which saves the map settings to the study.
-
Select the Custom Attributes tab and check the boxes of the custom study attributes to include in the study.
-
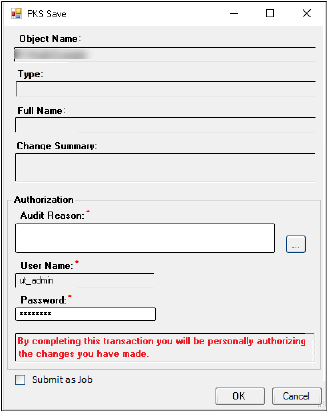
Check OK in the Create Study dialog to display the PKS Save dialog.
-
Enter an Audit Reason in the Audit Reason field.
-
Enter your password in the Password field.
-
Click OK, which displays the PKS Process Manager.
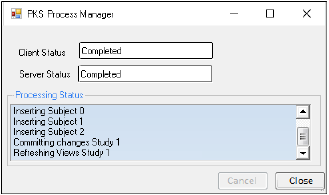
-
Click Close, which saves the study to the PKS.
The study can also be submitted as a job after which the Phoenix session can be terminated and the processing will continue on the server processed later.
•Select the Submit as Job checkbox to process.
•When the PKS has received the job information the PKS Process Manager can be closed.
•Use the PKS Job Viewer to monitor the processing status.
Properties can be entered once or saved for future use. Once a properties file has been saved, the file can be loaded during any study creation. Saving the properties file is helpful if multiple projects have the same properties or if you create a study in PKS from this project multiple times. The saved properties can be modified once they have been loaded.
This section covers the following topics:
•“Creating and Saving Properties to a file”
Creating and Saving Properties to a file
-
Load a Phoenix project file (*.phxproj) or create a new project.
-
Select PKS > Create Study.
-
If Phoenix is not already connected to PKS, click Connect and enter your login credentials in the Connect to PKS dialog.
-
In the Study Name field, type a study name.
-
Enter a description in the Description field.
-
Use the menus in the Create Study dialog to specify Blinding Type, Design, Type, Portfolio, etc.
A red asterisk (*) denotes a required study property. -
Click Save Properties to save the study properties.
-
In the Save As dialog, enter a file name and select a location in which to save the .map file.
-
Click Save to save the .map file.
-
Load a Phoenix project file (*.phxproj) or create a new project.
-
Select PKS > Create Study.
-
If Phoenix is not already connected to PKS, click Connect and enter your login credentials in the Connect to PKS dialog.
-
Click Load Properties to load a file with saved study properties.
-
In the Open dialog, select a .map file or a .pks file.
Phoenix WinNonlin study properties are saved as a .map file.
WinNonlin 5.3 study properties are saved as a .pks file. -
Click Open, which loads the study properties.

•If necessary, users can further modify study properties after the properties are loaded.
•Enter a new name or description in the Study Name and Description fields, or use the menus to modify study properties such as Blinding Type, Design, Type, etc.
If study files are saved to the study library, no mapping is necessary. However, if a study is going to be saved to the PKS from Phoenix, the data source and its columns must to be mapped before creating the study in the PKS. Only one data source needs to be selected. The data source can be imported from a disk or selected from an open project.
Once a data source is selected the observation data, demographic data, and other data must be mapped to the appropriate columns. A .map file can be created and saved or properties can be loaded from a previously created .map file.
•“Creating and saving a .map file”
•“Loading a study map from a file”
•“Loading a study map from PKS”
Note:If a sample, dose, or demographic source field contains multiple values, use one of the following options to prevent leading zeros or commas from being stripped:
•include a space between the values (e.g., “01, 2, 3”)
•include quotes in the value, so in a CSV file, it would be “”01,2,3””
•include any non-numeric characters in the value
-
Load a Phoenix project file (*.phxproj) or create a new project.
-
Select PKS > Create Study.
-
If Phoenix is not already connected to PKS, click Connect and enter your login credentials in the Connect to PKS dialog.
-
In the Properties tab, make sure the study property fields contain the appropriate selections.
-
Select the Study Data tab.
There are two ways to add a data source: selecting a file from a disk or selecting a worksheet in a Phoenix project.
-
To select a file from a disk:
•Click Browse Files.
•In the Open dialog, select a worksheet or workbook then click Open.
•In the Options area of the File Import Wizard, specify any additional import options.
•Click Finish to add the worksheet or workbook.
-
To select a file from a Phoenix project:
•Click Browse Projects.
•In the Select Source dialog, click the (+) signs beside workbooks and operational object results to locate a data source.
•Use the pointer to select the data source.
•Click Select.
The Select Object dialog closes and the selected data source is listed in the Data Source field.
Study data can be mapped to PKS structures and saved as a .map file, loaded from an existing map file on a disk, or loaded from an existing .map file in the PKS.
•"Creating and saving a .map file"
•"Loading a study map from a file"
•"Loading a study map from PKS"
Creating and saving a .map file
-
Load a Phoenix project file (*.phxproj) or create a new project.
-
Select PKS > Create Study.
-
In the Create Study dialog, select the Study Data tab.
-
In the Study Data tab, select a data source and click Map Study Data.
In the Study Mapping dialog, all the source columns in the worksheet are listed on the left. All of the different contexts for mapping are shown as tabs on the right. -
To map a column to a Subject Identifier, Demographic, Samples, or Doses context, click and drag the source column from the list on the left to the list in the context tab. For example, drag the column that uniquely identifies subjects from the Source Column list to the list in the Subject Identifiers tab.

•Use the Remove button to unmap a selected column.
•Enter an alternative name for the selected column by typing it in the Target Name field.
•Select the mapped column in the list to display attributes that can be modified.
-
Specify column attributes and defaults for data collection points or treatments.
•If the attribute values are in a separate column, click and drag that column to the attribute field.
(For example, if units are recorded as a separate column in the data source, click and drag that column name from the Source Column list to the Units attribute text field.)
•If the attribute value is always the same (i.e., static), enter that value and select the Static checkbox.
The Demographics tab maps subject data such as demographics and covariates.The selected demographic columns must contain values that exist once per subject. That is, the values are not time or visit dependent.
The Samples tab is for mapping time-dependent sample results. Samples and Doses tabs contain more attribute selections than Subject Identifiers or Demographics. These attributes are listed in the following tables.
|
Attribute |
Description |
|
Unit |
Units of measurement. |
|
Status |
Indicates data status, for example, below a limit of quantification (BQL), or missing due to dropout or non-adherence. Valid data are finite. The list of statuses is defined by a PKS administrator. |
|
Sample_Number |
Sample identifier. |
|
Sample_Matrix |
Identifier for the sample matrix. |
|
Sample Description |
Further information about the sample. |
|
Analytical Method |
Assay or technique used to obtain the sample data. |
|
LLOQ |
Lower limit of quantification for the assay. A numerical value. |
|
ULOQ |
Upper limit of quantification for the assay. A numerical value. |
|
Attribute |
Description |
|
Unit |
Units of measurement. |
|
Status |
Indicates data status, for example, below a limit of quantification (BQL), or missing due to dropout or non-adherence. Valid data are finite. The list of statuses is defined by a PKS administrator. |
|
Sample_Number |
Sample identifier |
|
Sample_Description |
Text information about the sample. |
|
State |
Text information about the sample. |
|
Route |
Variable identifying route, oral, IV, IM, etc., for each dose. |
The Data Collection Point tab (and Default Data Collection Point tab) is used to specify columns that contain data used to uniquely identify events where samples were collected or doses were administered. The mappings can be overridden per dose or sample.
The Treatment tab (and Default Treatment tab) is used to specify columns that uniquely identify administered treatments. Treatment information is combined with data collection point information to uniquely identify events where samples were collected or doses were administered.
The Default Treatment mappings can be overridden per dose or sample.
-
Click OK. The Save As dialog is displayed.
-
Select a directory in which to save the .map file and type a name in the File name field. Click Save.
-
Click the OK in the Study Mapping dialog.
The map file is used to create the study.
Loading a study map from a file
-
In the Study Data tab of the Create Study dialog, select a data source and click Map Study Data.
-
Click Load Map from File. which displays the Open dialog.
-
In the Open dialog, search for and select the .map file.
-
Click Open to load the .map file.
-
Click OK to close the Study Mapping dialog.
The loaded mappings are applied and attached to the study.
The mappings are applied to the selected data source as closely as possible. Phoenix displays warning messages if there are any problems with the mappings.
-
In the Study Data tab of the Create Study dialog, select a data source and click Map Study Data.
-
Click Load Map from PKS.
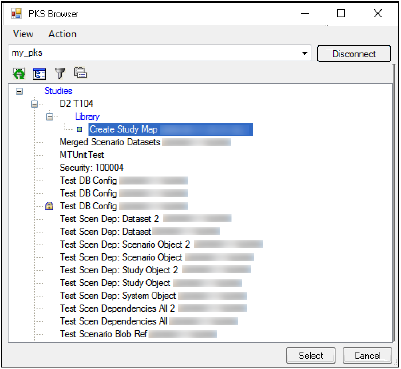
-
In the PKS Browser, click the (+) sign beside the study that contains the mappings and select the map file.
-
Click Select to load the map file.
The loaded mappings are applied and attached to the study.
The mappings are applied to the selected data source as closely as possible. Phoenix displays warning messages if there are any problems with the mappings. -
(Optional) Click through the study mapping tabs to make any changes.
-
Click OK to close the Study Mapping dialog.
-
In the Save As dialog, save the mapping file.
Detaching PKS objects from source
Objects loaded from PKS can be detached from their PKS source. Detaching an object from its source allows the objects to be edited without a link to a specific PKS source.
To detach a project, select the project in the Object Browser and then select PKS > Detach PKS Settings from Project.
OR
Right-click the project object in the Object Browser and select PKS > Detach Object.
The PKS source information is removed from all items in the project and are editable.
To detach an individual item within a project, right-click the item in the Object Browser and select PKS > Detach Object.
The PKS source information is removed from the selected item in the project and is editable.
