The Input Options tab allows users to add extra mapping contexts to the Main Mappings panel and convert fixed effect units.
-
Clear the Sort Input? checkbox in the Run Options tab to make the Reset? option available.
-
Check the Reset? checkbox if the main input dataset contains a reset column.
This option sets the state variables of differential equations to zero and restarts any sequence statements in the model. The low value and high value fields for the Reset option allow a range of values to be used to trigger a reset. The default is to reset when a value exactly equal to one is found in the Reset column. See “Simple versus complex time” for additional information. -
Check the MDV? checkbox if the main input dataset contains a missing dependent variable column.
-
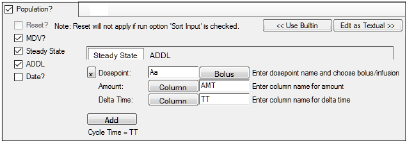
Check the Steady State checkbox if the main input dataset contains a steady state column.
Selecting Steady State displays the Steady State sub tab, which allows users to add new steady state treatment sequence items.
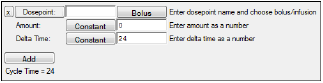
•The Dosepoint button indicates that the main dosepoint will be used on the given compartment. Click this button to use the second dosepoint (the button name changes to Dosepoint2), if one is available.
•In the Dosepoint field, type a name for the steady state dose point.
•Click Bolus multiple times to toggle between Bolus and Infusion as the input type.
•Click Constant (next to Amount) multiple times to toggle between Constant (the dose amount is a constant value) and Column (the dose amount comes from a column in the main input dataset).
•In the Amount field, enter the constant dose amount (when the button displays Constant) or the column name (when the button displays Column).
•Click Constant (next to Delta Time) multiple times to toggle between Constant (the time between doses is a constant value) and Column (the time between doses comes from a column in the main input dataset).
If Infusion is selected, an additional Rate option is added to the Steady State list.
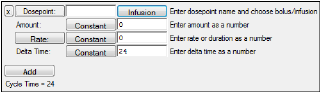
•The Amount should be set to 0 (for a steady-state infusion, non-zero values for the dose are not allowed).
•Click Rate multiple times to toggle between Rate and Duration as the input type.
•In the Rate field, enter the rate of the infusion (when the button displays Rate) or the duration of the infusion (when the button displays Duration).
•The Delta Time (for a steady-state infusion, non-zero values for the time between doses are not allowed).
•Click Add to add a new steady state treatment sequence item.
•Click the X button to remove a steady state treatment sequence item.
-
Check the ADDL checkbox if the main input dataset contains an additional identical doses column.
Selecting ADDL displays the ADDL sub tab, which allows users to add additional identical doses.

The options are the same as for the Steady State sub tab. Refer to the Steady State description for instructions on setting these options.
-
Check the Date? checkbox if the main input dataset contains a date column.
-
In the Date menu, select the date format used in the dataset.
Date columns in the dataset must be the Text data type. Phoenix automatically converts Dates to the Text data type on import.
Note:If Steady State or ADDL input is specified, and if the input column names are given, the column names are case-sensitive and must match the column names in the input dataset.
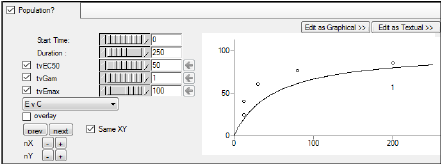
The Initial Estimates tab allows users to view plots of different variables in the main input dataset and view parameters in the model. Users can adjust initial estimates for the fixed effects to determine the best values.
-
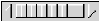
Use the pointer to move the Start Time and Duration sliders
 right or left to select which portion of the initial estimates time line to view, or type values into the fields beside the sliders. For example, if the total time line runs from 0–50, but you want to zoom in on 35–45. Set the start time to 35 and the duration to 10.
 -
Use the pointer to move the fixed effect slider
 right or left or adjust the initial estimates for each fixed effect, or type the values into the field beside the fixed effect slider.
Note:By default, the fixed effect sliders do not allow users to select negative values. Moving the slider to the left changes the initial estimates to smaller decimal values.
-
Clear the checkbox beside each fixed effect to allow the initial estimate to change to negative values.
-
If different initial estimates are selected in the Initial Estimates tab, click the Copy to initial estimates
 button to copy the initial estimate value to the Initial field for each parameter in the Fixed Effects tab.
If the initial estimates in the Fixed Effects tab match the initial estimates in the Initial Estimates tab, the Copy to initial estimates button is not available. -
In the plots menu
 , select the different variables, parameters, and covariates used to create the plots.
The plots available in the Initial Estimates tab change depending on the type of dataset used, the type of model selected, and any additional parameters and covariates that are selected. For example, in a one-compartment PK model with IV bolus dosing and no extra parameters or covariates, users can select plots of C vs time, V vs time, Ke vs time, V vs C, and Ke vs C. -
Check the log checkbox if the Y axis is logarithmic.
-
Check the overlay checkbox to create one plot that contains all profiles (will remove the previous, next, and trellis controls).
-
Click prev to view the previous plot.
-
Click next to view the next plot.
-
Check the Same XY checkbox to use the same tick mark values on the X and Y axes.
-
Click nX (+) to add a trellis row. This displays extra plots in the Initial Estimates tab.
-
Click nX (-) to remove a trellis row.
-
Click nY (+) to add a trellis column. This displays extra plots in the Initial Estimates tab.
-
Click nY (-) to remove a trellis column.
-
Increase the size of the Initial Estimates tab to expand the plot view.
Note:If the plotting window is not refreshed after making a change to the model structure or mappings, select a different tab and then go back to the Initial Estimates tab.
See “Parameters and parameter mappings” for more information on initial estimates setup.
