The data in emax.dat fits a sigmoid Emax model to dose and effect data from 100 subjects. There are five effect observations for each subject, at the same five dose levels. The model sets effect E equal to a function of the drug concentration C, with a model parameters describing the concentration at half-maximal effect EC50, maximum possible effect Emax, and parameter gamma.
Note:The completed project (Emax.phxproj) is available for reference in …\Examples\NLME.
Set up the Emax Phoenix Model object
-
Create a new project called Emax.
-
Import the dataset …\Examples\NLME\Supporting files\emax.dat and simhill4.5.dat.
-
Click
 to move from emax to the simhill4.5 dataset and click Finish in the File Import Wizard dialog.
 -
Right-click on Workflow in the Object Browser and select New > Phoenix Modeling > Phoenix Model.
-
Rename the Phoenix Model object Emax.
-
Use the mouse pointer to drag the emax worksheet from the Data folder to the Main Mappings panel.
-
In the Structure tab, select Emax in the Type menu.
-
Check the Sigmoid checkbox to specify the model is a sigmoidal emax model.
-
Select the option buttons in the Main Mappings panel to map the data types as follows:
subject to the ID context.
dose to the C context.
e to the EObs context. -
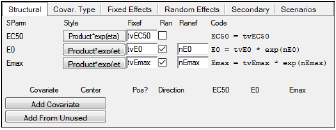
Select the Parameters > Fixed Effects sub-tab.
-
In the Initial field for tvEC50, enter 50 as the initial estimate value.
-
Leave the initial estimate for tvGam set to 1.
-
In the Initial field for tvEmax, enter 100 as the initial estimate value.
-
Select the Initial Estimates tab to find the best initial estimates.
-
Adjust the portion of the plot to view by setting the Duration to 250 either using the slider
 or typing the value in the field next to the slider.
 -
Click
 to execute the object.

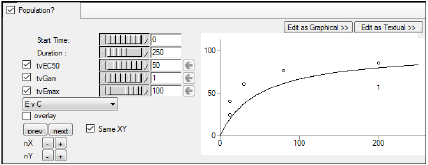
Enter different values for fixed effect parameters, and see the results on the XY plot. To select a negative value with the slider, clear the checkbox beside the parameter name. For more information on using the Initial Estimates, see the “Initial Estimates tab” description.
Set up an Emax Baseline project
-
Insert a second Phoenix Model object into the workflow and name it Emax Baseline.
-
In the Structure tab, select Emax in the Type menu.
-
Check the Baseline checkbox.
-
Select the Parameters > Structural sub-tab.
-
Clear the Ran checkbox beside EC50 to remove the random effect from the parameter.
-
Select the Fixed Effects sub-tab.
-
In the Initial field for tvEC50, enter 15 as the initial estimate value.
-
Leave the Initial field for tvE0 set to 1 as the initial estimate value.
-
In the Initial field for tvEmax, enter 150 as the initial estimate value.
-
Use the mouse pointer to drag the simhill4.5 worksheet from the Data folder to the Main Mappings panel.
-
Select the option buttons in the Main Mappings panel to map the data types to the following contexts:
ID to the ID context.
CONC to the C context.
DV to the EObs context. -
Click
 to execute the object.
Set up an Emax Baseline project including standard deviations
-
Right-click Emax Baseline and select Copy.
-
Right-click the Workflow object and select Paste.
-
Rename the project as Emax Baseline Stdev.
The data types are automatically mapped as follows:
ID to the ID context
CONC to the C context
DV to the EObs context -
In the Structure tab, type 50 in the Stdev field.
-
Select the Parameters > Structural sub-tab.
-
Check the Ran checkbox for EC50.
-
Clear the Ran checkbox for E0.
-
Select the Fixed Effects sub-tab.
-
Click
 beside tvEC50 to copy the new estimate to the Initial estimate field for tvEC50.
 -
Check the checkbox beside tvE0 to freeze the fixed effect for the parameter.
-
Click
 beside tvEmax to copy the new estimate to the Initial estimate field for tvEmax.
 -
Select the Random Effects sub-tab.
-
Click the Copy omega estimate
 buttons beside nEmax and nEC50 to copy the omega estimates to the initial estimate field for each parameter.
 -
Click
 to execute the object.

Save and close the project
-
Select File > Save Project.
-
Click Save.
-
Select File > Close Project.
The project is saved and closed and Phoenix can be safely closed.
This concludes the Emax model variations example.
