Note: This content is specific for PK Submit 1.0. For information specific to version 1.1, see the PK Submit 1.1 User's Guide PDF file.
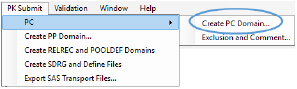
Select PK Submit > PC > Create PC Domain from the main menu.
This wizard allows you to import various input data files (concentration and dosing), perform data exclusions and add comments to data records, as well as configure an NCA.
The PC domain is created from a Master PC worksheet which is created and modified throughout the steps in this wizard. This worksheet contains concentration data from bioanalytical data sets, all PC domain variables, and additional variables needed for the NCA. At the end of this process, PK Submit will use this worksheet to create other worksheets/files in the Data folder:
Creating the PC Domain using the wizard involves the following tasks:
•Select the concentration data files
•Validation of PC domain creation
Select the concentration data files
-
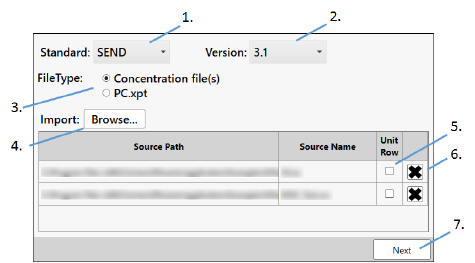
In the first page of the wizard, specify the CDISC standard output type from the STANDARD pull-down menu.
-
Choose the CDISC version from the Version pull-down menu.
-
Select the radio button to indicate whether the PC data source is Concentration file(s) or a PC.xpt file.
-
Click Browse and select an Excel or .csv file, external to Phoenix, containing the PC data to import, or if a Phoenix project is open and contains Data worksheets, click From Data Folder to select one of the worksheets in the Phoenix Data folder.
-
Select a source data file and check the Unit Row box to indicate that the selected file contains a row for the units (available for concentration files).
-
To remove a file from the list, select the file and click the corresponding X button in the Remove column (available for concentration files only).
-
Click Next.
Note:When importing from the external system, you must have write permission to the directory where the files being imported are located or an error will be displayed.
The bottom portion of the dialog lists details about the data sources already selected for import.
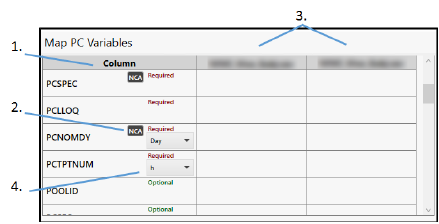
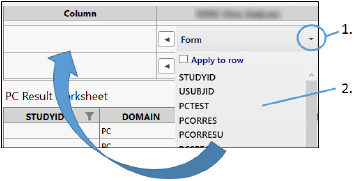
The next page of the wizard provides the ability to map source data columns to PC domain variables and other columns useful for the NCA for each source file selected in the previous page of the wizard. Previously stored mappings are automatically populated from the SQLite database associated with each user profile.
The PC Result worksheet panel at the bottom of the page presents the contents of the Master PC worksheet based on the source data columns and the specified mappings. Unmapped data source columns are not displayed in this worksheet. It does list all required and expected SEND/SDTM columns (whether mapped or not). Columns that are optional will be displayed if they are mapped. Additional information on this worksheet can be found in “Sort the PC result worksheet” and “Filter the PC result worksheet”.
-
The first column in the top table lists the Standard PC domain variable names that can be mapped plus other essential variables. The variable names depend on whether SEND or SDTM was specified on the first page of the wizard.
-
An NCA button in a source data column cell indicates this variable is or can be designated as an NCA Sort variable.
-
The remaining columns in the Map PC Variables table list the source data column name for each data source selected in the previous page of the wizard, one column per selected data source. If the source data file does not have the mapping for the PC domain variable, the cell is empty. If the empty cell is a required field, it will be highlighted in red.
-
For variable or data source columns that have units, use the dropdown menu to select the unit.
 is a selected Sort variable, whereas
  is an unselected, but potential, Sort variable. Click the button to toggle between selected and unselected.
If clicking  does not change it to
  , it means the Sort variable is required and cannot be unselected (e.g., USUBJID, PCTEST, PCSPEC). Sometimes there are multiple variables that can be Sort variables, but they are mutually exclusive (e.g., VISITDY or PCDY can be used, but not both). In such cases, when one variable is selected as the Sort variable, the NCA button for the other variables changes to
  .
.
See also:
•Manually map variable to data column
•Manually map data column to variable
•Add data column as a variable
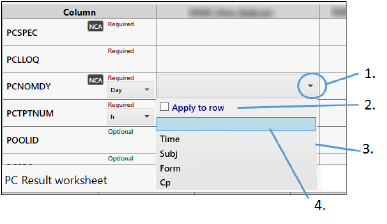
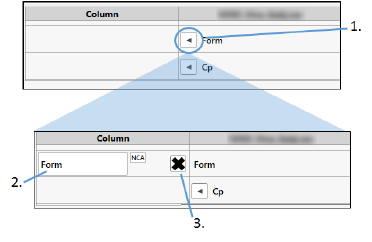
Manually map variable to data column
-
Click on the cell to be mapped.
-
In the menu, if you check the Apply to row box, the mapping that is specified in the next step will apply to all input files if they have the same column name. Checking this box must be done prior to making a mapping selection.
-
Select a source data column from the list.
-
To unmap a source data column, click on the cell and select the blank area from the list, just below the Apply to row box.
Note:PK Submit stores all manual mappings in the SQLite database. These mappings are applied automatically when using PK Submit in subsequent sessions. SQLite database mappings are stored for each user profile.
Manually map data column to variable
Any source data columns that are not mapped to a variable are listed at the bottom of the mapping table. (They are not included in the PC Result Worksheet table at the bottom of the page, however.)
-
Scroll to the bottom of the mapping table and click the cell for the unmapped data column.
-
Select the variable to be mapped from the list.
The source data column cell will move to the row for the selected variable.
Note:If the study data has the urine volume and unit, you must map the urine volume to the column URINE_VOLUME and the urine volume unit to URINE_VOLUME_UNIT and PCEVLINT.
-
Click
 next to the unmapped source data column name at the bottom of the first table to create a new PC domain variable.
 -
Enter a new name if desired.
-
Use the X button to delete the variable and return the source data column to an unmapped state.
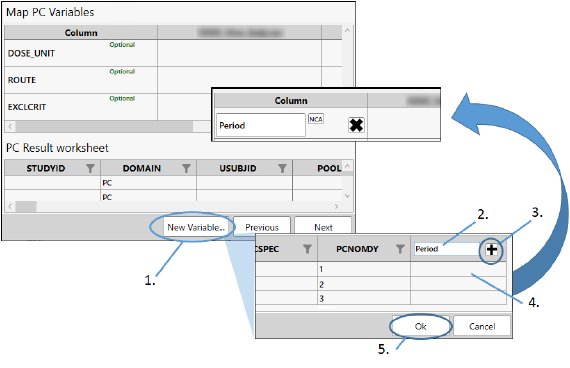
Typically, new variables are created only when needed NCA sort variables are not part of the PC domain and are not present in the source data. Using the New Variable button, new columns can be added and the associated data entered for each profile. The information is added to the PC Result worksheet.
-
Click the New Variable button at the bottom of the page.
-
In the Add Additional PC Variables dialog, enter the name of the new variable in the last column’s header field.
-
Click
 next to the field. (The icon turns to an X and can be used to remove the newly added variable.)
 -
Add the data for the variable to the cells in the column.
-
Click OK to add the variable to the mapping page.
The variable will be added as a new row and placed alphabetically in the list. It can be set as an NCA Sort variable using the  button. Use the X icon to remove it from the variable list.
Note:Variables added in this way are not saved to the SQLite database. They are study-specific.
There is an issue for Windows 10, non-English Virtual Machines where add a new variable generates a Phoenix exception. There is no known work-around at this time.
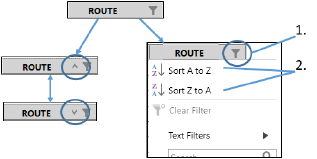
Sorting the columns in the results worksheet can be accomplished by simply clicking on the column header cell. Clicking the header multiple times will toggle between ascending and descending order.
Alternatively:
-
Click
 in the header.
 -
In the popup, select Sort A to Z or Sort Z to A.
If a column is sorted, an indicator appears in the header.
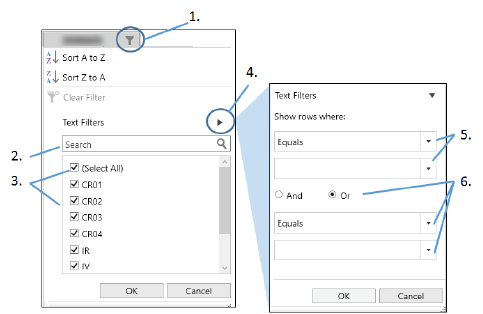
Filter the PC result worksheet
-
In the header of the column to be filtered, click
 .
.
The popup lists all values found in that column. -
To search for values, begin typing the text in the Search field and the list in the popup will automatically be filtered as you type.
-
Use the check boxes in the list to control which rows are shown (checked boxes) or hidden (unchecked boxes) in the result worksheet. Use the (Select All) check box to check or uncheck all items in the list at the same time.
-
To define a filter criteria, click
 next to Text Filters.
 -
Use the dropdown menus to set the operators and value to set the criteria.
-
To include a second criteria, select the And or Or radio button and use the second set of dropdown menus to define the second criteria.
Click Next in the Map PC Variables page to move to the Import Dosing page.
PK Submit checks to make sure all of the required mapping is complete. If there are any issues, the mapping table will be highlighted with a red border. You cannot proceed until all of the mapping is completed correctly.
PK Submit will also check that the USUBJID values contain the STUDYID. If not, the system will ask to concatenate the STUDYID to the USUBJID as per CDISC standards.
-
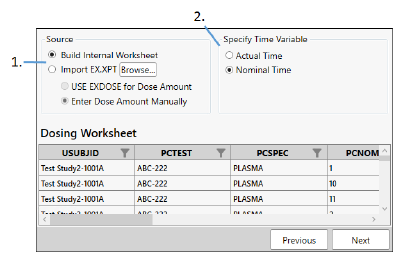
Select the radio button for the method of entering obtaining data for the Dosing worksheet.
-
For the Time Variable, select Actual Time to use the EXSTDTC and PCDTC columns to find the most recent dosing record for each sample record. Select Nominal Time to use the DoseTime or EXSTDTC and PCTPTNUM columns to find the most recent dosing record for each sample record.
-
When applicable, enter the Dose Date Time, Infusion Duration, and TAU values manually into the Dosing worksheet.
•Build Internal Worksheet: Populate the Dose Amount, Route, and Dose Unit columns using the data mapped into the DOSE_AMOUNT, Route, and DOSE_UNIT variables in the Master PC worksheet
•Import EX.XPT: Populate the Route, Dose Date Time, Dose Amount, and Dose Unit columns with the data from the EX.XPT file, if the data from the file match the profile in the Dosing worksheet.
Select Use EXDOSE for Dose Amount to populate Dose Amount and Dose Unit columns using EX.EXDOSE and EX.EXDOSEU data in the file.
Use the Enter Dose Amount Manually radio button to populate the Dose Amount and Dose Unit columns using data mapped into the DOSE_AMOUNT and DOSE_UNIT variables in the Master PC worksheet. A popup will display the number of Dose records imported.
Click Next to move to the Data Exclusion and Comments page.
A popup will warn if the PCRFTDTC column is not populated. If all Dose_Date_Time (PCRFTDTC) are not populated, the popup will display the number of Dose_Date_Time rows not populated/populated.
-
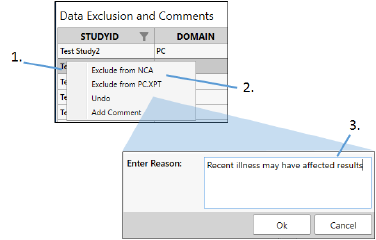
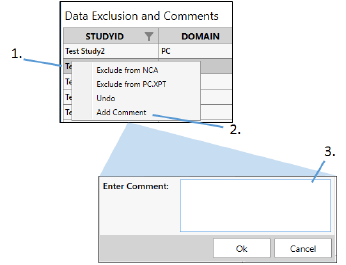
To exclude a data record(s), select the corresponding row(s) in the first table on the page.
-
Right-click a selected row and select Exclude from NCA or Exclude from PC.XPT from the menu.
-
In the popup dialog, enter the reason for exclusion and click OK.
For Exclude from PC.XPT, if there are any comments in the CO domain for the selected records, they will need to be removed before the exclusion can be performed.
Note:Use the filter icons beside each column name to aid in the selection of records for manual exclusion.
Filter criteria can also be used to identify the records to exclude.
-
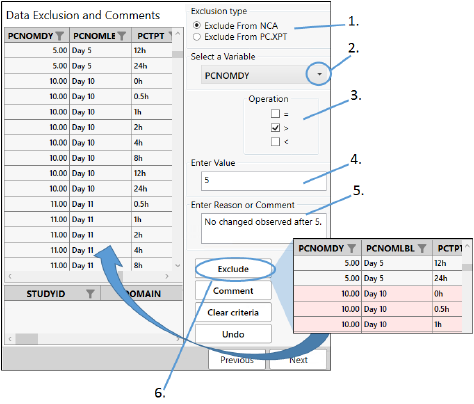
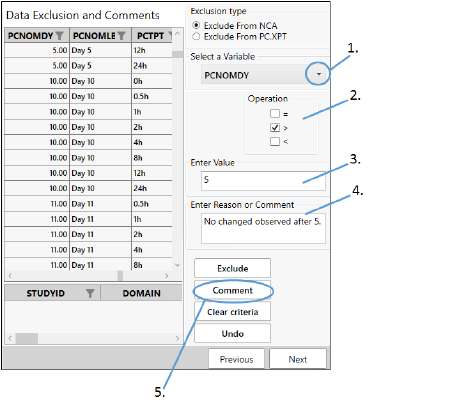
Select where the exclusions are to be applied: Exclude from NCA or Exclude from PC.XPT.
-
Select the variable on which to base the exclusions.
-
Check the box(es) for the operator(s) to use in the criteria. Use combinations of two operators, if needed (e.g., check < and = to indicate the value is “less than or equal to”).
-
Type the value in the Enter Value field.
-
Enter a reason for the exclusion.
-
Click Exclude.
The rows that match the criteria will be shaded pink.
For Exclude from PC.XPT, if there are any comments in the CO domain for the selected records, they will need to be removed before the exclusion can be performed.
To remove all the applied exclusions, click the Undo button.
To remove a specific exclusion, right-click the row and select Undo.
Click Clear Criteria to clear the fields and settings made on the page (any rows marked for exclusion will remain shaded).
For SEND 3.x, the reason is stored in the Master PC worksheet column PCREASEX, and PCEXCLFL=”Y” when the record is excluded from NCA or ExcludeFromPCDomain=”Y” when excluding from PC.XPT. In addition, EXCLCRIT=”Exclusion criteria” when filter criteria are used.
For SDTM 3.2, in the Master PC worksheet, ExcludeFromNCA=”Y” when the record is excluded from NCA or ExcludeFromPCDomain=”Y” when excluding from PC.XPT. In addition, EXCLCRIT=”Exclusion criteria” when filter criteria are used. The reason is not recorded. However, a record is created in the CO domain for NCA exclusions.
When Exclude from NCA is specified, the data records (where the column PCEXCLFL is set to “Y”) will be excluded from NCA_PLASMA_Worksheet or NCA_URINE_Worksheet; but will still be presented in the PC.XPT.
When Exclude from PC.XPT is specified, the data records that are marked as excluded from PC.XPT will be removed when the file PC.XPT is created. The records that are excluded from the PC domain will be included in the NCA_PLASMA_Worksheet and NCA_URINE_Worksheet
-
To add a comment to a data record(s), select the corresponding row(s) in the first table on the page.
-
Right-click a selected row and select Add Comment from the menu.
-
In the popup dialog, enter the comment and click OK.
The column COVAL in the CO domain stores the comment. If the comment is more than 200 characters, additional COVAL columns will be added and sequentially numbered (e.g., COVAL1, COVAL2).
Filter criteria can also be used to identify the records on which to comment.
-
Select the variable on which to base the criteria.
-
Check the box(es) for the operator(s) to use in the criteria. Use combinations of two operators, if needed (e.g., check < and = to indicate the value is “less than or equal to.”
-
Type the value in the Enter Value field.
-
In the Enter Reason or Comment field, type the comment.
-
Click Comment.
The column COVAL in the CO domain stores the comment.
To remove all the applied comments, click the Undo button.
To remove a specific comment, right-click the row and select Undo.
Click Clear Criteria to clear the fields and settings made on the page.
Click Next to move to the NCA Configuration page.
-
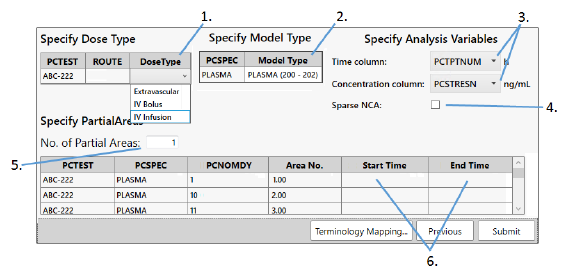
Click in the DoseType cell and select one of the dose type from the menu (Extravascular, IV Bolus, IV Infusion) for each unique combination of analyte and route
-
Click in the Model Type cell and select the type from the menu (PLASMA (200-202) or URINE (210-212)) for each biological matrix.
-
From the Time column and Concentration column menus, select the variable to use.
-
For the SEND standard, check the Sparse NCA box to indicate that this is a sparse study when appropriate.
Note that the Sparse NCA box appears only if the SEND standard is selected. -
Enter how many partial areas to use in the No. of Partial Areas field.
-
Enter the Start Time and End Time for each partial area (row) in the table.
-
When finished with the domain specifications, click the Submit button.
The Terminology Mapping button can be used to set the mapping of the matrix to the CDISC code list. (See “Terminology mapping” for more details.)
Validation of PC domain creation
Once Submit is clicked in the wizard, PK Submit will perform the following checks:
STUDYID is unique for the PC domain.
The following variables are “Y” or “null”: PCFAST, PCSPCUFL, PCBLFL, and PCEXCLFL.
PCTEST is less than 40 characters.
The combinations of PCTEST and PCTESTCD are unique. Every PCTEST value should only have one PCTESTCD.
The contents of PCORRESU and PCSTRESU are defined in the PKUNIT code list.
When PCBLFL=Y, PCSTRESC and PCSTRESU are populated.
PCTPTNUM and PCTPT are the same.
PCTPTNUM and PCELTM are the same.
PCRFTDTC, PCDTC and PCENDTC are in a valid format.
When PCENDTC is populated, PCENDY is populated as well.
When PCRFTDTC is populated, PCTPTREF is populated as well.
Proper order of columns and the type for each variable.
The following variables are populated: STUDYID, DOMAIN, USUBJID, PCSEQ, PCTESTCD, PCTEST, PCORRES, PCORRESU, PCSTRESC, PCSTRESN, PCSTRESU, PCNAM (SDTM only), PCSPEC, PCBLFL (SEND only), PCLLOQ, VISITNUM (SDTM only), PCDTC, PCNOMDY (SEND only), PCRFTDTC (SEND only).
Variables conform with their controlled terms in the code list.
A failure results in a displayed warning message and/or a message written to the Validation Report in the created Phoenix project Documents folder.
When the PC domain is created, the following NCA worksheets are added to the Data folder in a new Phoenix project.
NCA_PLASMA_Worksheet: Excludes all samples when the PCEXCLFL=”Y” and all records where the matrix (PCSPEC) belongs to the model type: URINE (210 –212).
NCA_URINE_Worksheet: Excludes all samples when the PCEXCLFL=”Y” and all records where the matrix (PCSPEC) belongs to the model type: PLASMA (200 –202). The StartTime column is added and populated using the formula: StartTime = PCTPT – PCEVLINT.
NCA_Dosing_Worksheet
An NCA object for plasma and/or for urine are added to the workflow.
The wizard also places the CDISC_OUTPUT_TYPE (contains the output type and version specified on the first page of the wizard), MasterPCWorksheet, NCA_SORT_KEYS (list of sorting columns in the PC domain and corresponding column names in the dosing data), PC (actual PC domain), and CO (CO domain) files in the Data folder.
The PK Submit > Exclusion and Comment menu item opens the PC creation wizard to the Data Exclusion and Comments page where you can re-visit the study previously imported, specify data to exclude, add comments, and modify NCA parameter settings (refer to “Exclude data” and the sections that follow it). The PC domain is updated with the modified information when the Submit button is clicked.
