PUBLISH and the GlobalSubmit Quality Suite
PUBLISH works in conjunction with the rest of the GlobalSubmit eCTD Suite as follows:
• eCTD technical validation is performed by GlobalSubmit VALIDATE. Validation can be initiated from PUBLISH, which causes a validation request to be issued to VALIDATE.
• Users who are not publishers will use GlobalSubmit REVIEW for eCTD review, which shares the same platform as PUBLISH.
Publishing in different views
Live Validation
An application/submission can be modified in 3 views; Origin, Lifecycle, and Current.
• Lifecycle and Current views are referred to as modular views.
This is because these views display the eCTD application’s modules only.
These views are helpful when looking at the application in its entirety and for lifecycling documents throughout the applications.
• Origin view is a sequential view.
Origin view is most frequently used when compiling submission specific documents.
The initial view is broken down by sequence initially and subsequently by module.
Another large difference between the Origin view and the Lifecycle and Current views is the availability of the Live Validation features, which is only available in the Origin view. Live Validation shows a color co-ordination of the submission to show any validation errors per ICH and regional guidance. This is discussed further in the next section of this user guide.
See “Editing a Sequence” for additional details on sequence building and modification.
Live validation is an automatic process within PUBLISH that makes publishers aware of any validation errors that will arise if they were to submit the application at that moment. This feature helps publishers save time by notifying of technical errors during the compilation, instead of seeing validation results in bulk after the submission has been compiled.
Note: Live Validation through the Errors Grid and color coding in the Navigation pane is available only in Origin View with CROSSCHECK enabled.
Through the Errors tab in the Preview Pane and color coding nodes in the Navigation pane, publishers can see that:
• An error exists and where it is located
• What the error is
• The corrective action needed to fix the error
The Errors tab includes the same information and columns available in VALIDATE Reports.
Depending on the severity, some errors will need to be fixed prior to submitting to the health authority.
Note: PUBLISH does not prevent the generation of the .xml backbone, even if there are technical errors.
Additional information is available in the following sections:
Leaf Colors
Additional Information on the Errors Tab
Sections in the Origin view will be color-coded based on the error severity levels selected from the Errors tab, per the region’s guidance. There are 8 different severity levels: by selecting a different severity level, the leaves will change colors depending on the severity level of the errors.
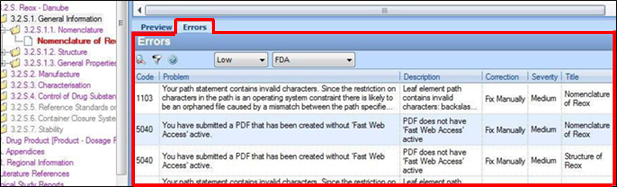
For example, if Low is selected, all errors that are considered low and higher (low, medium, and high) are listed in the Errors grid and more leaves will show as errors. By selecting Medium, the low level errors will not appear in the Errors grid, or have a red or purple leaf title, but Medium and High errors will. When High is selected, only the highest level errors will show as red or purple.
The following colors will appear in Origin view:
• Purple signifies that there is a technical error contained within a subsection of the node you have selected.
• Red signifies that the node in this color contains an error, or errors.
• Black signifies there is a file contained within the section or a subsection and that there are no technical errors.
• Grey signifies that no documents have been added to the section or its subsections.
Note: Only black and grey text will appear in other views, to distinguish if documents exist in a section.
Additional Information on the Errors Tab
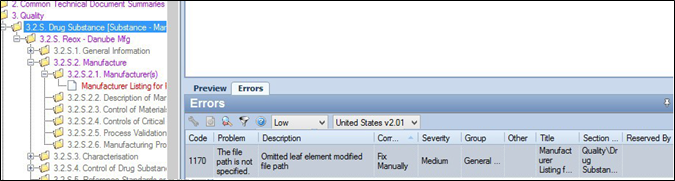
The Errors tab shows all the errors that correspond to that node and any subsections. In the screenshot below, you can see that the purple trail leads to the 3.2.S.2.1 section where the Manufacturer Listing for the Reox document contains the 1170 error.
In the Errors tab:
• Columns can be sorted by clicking on any of the column headings.
• You can right-click a row on the Error tab to access the following options in the context menu:
Locate opens the navigation tree to the source of the error.
This is particularly helpful when selecting an entire submission or study.
The Locate feature is also available from the Action menu.
Auto-fix auto-corrects certain errors where the fix is always the same.
This option will be automatically enabled for any error which may be corrected and disabled for those that cannot be auto-fixed.
Clear XML Errors clears any errors that are related to XML and will not be present after a Publish action.
Minimum Severity sets the minimum severity level (high, medium, low) to display in the tab, which, in turn, sets the lowest level of severity shown the application, including the color changes in Origin view as mentioned in the “Leaf Colors” section.
Columns available on the Errors tab include:
• Code: The four digit error code identifying the specific error.
• Problem: The error condition encountered to trigger the error.
• Description: A more detailed description of the problem.
• Correction: The action to be performed in order to clear the error. (Custom messages may be defined on VALIDATE Options page.)
• Severity: Severity level for the error from the Default profile. (Default profile can be configured on the VALIDATE Options page)
• Group: Grouping that the error belongs to
• Other: Miscellaneous information regarding the error; may consist of leafs IDs, file names, or related sequences.