When a table is selected from the diagnostics list, it is loaded into the PREVIEW tab on the right.
Below the preview area, there is a STYLE tab containing tools for customizing the appearance of the table. The customization options available are dependent on the type of plot.

Making any changes in this section automatically updates the table preview.
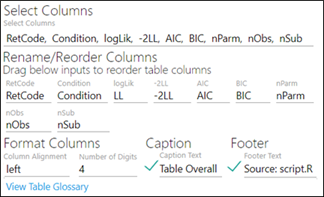
Choose the columns to include in the table by editing the Select Columns list.
The ordering of the columns can be changed by dragging and dropping the input column names in the Rename/Reorder Columns section.
Edit the column header by modifying the label shown below the input column name.

Select the alignment of column labels and cell content from the Column Alignment menu.
Enter the Number of Digits to display in table cells.
Check the Caption box to include a title for the table in the output and enter the text in the field. Uncheck the box to not include a title.
Check the Footer box to include a table footer in the output and enter the text in the field. Uncheck the box to not include a footer.
Click the View Table Glossary link to view a popup dialog with definitions for the various columns.