Installing Phoenix and License Authentication
The Phoenix installer is used to install Phoenix WinNonlin, Phoenix NLME, IVIVC Toolkit, and PK Submit.
Note that the order of steps performed prior to and after running the installer is very important if you have previously installed versions of Phoenix or Phoenix plugins.
Prepare for a clean install
Do you have any Phoenix plugins that were installed separately from Phoenix?
Yes: Folders for Phoenix Integral Plugin, PK Assist, and PK Submit (version 2.1 and earlier) must be manually uninstalled prior to uninstalling existing Phoenix versions. On Windows, use Windows > Settings > Apps to uninstall the plugins.
No: Continue with the next question.
Do you have Phoenix 8.0 or earlier installed?
Yes: Only one version of Phoenix should be installed. Since the Phoenix installer only checks for and uninstalls versions 8.1 or later, earlier versions must be manually uninstalled. On Windows, use Windows > Settings > Apps to uninstall Phoenix versions 8.0 or earlier.
No: Skip the next question.
Are there folders/files in C:\Program Files (x86)\Certara?
Yes: Once plugins and Phoenix 8.0 or earlier have been uninstalled, any folders or files in the Certara folder (except Trial Simulator, if present) must be removed.
No: Continue with the next step.
Run the installer
Download and extract the ZIP file that contains the installation files.
Right-click \phoenix\release\installer\Setup.exe in the extracted folder and select Run as Administrator. Login as an administrator.
If a "Windows protected your PC" message displays, close the message window. Right-click the Setup.exe file, select Properties, check the Unblock box, and press Apply, then OK. Start the installer.
If the installer detects a Phoenix 8.1 or later installation, select OK to uninstall Phoenix. Follow the prompts and restart the installer.
If the installer detects the absence or inappropriate version of .NET framework, Legacy WNL components, and/or Microsoft Visual C++ components a message states the necessary items will be installed. A forced reboot must be done prior to installing Phoenix. After which the Phoenix installation can be continued by restarting the installer.
When the Phoenix Setup wizard Welcome screen displays, click Next.
Select a setup type and press Next.
Typical: (Default) Installs only the Phoenix application and GCC (Minimalist GNU for Windows GCC Compiler).
Complete: Installs the Phoenix application, GCC, components for remote execution (JPS, JQS, and JMS), and MPI (for parallel computing for Phoenix NLME).
Custom: Allows you to select the items to install. 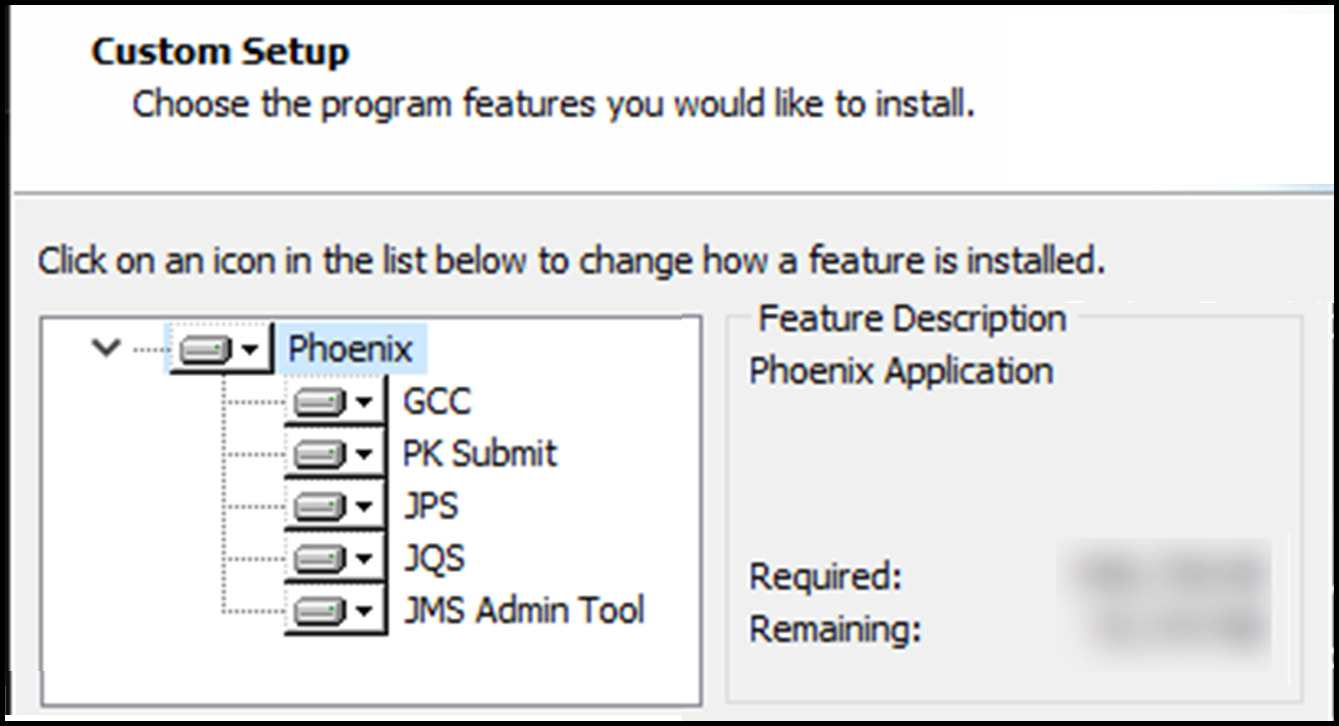
Note that the GCC component is always installed to C:\PHSTMinGW64 whether the default or an alternate location is specified.
Specify a destination folder and press Next.
In the Ready to Install screen, use the Back button to modify previous screens or press Next to continue the installation process.
In the Completed the Installation of Phoenix screen, press Finish to close the installer.
Reinstall plugins
Reinstall the plugins that were uninstalled.
PK Submit is installed by the Phoenix 8.6 installer, do not reinstall with the separate installer from a previous PK Submit release.
For PK Assist customers using Integral, the Phoenix Integral Plugin must be reinstalled before PK Assist is reinstalled.
If you encounter any difficulties with these steps, please contact Certara Support.
Open Phoenix and select Login in the License Unavailable message window.
In the browser window, enter your Certara credentials (or use SSO, if available) to authenticate your Phoenix license.

If your account has not been set up by your organization’s administrator, you will be redirected to Certara Admin’s registration page. Login can proceed but you will not have product access without the administrator’s assistance.
When the login success page is displayed in the browser, close the browser tab.

If you have not been granted product access, you will see an Access Denied message and should contact the organization’s administrator to request access.
Return to Phoenix and select Restart Phoenix.
Whenever Phoenix detects a change in product access, a restart is required to apply the changes.
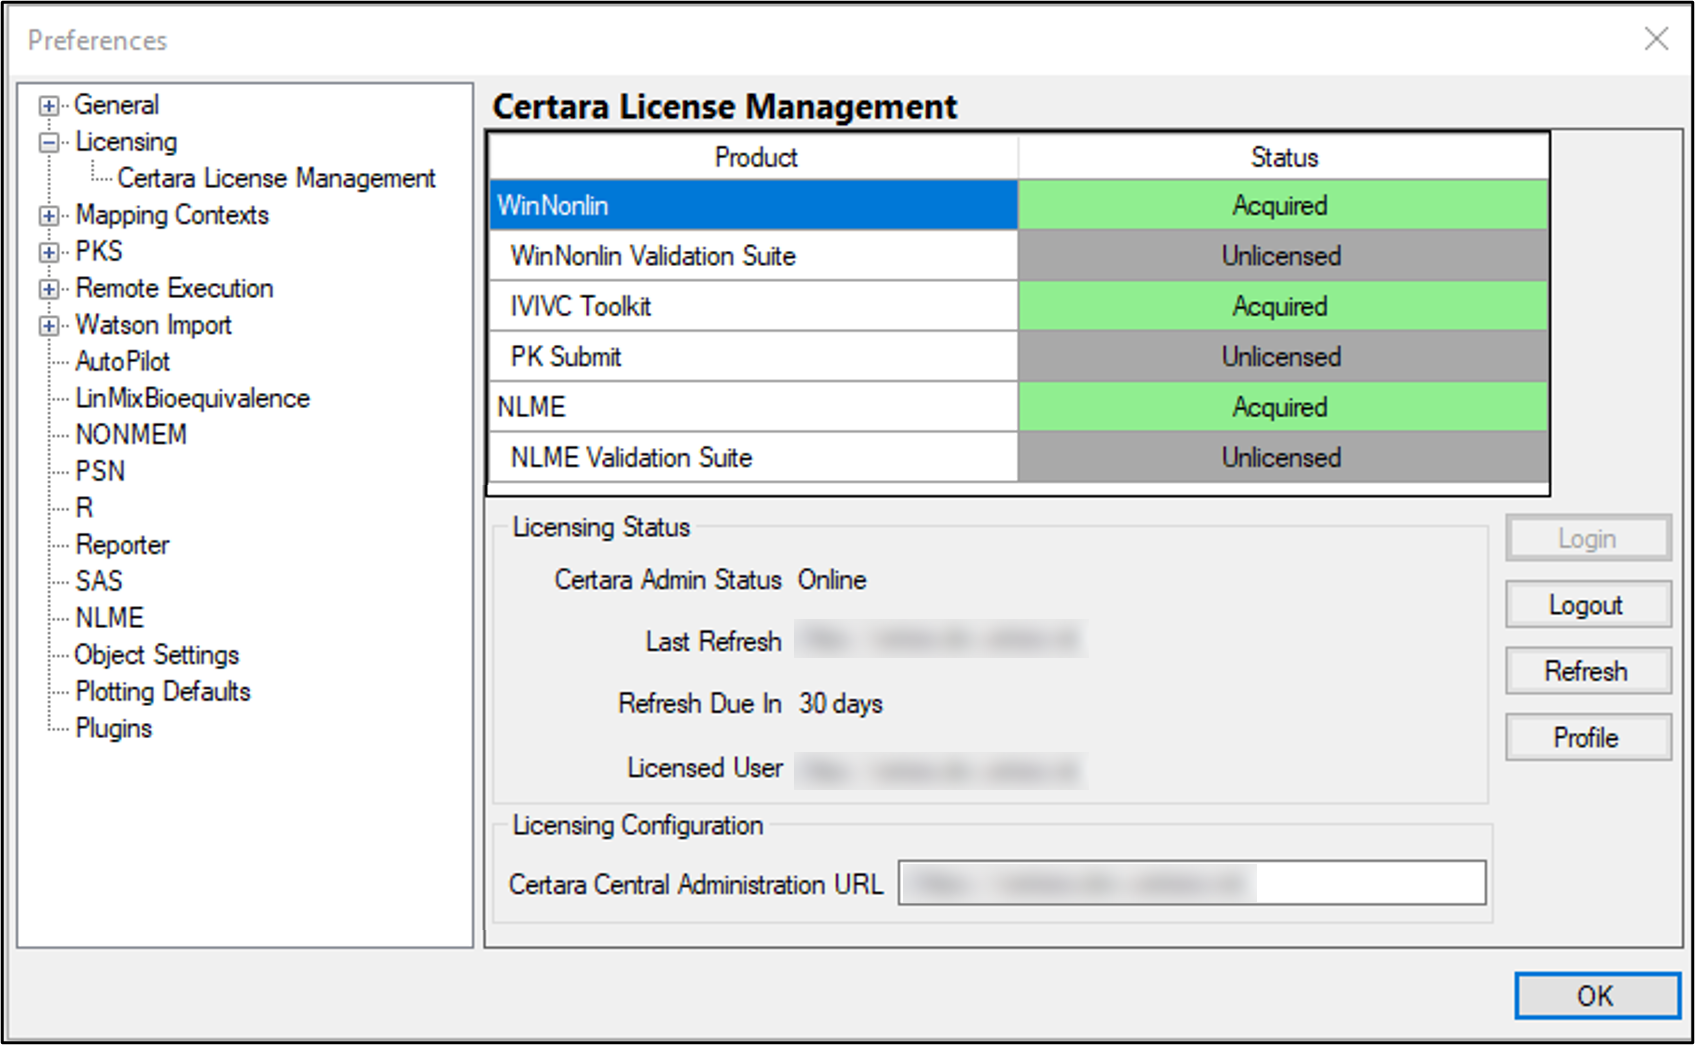
After a restart, you can select Edit > Preferences > Licensing > Certara License Management to view the products that have been unlocked, the time of the last connection to Certara Admin, the remaining time allowed for offline use.
Note: In organizations with restricted internet access, be sure to whitelist the organization’s URL since regular access is needed for refreshing the license.
In addition, the login, logout, refresh, and profile access can be managed from this screen.
Note: When you provide personal data, Certara, Inc.’s Privacy Notice (available at https://www.certara.com/legal/privacy-notice/) states that the information will be used for the purposes of administering or using Certara’s offerings and managing Certara’s relationship with you in any manner, e.g., setting up an account or collecting the personal data to process an invoice for accounting purposes.
To allow Phoenix to correctly process projects created in English locales, standards and formats must be set to US English. Using the Control Panel, navigate to the Region and Language settings. Select English (United States) as the format, then click Additional Settings and set the decimal symbol for numbers and currency to be a period (.) and, finally, set the list separator to be a comma (,).