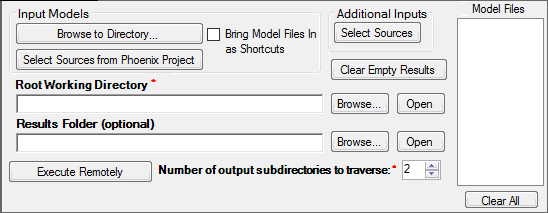
The Options tab for the PsN Shell object is distinct in its functionality, relative to the other third-party tool objects. The PsN Shell object also has several additional tabs related to specific commands that can be submitted to the PsN program.

Use one of the following methods to access the model files
To load model files from the file system, press Browse to Directory to select the folder containing the model file(s). The path to the model file cannot have spaces.
Files with an extension of .ctl and .mod are recognized as model files. All models are brought into the Code folder of the Phoenix project and mapped to the PsN shell.
To create shortcuts to the model files in the file system instead of loading them into Phoenix, check the Bring Model files In as Shortcuts box. (Turn off the checkbox to import the full model file as mentioned above.)
If model files are already available in the project’s Code folder, click Select Sources from Phoenix Project to select the desired model file.
The $DATA record for each model is parsed for the dataset name. The input specified for each unique dataset is published in the object. The names of the model files are added to the Model Files list on the rights side of the Options tab.
After the model file is parsed, the Setup tab will show a list of items that need to be mapped. Once the model files and dataset are specified and mapped, you can start building the command lines.
To clear all of the entries in the Setup tab and remove all mappings, commands, and models, press Clear All below the list of model files .
To include other files along with the mapped input, press Select Sources (under the Additional Inputs heading).
As an example, to use a different PsN configuration file than the default:
a. Import the configuration file to use into the project (it will be placed in the Code folder).
b. Edit the commands so the -config_file option points to the name of the imported configuration file.
c. Use the Select Source button in the Options tab to add the configuration file to the list in the Setup tab.
When the object is executed, the new configuration file will get copied to the working directory and the command that references that file will execute using that specified configuration file.
3. Press Clear Empty Results to remove any results published by the object that are empty.
4. Enter the path to the Root Working Directory or use Browse to select the directory.
Press Open to display the contents of the directory in a separate window.
5. Enter the path to the Results Folder or use Browse to select the folder.
Note: Setting the working directory and/or output folder in the Preferences dialog eliminates the need to enter the information in the Options tab for each run. The fields will automatically be filled with the paths entered as preferences.
6. In the Number of output subdirectories to traverse field, enter the level of output subdirectories from which to retrieve results.
The higher the number, the deeper into the output directories Phoenix will go to retrieve output.
7. To start the development environment, press Start in the Development Environment section of the Options tab.
The development environment as configured in the Preferences dialog is started.
8. When script work is completed, press Reload Script to bring the modified script into Phoenix for use in the next execution of the object.