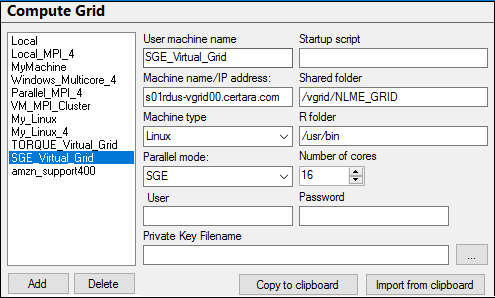
The Compute Grid page is for adding, modifying, or deleting the setup for a grid. The list of grids on the left of the page is the list presented in the Execute on menu in the Run Options tab for an NLME object.
In the Preferences dialog, expand Remote Execution and select Compute Grid.

Set up a new grid
1. Press Add.
2. Enter the following information for the new grid:
User machine name: Name to appear in the selection box on the Run Options tab of Phoenix models.
Startup script: Script to execute on the remote host to setup the run environment.
Machine name/IP address: Actual machine name or its IP address.
Shared folder: Location where the application can write results/temporary files on the remote machine.
Machine type: Choose from Windows or Linux.
R folder: Path to R on the remote machine.
Parallel mode: Options available depend on the selected machine type.
For Windows, choose from None, MultiCore, MPI, LSF.
For Linux, choose from None, MultiCore, MPI, TORQUE, SGE, SGE_MPI, TORQUE_MPI, LSF, LSF_MPI, SLURM, SLURM_MPI.
Number of cores: Number of computational cores available on this grid.
User: Username for logging into the host. This is required to use the grid, unless using a private key file.
Password: Password for logging into the host. This is required to use the grid unless using a private key file.
Private Key Filename: As an alternative to entering a username and password, enter the name of the private key file to use for ssh private keyfile authentication or use the ellipsis button to display a file browser for selecting the file. See the “Setting up an ssh private key file” section.
Modify grid settings
1. Select the grid from the list.
2. Adjust the settings in the page as needed.
3. Press the Enter key.
Changes are automatically updated in the your custom PhoenixParallelExecutionSettings.txt file.
Delete a grid platform
1. Select the grid from the list.
2. Press Delete.
The grid is automatically removed from the your custom PhoenixParallelExecutionSettings.txt file.