Once a database connection string is established (see “Establishing a connection”), ODBC import requires a query specifying the data table, field(s), and records to be imported. There are two ways to specify a query:
Select File > ODBC > Import > Legacy Wnl.
Select the Create a new Import option button in the ODBC Import dialog and press Next.
Create a new or load a saved connection string, as detailed under “Establishing a connection”.
Select the Build a Query option button and press Next.
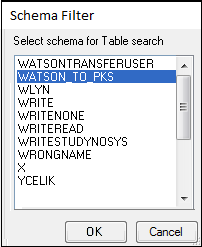
The Phoenix Query Builder accesses the database and loads a list of the available tables. If the appropriate ODBC drivers are available, the Schema Filter dialog is displayed for filtering available database tables by schema. The schema are created by the database administrators.

If the Schema Filter dialog is displayed, select the schema to use in filtering the list of data tables, then press OK.
In the Source Table list, select a table from which to import data.
Press Next to continue with selecting the fields to import.
Or
Press Done to load all fields in the table.
Select field(s) to import
1. Click a field in the list to select it for import. (Click a second time to deselect it.)
Or
Press Select all to select all fields. (Press De-Select all to clear all field selections.)
2. Press Next to continue with filtering the records.
Or
Press Done to import all records in the selected fields.
Create the record filter
1. From the Field Name menu, select a field name used to filter queries.
2. From the Operator menu, select a comparison or logical operator. (The logical operator like means true if the operand matches a pattern.)
3. Enter a value in the Field Value field or press List Distinct Values to select from all existing values for the selected field.
4. Press Add to set the filter.
5. To apply more than one filter, select the And or Or option buttons and create another filter. Filters are applied in the order they are created.
6. Press Done when all filters are entered.
Specify final settings
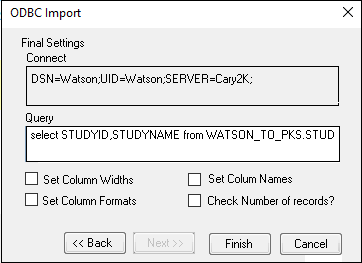
1. In the ODBC Import: Final Settings dialog, confirm/edit the connection string and query SQL.

2. Check the Set Column Widths box to adjust the destination worksheet's columns to match the widths of the fields in the database.
3. Check the Set Column Names box to adjust the destination worksheet to have the same column names as the source fields.
4. Check the Set Column Formats box to apply the appropriate number formats to columns containing times, currency, and dates.
5. Check the Check Number of records? box to provide a count of filtered records prior to the import, and the option to return and edit the query if needed.
6. Press Finish to import the selected data to a Phoenix worksheet.
7. If Check Number of Records? is checked, a message is displayed that states the number of records returned by the query. Press Yes to continue.

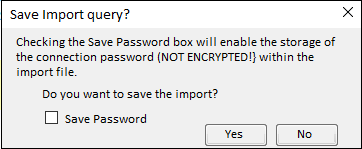
8. In the Save Import query? dialog, check the Save Password box to save the database username, password, and connection string in the import file.
Saving all three pieces of information in the import file allows connection to the database.
Note: The import file is not encrypted, so the saved password is not secure.
9. Press Yes to save the import file.
a. In the Save As dialog, specify a directory in the Save in field.
b. Type a file name in the File name field.
c. Press Save. (Pressing Cancel imports the worksheet into Phoenix but the import file is not saved.)
The size of the worksheet Phoenix can import depends on the amount of memory in the computer running Phoenix. The list below shows memory requirements and cell limitations. ODBC drivers might impose additional limits.
For 1 gigabyte of RAM, there is a limit of 2 million worksheet cells
For 2 gigabytes of RAM, there is a limit of 4 million worksheet cells
For 3 gigabytes of RAM, there is a limit of 6 million worksheet cells
A saved import specifications file (*.imp) may or may not contain the connection string, depending on what options were specified during saving.
1. Select File > ODBC > Import > Legacy Wnl.
2. In the ODBC Import dialog, select the Load an existing Import option button and press Next.
3. In the Open dialog, select the import (*.imp) file and press Open.
The ODBC Import: Final Settings dialog appears with all settings for that import loaded.
4. Makes changes as needed in the Import: Final Settings dialog or by using the Back button.
5. When the settings are correct, press Finish.
The data from the database are then loaded into a Phoenix worksheet.
Be aware that, once a connection string (new or existing) is established, any saved query can be loaded so long as it uses the tables, fields, and record types in the database to which Phoenix is connected.