Variations in models using Theophylline data
The data in theopp.dat came from a study of the kinetics of the anti-asthmatic agent theophylline reported by Boeckmann et al. (1992). In this experiment, the drug was administered orally to twelve subjects, and serum concentrations were measured at ten time points per subject over the subsequent 25 hours.
The common model for the kinetics of theophylline following oral administration is a one-compartment model with first-order absorption and elimination. In this model, the subject-specific pharmacokinetic parameters to be estimated are the absorption rate constant, Ka, the volume of distribution, V, and the clearance rate constant, Cl.
Note: The completed project (Theo_Model.phxproj) is available for reference in …\Examples\NLME.
Set up the Maximum Likelihood Models object
Create a new project called Theo_Model.
Import the dataset …\Examples\NLME\Supporting files\theopp.dat.
Press Finish in the File Import Wizard dialog.
Right-click Workflow in the Object Browser and select New > Modeling > Maximum Likelihood Models.
Rename the Maximum Likelihood Models object Diagonal Model.
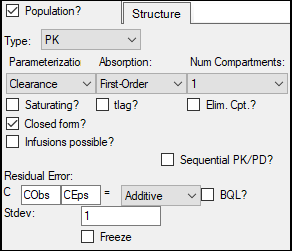
This model is a one-compartment model with 1st order input and 1st order elimination.
Leave Clearance in the Structure tab Parameterization menu.
In the Absorption menu, select First-Order.
Leave the Num Compartments menu set to 1, leave the Closed form? box selected, and leave the error model set to Additive.

Select the Parameters tab and then select the Fixed Effects sub-tab.
In the Initial column, type the following initial estimates for each of the study parameters:
tvKa = 2
tvV = 0.5
tvCl = 0.1
Select the Structural sub-tab.
Press Add Covariate.
Type wt in the Covariate field. wt is added as a context association in the Main Mappings panel.
Note: Adding weight as a covariate allows the Maximum Likelihood Models object to create covariate plots in the output.
Select the Run Options tab.
Press Advanced.
In the SE Step field that is added to the panel, change the value from 0.01 to 0.001.
Map the dataset
1. Drag the theopp worksheet from the Data folder to the Main Mappings panel.
2. Map the columns to the contexts as follows:
xid to ID.
dose to Aa.
time to Time.
yobs to CObs.
wt to wt.
3. Click ![]() (Execute icon) to execute the object.
(Execute icon) to execute the object.
Set up the full block model
1. In the Object Browser, right-click Diagonal Model and select Copy.
2. Right-click Workflow and select Paste.
The model object and its settings are pasted into the Theo_Model project and named “Copy of Diagonal Model”.
3. Rename the project as to Full Block Model.
4. Go to the Parameters > Fixed Effects sub-tab.
5. Press Accept All Fixed+Random to copy the estimates to the Initial estimates field for each parameter.

6. Select the Random Effects sub-tab.
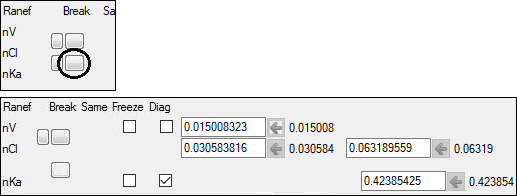
7. Clear the Diag checkbox to create a full block model.

The columns are automatically mapped as follows:
xid to ID.
dose to Aa.
time to Time.
yobs to CObs.
wt to wt.
8. Execute the object.
Set up the partial diagonal model
1. Right-click Full Block Model and select Copy.
2. Right-click Workflow and select Paste.
The model object and its settings are pasted into the Theo_Model project and named “Copy of Full Block Model”.
3. Rename the project as Partial Diagonal Model.
4. Go to the Parameters > Fixed Effects sub-tab.
5. Press Accept All Fixed+Random to copy the new estimates to the Initial estimates field for each parameter.
6. Select the Random Effects sub-tab.
7. Split the random effect blocks between the parameters Cl and Ka by clicking the Split or join the random effect blocks  button (under the Break heading) between Cl and Ka.

The columns are automatically mapped as follows:
xid to ID.
dose to Aa.
time to Time.
yobs to CObs.
wt to wt.
8. Execute the object.
Set up the partial diagonal model with time lag
1. Right-click Partial Diagonal Model and select Copy.
2. Right-click Workflow and select Paste.
The model object and its settings are pasted into the Theo_Model project and named “Copy of Partial Diagonal Model”.
3. Rename the project as Partial Diagonal Model tlag.
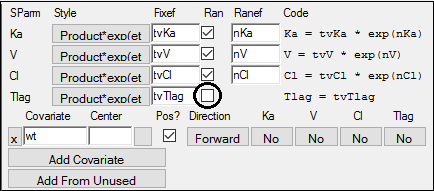
4. Go to the Structure tab and check the tlag? checkbox to add the Tlag (time lag) parameter to the model.
5. Select the Parameters > Fixed Effects sub-tab.
6. Press Accept All Fixed+Random to copy the new estimates to the Initial estimates field for each parameter.
7. Select the Structural sub-tab.
8. Clear the Ran checkbox for Tlag to remove random effects from Tlag.

9. Execute the object.
Save and close the project
1. Select File > Save Project.
2. Press Save.
3. Select File > Close Project.
The project is saved and closed and Phoenix can be safely closed.
This concludes the model variations example.