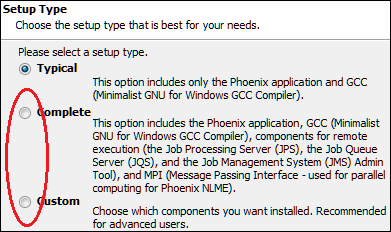
During the installation of Phoenix, options to install the JMS components are available via selection of either Complete or Custom installation type.

To perform a Complete installation
Select the Complete option to install all components (MPI and JMS servers: Job Queue Server and Job Processing Server).
Click Next > and, if desired, change the installation directory.
No further selections are needed to setup JMS in the remainder of the installation.
Click Next > to review the installation settings.
Click Next > to install the components.
The system on which the JMS component(s) are installed must be rebooted. Once the Phoenix installation is complete, use the Restart now checkbox to indicate whether to reboot the computer at this time or not and click Finish.
After rebooting, the installed Server parts will start as a Windows Service. Below is a representation of both JMS Servers installed on a single PC.
 [
[
Note: For third-party applications compatible with Phoenix to be utilized for Remote Execution, the Job Processing Service must be run as an existing user on the JPS system, and not just the default Local System account. The supported third-party applications are R, SAS, and NONMEM, which must be installed and have working folders on the JPS and configured via the Phoenix Preferences on this system. The deployed Phoenix installation on the JPS has no need to be licensed as its sole purpose is to configure the third-party applications for use by the JPS.
To perform a Custom installation
1. Select the Custom installation type to choose individual components for installation.
This is useful in an environment where components will reside on multiple computers, for example Job Queue Server on one computer and the Job Processing Server on another. This configuration will facilitate distributing the load of processing for the Queue and the Engine(s).
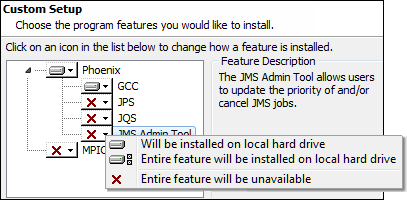
2. Click Next > to display the Select Features page listing the optional components available for installation.
3. Select a component using its drop-down menu and choose from the available options.

It is preferred to select the option Entire feature will be installed on local hard drive.
4. Click Next > and, if desired, change the installation directory.
5. Click Next > to review the installation settings.
6. Click Next > to install the components.
7. The system on which the JMS component(s) are installed must be rebooted. Once the Phoenix installation is complete, use the Restart now checkbox to indicate whether to reboot the computer at this time or not and click Finish.