The results of any executed operational object can be printed. Phoenix can also print worksheets, text files of any format, .rtf files, .map files, .lib files, .mdl files, and HTML tables.
Note:The only items in the Documents folder that can be printed are text files. Any other files imported into the Documents folder, including types that Phoenix can print, are not printable if they are in the Documents folder.
Select the Results tab of any executed operational object.
Select any text or plot object in the Results tab.
Click ![]() (Print Results icon).
(Print Results icon).
In the Print dialog, select a printer, the number of pages and copies to print, and click OK.
Printing items in the Object Browser
Not all objects in the Object Browser can be printed. For example, workbooks and most objects in the Documents folder cannot be printed.
If an item cannot be printed, the Print and Print Preview options in the File menu are disabled.
To set up a page for printing
Select File > Page Setup.
The Page Setup dialog has several tabs containing setup options for headers, footers, page orientation, margins and other options that are relevant for a particular type of object.
To set up plot printing
Select the Plots tab.
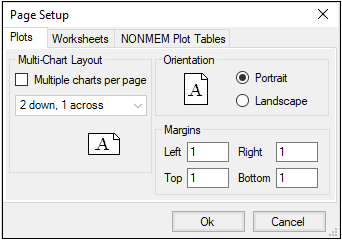
To specify how multiple charts are to appear on a printed page, check the Multiple charts per page box and choose a predefined layout from the pull-down menu.
Specify the orientation of the charts on the page as either Portrait or Landscape.
Enter the size of each page margin (in inches).
To set up worksheet printing
Select the Worksheets tab.
Select the Layout sub-tab.
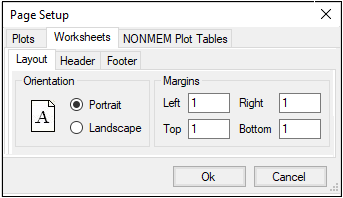
Specify the orientation of the data on the page as Portrait or Landscape.
Enter the size of each page margin (in inches).
Select the Header sub-tab.
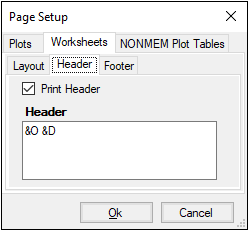
In the Header field, enter codes for information to include in the header in the order they should appear.
Codes supported for formatting headers and footers include:
&D (Date)
&N (Total number of pages)
&P (Current page number)
&T (Time)
&O (Object name)
The options on the Footer tab can be set in the same manner as described for the Header tab.
Note:The options on the DME Plot Tables tab and the NONMEM Plot Tables tab are identical to those in the Worksheets Layout tab.
To print single objects
Select an object in the Data, Code, Tables, or Documents folders.
Select File > Print.
Or type CTRL+P.
To print multiple objects
Select File > Print All.
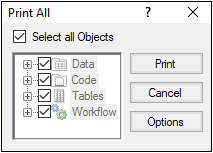
In the dialog, click Print to print all printable items in the Object Browser
This includes the results of any executed operational object, any internal worksheets created by operational objects, and any imported and user-created files.
Or
Uncheck the Select all Objects box and check/uncheck the boxes beside each item to include or exclude it in the print job and then click Print.
Click Options in the dialog.
Check the Multiple charts per page box to print multiple charts per page.
Click the chart layout menu to select how many charts to print down and across each page.
Click OK.
