The instructions for installing Phoenix WinNonlin and Phoenix NLME are the same.
Note:To allow Phoenix to correctly process projects created in English locales, standards and formats must be set to US English. Using the Control Panel, navigate to the Region and Language settings. Select English (United States) as the format, then click Additional Settings and set the decimal symbol for numbers and currency to be a period (.) and, finally, set the list separator to be a comma (,).
The following instructions assume that the Phoenix license is installed on the end user’s local machine. If Server license(s) are being used, Phoenix will need to be configured to use the Server license(s) after installation of the release. For instructions, please refer to the “Licensing of Phoenix software” section.
Prepare for a clean install
-
Manually uninstall any previous version of Phoenix (e.g., on Windows, use Windows > Settings > Apps & features).
-
Manually uninstall any plugins that were installed separately from Phoenix (e.g., on Windows, use Windows > Settings > Apps & features).
Folders for these separately installed plugins will remain in C:\Program Files (x86)\Certara\Phoenix\application\Plugins after uninstalling Phoenix. Such plugins include: Phoenix Integral Plugin, PKAssist, and PKSubmit. -
Copy the license file (lservrc) from C:\Program Files (x86)\Certara\Phoenix\application\Services\Licensing to a temporary location.
-
Remove all remaining folders and files under C:\Program Files (x86)\Certara.
Start the installer
-
Extract the ZIP file that contains the installation files.
-
Double-click Setup.exe to run the Phoenix Installation wizard.
Setup.exe detects the operating system and starts the appropriate executable. The installer checks for the following:
•the appropriate version of the .NET framework
•the LegacyWNL components and Microsoft Visual C++ components
The user is notified if any of these requirements are not met and the installer will proceed to install the necessary items and a forced reboot must be done prior to installing Phoenix. To continue with the Phoenix installation, double-click Setup.exe.
Follow installer steps
-
On the Phoenix Setup wizard Welcome screen, click Next to display the Setup Type screen.
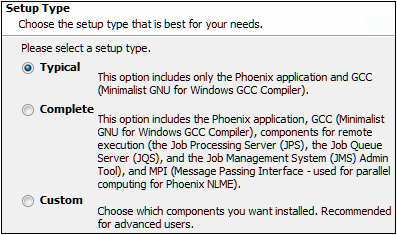
Setup Type screen
-
Select a setup type.
-
Click Next to display the Destination Folder screen.
-
Specify a destination folder and click Next to display the Ready to Install screen.
-
In the Ready to Install screen, use the Back button to return to the previous screens to make any changes to the installation or click Next to continue the installation process.
Once installation is finished, the “Completed the Installation of Phoenix” screen is displayed. -
To complete the installation, the computer should be restarted. However, if restarting needs to be delayed, uncheck the Restart now checkbox.
-
Click Finish to close the installer.
Typical is the default setup type. Only the Phoenix application and GCC (Minimalist GNU for Windows GCC Compiler) are installed.
Complete installs the Phoenix application, GCC, components for remote execution (JPS, JQS, and JMS), and MPI (for parallel computing for Phoenix NLME).
Custom allows the user to select the items to install. Recommended for advanced users.
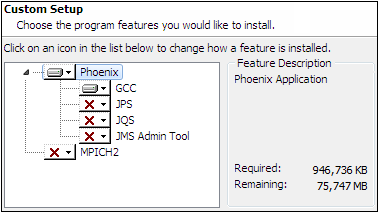
Custom Setup screen — displayed only when Custom is selected as the setup type.
The GCC component will be installed to C:\PHSTMinGW64 whether the user retains the default installation location or selects an alternate location.
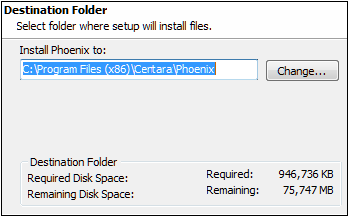
Destination Folder screen
Note:If MPICH2 was installed, it is recommended that users open TCP ports on their computers to avoid firewall messages when using the MPICH2 software. See “Opening TCP ports for MPICH2” for instructions on opening TCP ports.
Return license file and reinstall plugins
-
Copy your license file back to C:\Program Files (x86)\Certara\Phoenix\application\Services\Licensing.
-
Reinstall the plugins that you uninstalled.
For PK Assist customers using Integral, the Phoenix Integral Plugin must be reinstalled before PK Assist is reinstalled.
If you encounter any difficulties with these steps, please contact Certara Support.
Post-installation considerations
Configuring Phoenix for international use
Opening TCP ports for MPICH2
Executables to be white-listed
Installed folders requiring read/write permission
Modifying, updating, or removing an installation
Configuring Phoenix for international use
When Phoenix is installed on systems that do not use the United States region, then some regional display information must be changed before Phoenix can be used. (The following instructions assume Windows 8.1 KB2919355 is being used.)
Caution:If the settings are not changed then Phoenix cannot correctly run projects that are created in the English (United States) region.
-
In the Control Panel, open the Regional and Language dialog (in Windows 8.1, click Clock, Language, and Region and then click Region and Language).
-
In the Regional and Language dialog, select English (United States) as the region.
If the region information cannot be changed, then users must set the decimal symbol to a period (.) for numbers and currency, and the list separator symbol to a comma (,). -
Click the Additional settings button. The Customize Format dialog is displayed.
-
In the Decimal symbol menu, change the decimal symbol to a period (.).
-
In the List separator menu, select a comma (,).
-
Select the Currency tab.
-
In the Decimal symbol menu, change the decimal symbol to a period (.).
-
Click OK and then OK in the Regional and Language to save the changes.
Note:When Phoenix is installed and configured to run on a Windows operating system version where its Regional Language settings are not US English, SAS and SigmaPlot objects cannot be executed.
Note:For operating systems with Regional Language settings set to Japanese, the default Calendar type should be set to Western Calendar (Japanese) in order for .xpt files to be exported correctly.
MPICH2 is an implementation of the Message Passing Interface (MPI) standard, which allows users to process Phoenix models using multiple CPUs or CPUs with multiple cores.
MPICH2 must use certain TCP ports. If TCP ports are not opened for MPICH2, and the computer uses a software firewall, then the firewall might display alerts each time MPICH2 is run. The multiple alerts are displayed because the executable that uses MPICH2 is compiled dynamically with each execution, so adding an exemption in a firewall for MPICH2 might work only temporarily.
Users can restrict MPICH2 to use a range of ports, and open those ports in a firewall to avoid the multiple warnings. To do this, run the batch tool <Phoenix_install_dir>\MPICH2-1.4.1\tools\mpiPortTool.bat as an administrator and open the recommended ports 10000 to 11000. (Please contact your IT support personnel for help with opening ports in a networked computing environment.)
Executables to be white-listed
There are executables that may be flagged/quarantined by different antivirus software. This can cause Phoenix applications to function improperly or even fail. To avoid these types of problems, the following items should be included in an exception list for virus protection by your IT professional.
wnlnca.exe in C:\Program Files (x86)\Certara\Phoenix\application\Plugins\WnlModeling\
Phoenix.exe in C:\Program Files (x86)\Certara\Phoenix\application\
Phoenix32.exe in C:\Program Files (x86)\Certara\Phoenix\application\
ChiDistribution.exe in C:\Program Files (x86)\Certara\Phoenix\application\lib\
TDL5.exe in C:\Program Files (x86)\Certara\Phoenix\application\lib\NLME\Executables\
In addition, the following folders (and their sub-folders) may need to be added to the exception list:
C:\Users\%UserName%\AppData\Roaming\Certara
C:\Users\%UserName%\AppData\Local\Temp
C:\Users\%UserName%\Documents\Certara Projects
C:\Program Files (x86)\Certara
C:\ProgramData\Certara
C:\PHSTMinGW
C:\PHSTMinGW64
Installed folders requiring read/write permission
For environments where a Phoenix installation is being shared, users should have read/write permission for C:\ProgramData\Certara.
When creating custom tables, users should have read/write permission for C:\Program Files (x86)\Certara\Phoenix\application\Plugins\Table\Custom.
Modifying, updating, or removing an installation
If Phoenix is already installed, then users can double-click the Setup.exe or the Setup.msi file to update or modify a Phoenix installation.
-
Double-click the Setup.exe or the Setup.msi file to display the Welcome screen.
-
Select a maintenance operation.
-
Click Next.
Modify Available Options is the default selection type and provides options to install updates to the existing application.
Repair Application re-installs over the existing application to replace possibly corrupt files.
Uninstall removes all files from the Phoenix installation folder that were originally part of the installation, including files associated with GCC and MPICH2. The uninstall process does not uninstall any .NET framework versions or C++ runtime versions that were installed as prerequisites, nor does it uninstall the LegacyWNL file.
•If Modify Available Options is selected, the Custom Setup dialog is displayed.
•If Repair Application is selected, the Ready to Install Phoenix dialog is displayed. Phoenix will be re-installed based on the user selections made when Phoenix was originally installed.
•If Uninstall is selected, the Ready to Install Phoenix dialog is displayed.
Note:During the uninstall process, if a dialog is displayed stating that the application called MPICH2 Process Manager needs to be closed before continuing, accept the default to automatically close the application and click OK. If an Application Requirements dialog is displayed stating that requirements must be processed before continuing, click Next.
Silent installation of Phoenix
Administrators can remotely install Phoenix on users’ computers in “silent” mode using scripting. This allows large organizations to “push out” installation updates to computers overnight without any user interaction.
The command to issue is the following. This can be run from a command prompt, from the directory where the Phoenix setup.exe file is located.
setup.exe /s MINIMUM=FALSE COMPLETE=TRUE DESKTOPDIR=C:\Users\Public\Desktop
where:
/s: Tells the install to be silent (no UI is displayed)
MINIMUM=FALSE: Specifies that it will not just be Phoenix installed
COMPLETE=TRUE: Specifies that MPICH and JMS are also to be installed
DESKTOPDIR=C:\Users\Public\Desktop: Specifies the location to put the Phoenix shortcut. Specifying the Public profile will ensure ALL users receive the shortcut.
As part of scripting the installation (PowerShell is being used in the following example):
Start-Process <PATH_TO_PHOENIX_EXECUTABLE> -ArgumentList “/s MINIMUM=FALSE COMPLETE=TRUE DESKTOPDIR=C:\Users\Public\Desktop” -Wait
Italicized text above indicates PowerShell syntax needed to properly execute the command, as well as wait for a successful completion before continuing.
Phoenix 64-bit versus 32-bit version
Both the 64-bit and 32-bit versions of Phoenix, namely Phoenix and Phoenix32, are available to users with 64-bit operating systems. Users of 32-bit operating systems are unable to launch Phoenix as a 64-bit application. Any features not available in Phoenix 64-bit are available in the 32-bit version, on the same system.
Functional differences between 32-bit and 64-bit
Phoenix 64-bit has all the same features as Phoenix running in 32-bit, except for the specific differences outlined here. The following functionality descriptions refer only to the 64-bit version.
-
Executables: Executables that do not support 64-bit fail validation if the user tries to execute them. Users can still open, save, create and interact (limited in some cases) with all executables but are not able to execute them if not supported in 64-bit. These executables are: SigmaPlot and AP.
-
File I/O: Not all file formats supported in 32-bit are supported in 64-bit. Primarily due to COM interaction with legacy WNL components used to read the file formats. This is the case for importing files from the desktop as well as Certara Integral. (The exception is WNL 5 scenarios from PKS. Scenarios are well-formed workspaces that can be loaded without additional user intervention in a separate process space which is why they are supported.)
PWO, PMO, PTO, PCO, BQL, TDF, XML, LML, CMD, IVC, MAP
WNL workspaces (WSP, PWS)
ODBC Import
In the case of the legacy files the user is given a warning that the file format is not supported in 64-bit. For ODBC, the menu options are not displayed to the user. To import these legacy files, run Phoenix32.exe to import the data and save the project. The saved project can then be loaded into 64-bit Phoenix.
Projects created in the 32-bit or 64-bit versions of the application work in both versions. JMS/RMS work with Phoenix regardless of the bit level of the server or client components. 32-bit Phoenix can communicate with 64-bit JMS/RMS, 64-bit Phoenix can communicate with 32-bit JMS/RMS. Certara Integral works with both versions of Phoenix.
The JMS queue and job processor components (queue: JQS, job processor: JPS) support 32 and 64-bit versions. The AnyCPU versions are the default. If a user or admin needs to use the 32-bit versions of JQS or JPS they are also installed as jqs32.exe and jps32.exe. To use the 32-bit versions the services must be stopped and the 32-bit versions must be renamed to jqs.exe and jps.exe respectively.
