The following topics are discussed in this section:
Showing sources
Showing dependents
Send To menu
Copying/Pasting Data folder items
Copying/Pasting a workflow object
Moving a workflow object
Deleting items
Exporting a workflow
Comparing or refreshing a dataset
-
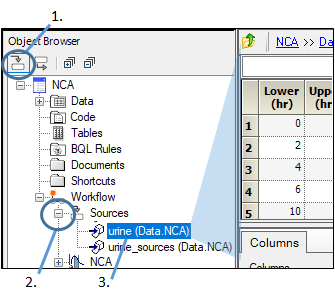
Click
 (Show Sources icon) to display the source worksheets for each workflow and operational object.
 -
Click the (+) sign next to Sources to view the source worksheets for an object.
Source worksheets include imported datasets and user-created datasets. -
Select a worksheet to view it in the right viewing panel.
The worksheet is displayed in the Grid tab, with the Columns tab below.
Right-click an item in the Sources list and select Find Object in Browser to automatically go to that item in the Object Browser.
Source worksheets can be edited like any other worksheet. If a worksheet or part of a worksheet is shaded gray, it cannot be edited. Be aware that editing a source worksheet that is used by an executed operational object marks the object, its results, and the workflow as out-of-date. Also, if multiple operational objects use the same worksheet, then changing the worksheet affects all of those objects, not just the selected one.
-
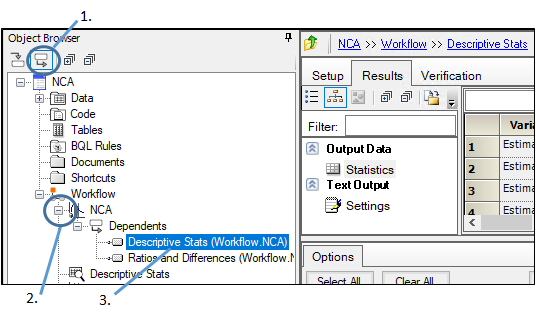
Click
 (Show Dependents icon) to display dependent objects for each worksheet in the Data folder.
 -
Click the (+) sign next to Dependents to view the dependent object list.
-
Select an object in the dependent object list to display it in the right viewing panel.
Selecting a workflow object displays the Diagram tab for that workflow.
Right-click an item in the Dependents list and select Find Object in Browser to automatically go to that item in the Object Browser.
Note:Only dependents of final output are shown, dependents of intermediate or secondary results are not listed.
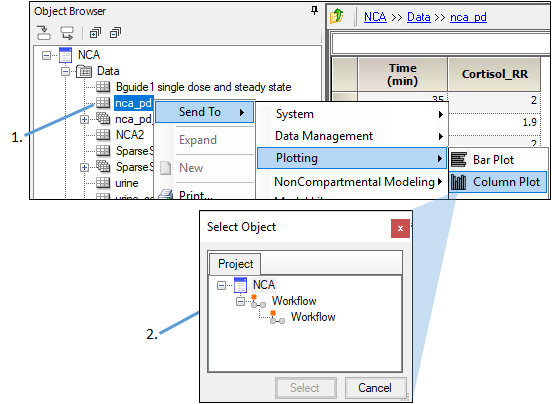
The Send To menu is used to insert an operational object, automatically mapping the selected dataset to it.
-
Right-click a dataset in the Data folder, select Send To > <object group> > <object>.
For example, right-click a worksheet and select Send To > Plotting > Column Plot. -
If there are multiple workflow objects, select the one in which to add the new object.
The object is added to the workflow, with the dataset is automatically mapped to its main input.
The Send To menu is accessible from any dataset in the Data folder and from any results worksheet.
Items other than datasets can be sent to operational objects. Code and scripts in the Code folder can be sent to the User ASCII Model, NONMEM Shell, SAS Shell and SigmaPlot Shell operational objects. The Maximum Likelihood models, however, does not allow users to send a code file to be mapped to the object, because the Maximum Likelihood Models object always defaults to the built-in model, and not the text model.
BQL rules in the BQL Rules folder can be sent to a BQL object by right-clicking a rule set and selecting Send To > Data Management > BQL.
Copying/Pasting Data folder items
Right-click a worksheet, workbook, or subfolder in the Data folder and select Copy.
Or select the item and type Ctrl+C.
Right-click the Data folder or a Data subfolder and select Paste.
Or select the folder and type Ctrl+V.
A duplicate of the worksheet, workbook or subfolder and its contents will be added to the folder or subfolder with “Copy of” prepended to the name.
Copying/Pasting a workflow object
Right-click a Workflow in the Object Browser and select Copy.
Or select the Workflow and type Ctrl+C.
Right-click the target Workflow and select Paste.
Or select the target Workflow and type Ctrl+V.
A duplicate of the object will be added at the bottom of the list of workflow objects with “Copy of” prepended to the name.
When pasting an object using Ctrl+V, Phoenix identifies an appropriate parent for the copied object. For instance, if a Workflow object is copied and then an executable (not a Workflow) is selected, typing Ctrl+V will paste a copy of the Workflow object into the parent executable’s Workflow. If another location is selected, such as the Data folder, a copy of the Workflow object will be pasted in the root Workflow. (Similarly, copying a worksheet and trying to paste it into an executable with Ctrl+V will paste the worksheet into the Data folder.)
Caution:When copying and pasting objects, auto-mapping can take place. For example, a parameter worksheet with a Lower or Upper column can be unexpectedly mapped when pasting in an NLME model. It is a good idea to check mappings after pasting a copied object.
Click and drag the object from one Workflow to another Workflow
Right-click an item in the Object Browser and select Delete.
Or select an item in the Object Browser and press the Delete key.
Click Yes in the confirmation dialog.
Since only one item can be selected at a time in the Object Browser, only one item can be deleted at a time. If there are multiple items that need to be deleted, use the Information tab. See “Information tab”.
Phoenix can export all of the objects within a Workflow with one click. This option, called Dependencies, is intended to share work with users that might not have Phoenix. It provides a .xml summary that displays information about the Phoenix objects in the Workflow and the results. To use this functionality:
-
Right-click a Workflow object and select Dependencies.
-
In the dialog, navigate to an empty folder.
All of the Workflow output will be exported to this location.
(Plot results containing more than 100 chart tabs will only output the first 100 tabs.) -
Enter a file name and select Save.
Exporting all objects in a Workflow may take a while, depending on the number of objects. -
In the next dialog, select Yes to open a browser window and view a summary.
All objects are listed, including links to all results for each object.
Select No to return to the main Phoenix window.
Note:Exporting a Workflow in this manner is not a substitute for saving Phoenix projects as .phxproj files. Files exported via the Dependencies option cannot be imported back into Phoenix as a Workflow.
Comparing or refreshing a dataset
Datasets in ASCII format, meaning those with .csv and .dat extensions, can be compared to the original dataset and updated from the original file.
To compare imported and original dataset
Right-click an ASCII dataset in the Data folder and select Check State.
Phoenix compares the imported version with the original version and tells the user if the datasets match.
To refresh a dataset
Right-click an ASCII dataset in the Data folder and select Refresh from Source.
The dataset is synchronized with the original dataset.
