Creating a two dose point model for intravenous and oral data
This example shows how to turn a single dose point model into a two dose point model using the graphical editor.
The data used in the cmt1ivpo dataset is from a simulated trial. The purpose of this example is to show how to use a dataset that contains multiple dosing routes with the Phoenix NLME GUI.
Note:The completed project (IVPO.phxproj) is available for reference in …\Examples\NLME.
Set up the Maximum Likelihood Models object
-
Create a new project called IVPO.
-
Import the dataset …\Examples\NLME\Supporting files\cmt1ivpo.dat.
Click Finish in the File Import Wizard dialog. -
Right-click the cmt1ivpo worksheet and select Send To > Modeling > Maximum Likelihood Models.
-
In the Structure tab of the Phoenix model, select Clearance from the Parameterization menu, if needed.
-
In the C (Continuous Observation) error model menu, select Multiplicative.
-
Keep the default value of 0.1 in the Stdev field.
Graphically edit the model
-
Click Edit as Graphical.
In the confirmation dialog, click Yes.
In the second confirmation dialog about not using the closed-form, click Yes. -
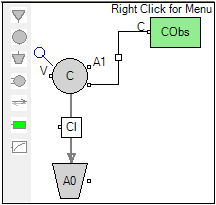
Select Model in the Setup tab list, if needed.
-
Add an Absorption compartment by clicking
 in the Maximum Likelihood Models object toolbox.
 -
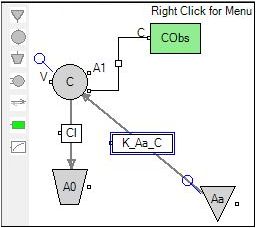
Add a PK flow between the Absorption compartment Aa and the Central compartment C by clicking
 in the toolbox.
Click the first compartment of the flow, the Absorption compartment Aa.
Click the second compartment of the flow, the Central compartment C.
The PK flow is inserted between the two-compartments and is labeled K_Aa_C. -
Select the Parameters > Fixed Effects sub-tab.
-
In the Initial column, type 0.2 as the initial estimate for tvCl.
-
Select the Random Effects sub-tab.
-
Type 0.1 in the fields for nV, nCl, and nK_Aa_C.


Map the model variables
-
Select Main in the Setup list.
-
Use the option buttons in the Mappings panel to map the data types as follows:
id to the ID context.
time to the Time context.
conc to the CObs context.
doseiv to the A1 context.
dosepo to the Aa context. -
Click
 (Execute icon) to execute the object.
Save and close the project
-
Select File > Save Project.
-
Click Save.
-
Select File > Close Project.
The project is saved and closed and Phoenix can be safely exited.
This concludes the two dose point model example.
