The Properties operation in the Data Wizard allows users to set column header names, units, and data types (text or numeric) for worksheets.
The interface consists of three main parts:
Main Mappings panel
Options tab
Defaults tab
Users must map a dataset to the Main Mappings panel when the first step is set up. All subsequent steps will automatically be mapped to the same dataset.
None: Columns mapped to this context are simply included in the output.
Sort: Sort variables used to define individual profiles.
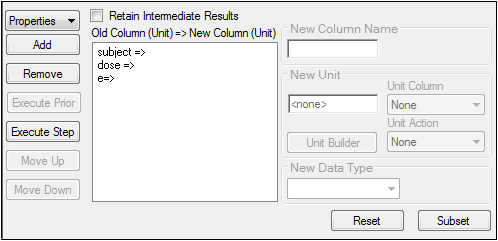
The Options tab lists all the column headers in a worksheet and any associated units. The column headers and units are displayed in the columns list in the Options tab.

To change column header properties:
Select a column header in the columns list to change its properties.
In the New Column Name field, type a new column header name.
Phoenix does not allow spaces in column headers and will substitute an underscore (_) for a space.
A column name can only consist of alphanumeric characters and underscores, and cannot start with a number.
The constraints on column names exist because spaces and other characters in column names can cause filter and sort functions to not work correctly.
In the New Unit field, type a new unit for the new column.
Alternatively, click Units Builder to use the Units Builder dialog to change column units. The Units Builder can be used to specify new units or convert existing units.
In the Unit Action list, select the action desired: Specifying the unit or Converting units.
See “Using the Units Builder” for more details on this tool.
Each column in a worksheet can use different units. The units are displayed in parentheses in the column header, and can be used in calculations. If the units are not standard or recognizable, Phoenix displays them in braces: {mmHg}. Nonstandard units are carried throughout any operations but are not used in any calculations. For a list of valid units and prefixes, see “Valid units and prefixes in Phoenix”.
Caution:If it is possible, units are automatically converted when the new column unit does not match the old column unit. Make sure the old and new column units match if unit conversion is not necessary or wanted.
In the New Data Type menu, select Text or Numeric to change the data type of the selected column.
Changing a column from text to numeric deletes any non-numeric values in the column. Changing a column from numeric to text does not delete any values.
Data type refers to column data types. There are two kinds, numeric and text. Numeric columns contain only numeric values, and Phoenix treats the values in a numeric column as numeric data.Text, or string-type, columns can contain mixed numeric and text values, but Phoenix treats values in a text column as non-numeric values that cannot have certain operations performed on them, such as an arithmetic transformation.
Select another column header in the columns list to change its properties.
For a list of valid units and prefixes, see “Valid units and prefixes in Phoenix”.
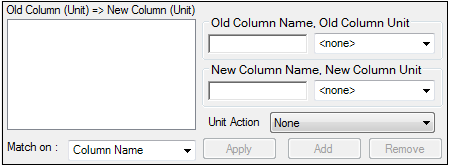
The Defaults tab is used to automatically change column properties. Users can specify new column names and units for common columns like Time or Concentration.
Caution:Defaults must be specified before a worksheet is mapped in the Properties operation.

When a worksheet is mapped to a Properties operation that has defaults set, any matching column headers and units are automatically changed or converted.
Defaults are listed on the default columns box.
To add new defaults
Type the column header name to be automatically converted in the Old Column Name field.
Select a unit, if applicable, in the Old Column Unit menu.
Type a new column name in the New Column Name field.
Select a new unit, if applicable, in the New Column Unit menu.
Caution:If it is possible, units are automatically converted if the new column unit does not match the old column unit. Make sure the old and new column units match if unit conversion is not necessary or wanted.
Click Add to add the new column header default to the default columns box.
The default column name can be edited after it is added.
Make any changes in the column name field and column units menus, and click the Apply button to apply the changes.
In the Match on menu, select whether or not to match the default column to input worksheet columns based on column name or column name and unit.
Select a default in the default columns box and click Remove to remove the column default.
Add another default by typing another column header name in the Old Column Name field and repeating the previous instructions.
