The Watson Import object uses the Watson LIMS plug-in to access active studies in Watson LIMS. Data from Watson LIMS are imported into a Phoenix project as either a study Workbook or as a study in Integral.
The Watson LIMS plug-in assumes that the Watson LIMS software is installed and running properly.
This section includes the following topics:
•Importing the Watson Study as a study worksheet
•Importing the Watson Study in Integral
A number of preferences for the Watson Import object are available to the user via the Preferences dialog (Edit > Preferences).
•Sample and Dosing worksheet configuration
Each tab of preferences has the following buttons available:
Save to File stores the configuration selections to a specified file.
Load from File loads configuration selections from a specified file.
Apply Changes saves the configuration settings as the active configuration.
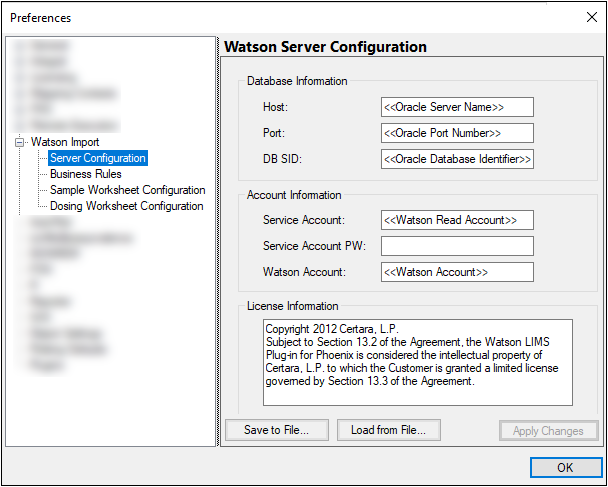
In the Preferences dialog, select Watson Import > Server Configuration.
|
Database Information |
|
|
Host |
Enter the name or IP address of the Oracle Server where the Watson schema is located. |
|
Port |
Enter the port of the Oracle Server where the Watson database is located (Oracle’s default port number is 1521). |
|
DB SID |
Enter the name of the Oracle database where the Watson schema is located. |
|
Account Information |
|
|
Service Account |
Enter the name of the Oracle database account used to select data from the Watson schema. |
|
Service Account PW |
Enter the password for the Service Account. |
|
Watson Account |
Enter the name of the Watson schema. |
|
License Information |
|
|
Info field |
Lists copyright and specific licensing information. |
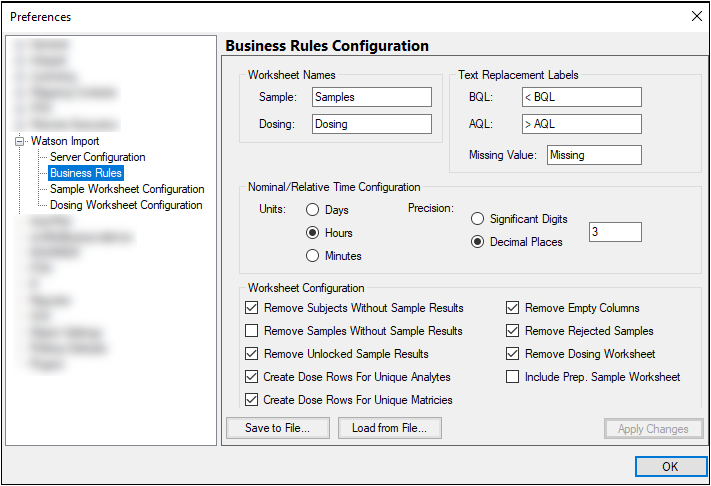
In the Preferences dialog, select Watson Import > Business Rules.
|
Worksheet Names |
|
|
Sample |
Enter the name of the Sample Worksheet that is created in the Phoenix project. |
|
Dosing |
Enter the name of the Phoenix Dosing Worksheet that is created in the Phoenix project. |
|
Text Replacement Labels |
|
|
BQL |
Enter the text used to represent values from Watson that are below the limit of quantification. |
|
AQL |
Enter the text used to represent values from Watson that are above the limit of quantification. |
|
Missing Value |
Enter the text to display in cells that are missing data. |
|
Nominal/Relative Time Configuration |
|
|
Units |
Specify the unit of the transferred columns (Days, Hours, Minutes). |
|
Precision |
Specify the precision of the time columns transferred from Watson by selecting either Significant Digits or Decimal Places and entering the numeric value for the precision in the adjacent field. |
|
Worksheet Configuration |
|
|
Remove Subjects Without Sample Results |
Only import subjects with at least one concentration value in Watson. |
|
Remove Samples Without Sample Results |
Only import designed samples that have a corresponding sample result in Watson. |
|
Remove Unlocked Sample Results |
Only import samples from Watson where the sample result is locked. |
|
Create Dose Rows For Unique Analytes |
Create additional dosing rows for each unique analyte in the study. |
|
Create Dose Rows For Unique Matrices |
Create additional dosing rows for each unique matrix in the study. |
|
Remove Empty Columns |
Only import a column of data from Watson when at least one value exists in the column. |
|
Remove Rejected Samples |
Remove samples that have been rejected from the sample dataset. |
|
Remove Dosing Worksheet |
Do not create a dosing worksheet on a transfer from Watson. |
|
Include Prep. Sample Worksheet |
Create a prepared sample worksheet |
|
ReAssay Handling |
|
|
Include Samples with ReAssay Tags |
Include reassayed data in the worksheets returned to Phoenix. |
|
Filter Criteria |
Reasons: Enter the reason for the reassay (e.g., Mandatory Repeats or Incurred Sample Repeats). |
|
Statuses: Enter the status of the reassay (e.g., acc). |
|
|
If there is no entry for Reasons and Statuses, but the Include Samples with ReAssay Tags option is checked, then all of the reassayed data is imported. |
|
Sample and Dosing worksheet configuration
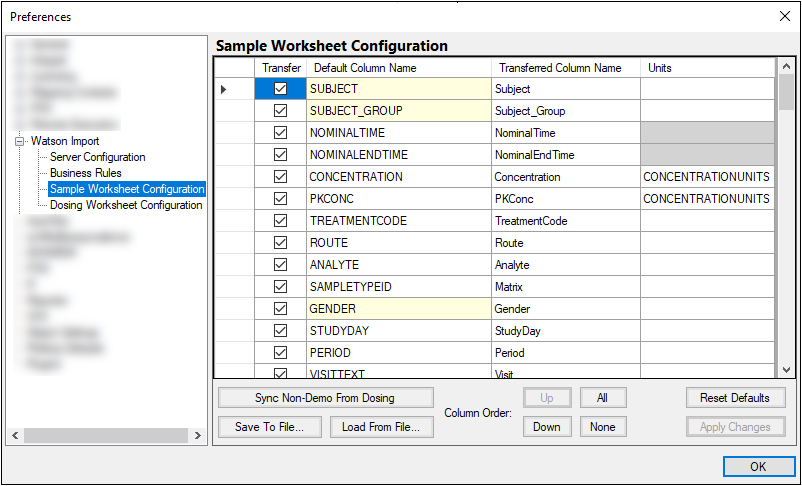
The layout and options available in the Sample Worksheet Configuration are identical to those available in the Dosing Worksheet Configuration are discussed in this single section.
In the Preferences dialog, select Watson Import > Sample Worksheet Configuration or Dosing Worksheet Configuration.
|
Columns |
|
|
Transfer |
Check the checkbox to transfer the column during the Watson import. |
|
Default Column Name |
Displays the Watson column name and is not editable. |
|
Transferred Column Name |
Enter the name of the column as it will appear in the Phoenix Worksheet after the Watson import is completed. |
|
Units |
Define the unit for the transferred column. |
|
Other Settings |
|
|
Sync Non-Demo From Samples |
Synchronize configuration settings from the columns that are shared across the Dosing and Sample Worksheet configurations (e.g., Treatment, Period). |
|
Column Order |
Click the Up or Down to move the selected row up or down the list, respectively. |
|
All/None |
Click All to check all of the Transfer checkboxes. |
|
Defaults |
Restore the Worksheet configuration options to the original default selections. |
Importing the Watson Study as a study worksheet
Select Watson > Create Study Workbook.
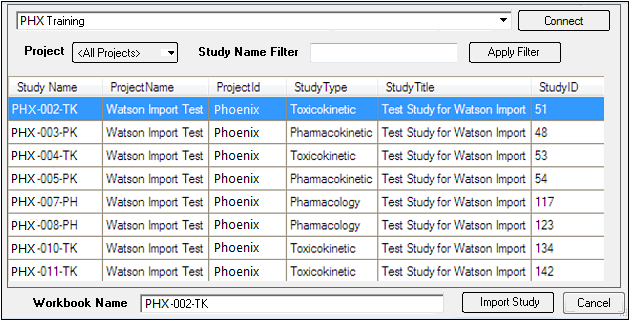
Select Watson Study to Import dialog
In the dialog, click a row to select the study to import and then click Import Study.
Once the import is complete, the name of the study is add under the Data section of the Phoenix Object Browser.

Imported Watson study is added to the Data folder
Note that the Dosing and Samples Worksheets may or may not be created depending on the Business Rules that were set up in the Preferences dialog. The Transfer Summary Worksheet provides information about the importing process.
Use the Watson > Refresh Study Workbook menu option to update the data with any changes that have been made to the study data.
Importing the Watson Study in Integral
Select Watson > Create Study Workbook.
Click Connect and log in to Integral.
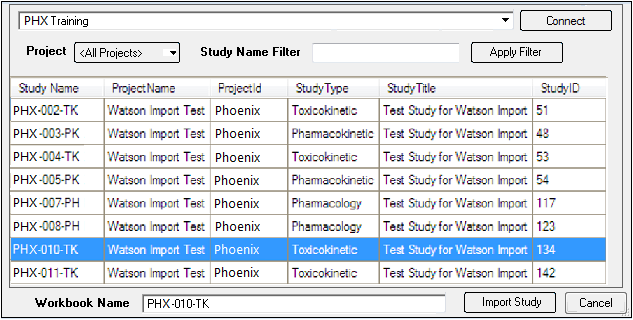
Select Watson Study to Import dialog
In the dialog, click a row to select the study to import and then click Create Study.
Once the import is complete, select Integral > Browser.
The study will be displayed in the Integral browser tree.
A right-click menu is available for the Watson study item containing the same options as other Integral studies. There is an additional item on the menu called Update Watson Study, which updates the data with any changes that have been made to the study data.
See “Integral” for details on the functionality available.
The Watson Import object creates the study in two steps: 1) create the study with subjects and samples; 2) append dosing.
