The SigmaPlot Shell object imports SigmaPlot scripts and datasets for use in Phoenix.
Note:Phoenix program plugins, such as the SigmaPlot Shell object, assume that the corresponding third party software is installed and running properly.
Use one of the following to add a SigmaPlot Shell object to a Workflow:
Right-click menu for a Workflow object: New > SigmaPlot > SigmaPlot Shell.
Main menu: Insert > SigmaPlot > SigmaPlot Shell.
Right-click menu for a worksheet: Send To > SigmaPlot > SigmaPlot Shell.
Note:To view the object in its own window, select it in the Object Browser and double-click it or press ENTER. All instructions for setting up and execution are the same whether the object is viewed in its own window or in Phoenix view.
Additional information is available on the following topics:
•Importing/Writing the code to access the external program
•Executing a third party tool object
The Setup tab allows mapping of datasets and script files to the object. The Mappings panel simply lists the columns found in the dataset. The Text panel, as shown in the previous image, allows users to map a script or control/model file to the object and view the contents.
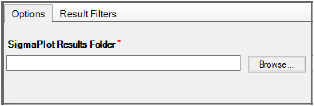
The Options tab is used to define a location for the output.
The results folder set in the Options tab must match the export folder location set in the script. To make sharing projects involving SigmaPlot Shell objects easier, set the results folder in the Options tab to the getwd value and refer to getwd in the code. Files written to the path returned from getwd end up in the output folder and in the results.
Enter the output folder path in the field or click Browse to specify the output folder location.
Allows specification of how different results files from the external program should be imported. Phoenix first looks for the first rule to match a file and uses that rule to import the object. The order of the rule matching is: Always Import (using normal import methods), Max File Size (will create a shortcut), Shortcut Files, Binary Files (using normal import methods). The user creates filter criteria based on filename patterns. If a maximum file size is specified, any file larger than the entered value will always be imported as a shortcut (unless the file matches filter criteria in the Always Import list).
Importing/Writing the code to access the external program
The SigmaPlot Shell object must have code that will allow it to initiate the external program and submit jobs. The code can be stored as a script or control/model file. These code sources can be imported into the project and mapped to the object, or the code can be directly entered into the object.
•Import and map file containing code
Import and map file containing code
-
Select a project or workflow in the Object Browser and then select a third party tool object from the Insert menu.
-
Select the File > Import menu option (or use one of the File > Custom Import options).
-
Navigate to and select the file(s) to import in the Import File(s) dialog.
Imported scripts or control/model files are added to the Code folder in the Object Browser. -
Use the pointer to select and drag a dataset from the Data folder to the object’s data mappings panel.
The dataset is mapped to the object’s Mappings panel and the dataset name is displayed beside the primary data input in the Setup tab list. -
Click the option buttons in the Mappings panel to map/unmap a data type in the dataset to the desired context. Contexts that must have data mapped to them so the object can perform its function are shaded orange.
Instead of importing and mapping a script/control file to use the third party tool object, users can write their own code or copy and paste code from another source. (For more information on the text editor, see http://www.syncfusion.com/products/user-interface-edition/windows-forms/edit/overview.
-
To enter the code manually, check the Use internal Text Object checkbox.
If a script/control file is already mapped, a message is displayed that asks if the mapped file should be copied to the internal text editor.
•Click Yes to allow editing of the currently imported file.
•Click No to remove the imported control file.
-
Type the code directly in the field.
-
When entry or modifications are complete, click Apply.
Some important things to consider when entering code in the Text panel versus importing and mapping a script/control file are:
Apply must be clicked for the code entered or modified to be accepted.
Changes made in the Text panel are not applied to the file on the disk.
The script can be modified either in the Code folder or in the object itself and these are kept in sync.
Once the user switches to Use Internal Text, any subsequent changes are not kept in sync with the script in the Code folder.
Changes to column headers in the .NamedRanges.Add statement are reflected in the Dataset Mappings panel. Changes made to a mapped script do not change the script in the Code folder.
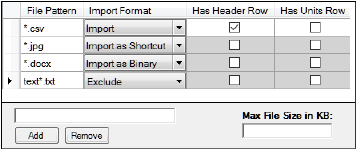
The Result Filters tab allows users to define filters that determine whether files of a certain name or size are returned to Phoenix as a shortcut, a binary file, a complete copy, or returned at all.
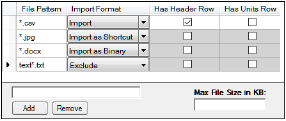
Result Filters tab for an object
-
Type the file pattern to serve as a filter into the field near the bottom of the tab and click Add. (Enter full file names or use the wildcard “*”, e.g., *.txt.)
-
To remove a pattern from the list, select it and click Remove.
-
For each pattern, select how files matching the pattern are to be handled:
Import: Default file handling for imported data of that file type is used to import the file
Import as Shortcut: The file itself is not imported, however, a shortcut is created that points to the complete file
Import as Binary: The file is imported as a binary object, with no conversion to any specific Phoenix type
Exclude: The file is not imported
Should a file match several specified patterns, the precedence of processing is: Exclude, Import, Shortcuts, Binary.
-
For .csv and .dat output files, check the Has Header Row box to indicate that files matching the file pattern have a header row.
-
For .csv and .dat output files, select the Has Units Row option to indicate that files matching the file pattern have a units row.
-
Enter maximum size that an imported complete file can be in the Max File Size in KB field.
Any file that exceeds this size is imported as a shortcut (unless the file matches a File Pattern whose Import Format is set to Import).
Executing a third party tool object
Click  or to run the job remotely (available for all third party tool objects except the SigmaPlot object), click Execute Remotely in the Options tab.
Executing a third party tool object remotely sends the job to the server that is defined in the Preferences dialog (Edit > Preferences > Remote Execution). See “Phoenix Configuration” for instructions. The project is saved automatically.
The project must have been saved at least once prior to executing on RPS, otherwise execution will not pass validation and a validation message will be generated.
At this point, the step being executed on RPS, along with any dependent objects, has been locked. It is now safe to close the project or to continue working in Phoenix.
In Phoenix, some objects in a workflow allow the user to click and execute the last object in a chain and it will re-run any necessary objects earlier in the workflow. This is not true for the R object. Either the workflow or the individual objects must be executed to obtain the current source data for the R object.
Note:Executing a Sigma Plot script that attempts to write results to a non-existent folder can result in Sigma Plot getting 'stuck' in a state where the only way to close the application is to kill it with Window’s task manager. Check the output folder names in the export statements of the scripts to confirm you are writing to an existing directory.
The results are displayed on the Results tab. The output for SigmaPlot Shell objects falls into the following categories:
Output Data: Datasets in tabular form
Text Output: Settings files, log files, and other text output
Other: Other kinds of files, for example: documents, export files, binary files, etc.
Images: Graphs or other images in recognized image formats (jpg, tiff, emf, etc.)
