The RPS (Remote Processing Server) allows users to submit particular steps in their workflows to external programs (e.g., NONMEM, SAS, etc.) for remote execution. The RPS Queue and RPS Processor work together to efficiently submit the remote jobs to the various programs and return the results.
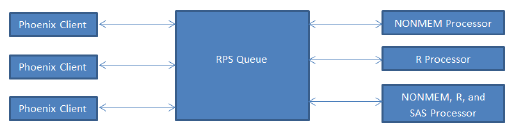
Diagram of how remote processing works
This section includes the following topics:
Each RPS processing server should contain only one RPS processor installation, but each processor installation can be configured to process multiple jobs concurrently. RPS processors can be installed on any number of servers, and each processor can be configured to process different job types. For instance, there could be one server that only processes R jobs, one server that only processes NONMEM jobs, and yet another server that processes R, NONMEM and SAS jobs. The queue will only send a processor jobs of types that it is configured to process.
To install a processor
-
Copy PhoenixJobProcessor.zip to the machine that will perform the execution.
The executing machine must be able to ping the machine where the RPS Queue is installed. -
Create a new folder where the RPS processor will be installed.
-
Unzip PhoenixJobProcessor.zip into the new installation folder.
-
Modify the serverConfig.xml file as needed (discussed below).
-
After saving changes to serverConfig.xml start the RPS by opening a command window, navigating to the installation folder and typing the following:
java –jar PhoenixJobProcessor.jar
See “Windows Service Notes” and “Linux Daemon Notes” for some platform-specific information.
RPS processors are configured by editing the file serverConfig.xml. Configuration consists of specifying the queue address, defining which types of processes the server can execute, specifying the number of concurrent processes the server is allowed to process, and process-specific attributes such as desired output location.
|
Element |
Attribute |
Required |
Description |
|
settings |
logLevel |
Yes |
Valid values include: ALL, FINEST, FINER, FINE, CONFIG, INFO, SEVERE, WARNING, and OFF. |
|
processors |
maxProcesses |
Yes |
Maximum number of processes that the server can execute simultaneously. |
|
maxLogLines |
Yes |
Maximum number of lines to return when log info is requested by the Queue. |
|
|
processor |
name |
Yes |
Type of processor. Valid names include: r, sas, nonmem7, psn, and custom. |
|
class |
Yes |
Java class to be used to process all jobs for that type. |
|
|
allowConcurrentExecution |
Yes |
Defines whether or not more than one instance of this process type can be executed simultaneously. |
|
|
logFile |
No |
File name to use for job specific log information requested by the Queue. |
|
|
outputFolder |
No |
Root location to write all output for this type of job. |
|
|
outputShareName |
No |
Name that the output folder is shared as on the network. |
|
|
server |
name |
Yes |
RPS Queue Server name. |
|
root |
Yes |
Context root of the Queue Server. In most cases, this value is “PhoenixServer”. |
|
|
port |
Yes |
Port to use when accessing the Queue Server. |
|
|
useSSL |
Yes |
Valid values are true and false. |
|
|
timeout |
Yes |
The http timeout value in seconds. |
|
|
pollinterval |
Yes |
Defines, in seconds, how often requests are sent to the Queue. |
The example configuration file that is shipped with the product contains definitions for all process types. The types of processes that are processed on a server can be limited by removing or commenting unused process types. For example, if the processor is only to process NONMEM and R process types, then the file would look something like this:
<settings logLevel="CONFIG">
<processors maxProcesses="1" maxLogLines="50">
<processor name="r" class="com.Certara.phx.process.
RProcessor" allowConcurrentExecution="false"
logFile="PHOENIX.LOG" outputFolder=
"c:\\Output\\RPS\\R" outputShareName="R">
<parameter name="executablepath" value=
"C:\\Program Files\\R\\R-2.13.1\\bin\\R.exe"/>
<parameter name="args" value="--quiet"/>
</processor>
<processor name="nonmem7" class="com.Certara.phx.
process.NonMemProcessor" allowConcurrentExecution=
"false"
logFile="stdout.txt" outputFolder=
"c:\\Output\\RPS\\NONMEM">
<parameter name="executablepath" value=
"M:\\NMVII\\run\\phx.nmfe7.bat"/>
</processor>
</processors>
<server name="localhost" root="PhoenixServer" port="8080"
useSSL="false" timeout="300" pollInterval="5" />
</settings>
The install_service.bat file can be used to install the service. A few modifications might be required to the script to accommodate variations in specific installation file paths. The batch file specifies the necessary Java options required to run the PhoenixJobProcessor, and specifies a location in which to find the serverConfig.xml file (JobProcessorHome environment variable).
If a 64-bit version of Java is being used, replace all instances of job_processor.exe with job_processor64.exe.
Example
@echo off
rem -------------------------------------------------------
rem Start/Stop Script for the Phoenix Job Processor
rem
rem -------------------------------------------------------
set job_processor_home=C:\ PhoenixRemote
set cp=%job_processor_home%\lib\apache-mime4j-0.6.jar
set cp=%cp%;%job_processor_home%\lib\commons-codec-1.3.jar
set cp=%cp%;%job_processor_home%\lib\commons-daemon-
1.0.2.jar
set cp=%cp%;%job_processor_home%\lib\commons-logging-
1.1.1.jar
set cp=%cp%;%job_processor_home%\lib\httpclient-4.0.1.jar
set cp=%cp%;%job_processor_home%\lib\httpcore-4.0.1.jar
set cp=%cp%;%job_processor_home%\lib\httpmime-4.0.1.jar
set cp=%cp%;%job_processor_home%\lib\xercesImpl.jar
set cp=%cp%;%job_processor_home%\lib\xml-apis.jar
set cp=%cp%;%job_processor_home%\PhoenixJobProcessor.jar
REM echo %cp%
@echo on
job_processor.exe //IS//PhoenixJobProcessor --Install=
C:\PhoenixRemote\ job_processor.exe --Description=
"Phoenix Job Processor" --Jvm=auto --Classpath=%cp% --
StartMode=jvm --StartClass=com.Certara.phx.process.
ProcessRunnerService --StartParams=start --StopMode=
jvm --StopClass=com.Certara.phx.process.
ProcessRunnerService --StopParams=stop --LogPath=
%job_processor_home%\logs --LogPrefix=service.log --
JvmOptions=-DJobProcessorHome="%job_processor_home%"
Use the script phoenix_job_processor.sh to run RPS as a Linux daemon. The script must be modified to update the values for JAVA_HOME, PHOENIX_JOB_PROCESSOR_HOME, DAEMON_HOME, TMP_DIR, and JOB_PROCESSOR_USER so that they are appropriate for the user’s environment.
Once the script has been modified, start RPS like this:
sh ./phoenix_job_processor.sh start
Stop the process using the stop argument like this:
sh ./phoenix_job_processor.sh stop
Example
#!/bin/sh
###########################################################
#
# Copyright 2010 Certara
#
###########################################################
#
# Small shell script to start/stop Phoenix Job Processor
# using jsvc. Adapt the following lines to your
# configuration
JAVA_HOME=/usr/java/jre1.5.0_22
PHOENIX_JOB_PROCESSOR_HOME=/share/job_processor_daemon
DAEMON_HOME=/usr/java/jdk1.5.0_22/bin
JOB_PROCESSOR_USER=root
TMP_DIR=/var/tmp
CLASSPATH=\
lib/apache-mime4j-0.6.jar:\
lib/commons-codec-1.3.jar:\
lib/commons-daemon-1.0.2.jar:\
lib/commons-logging-1.1.1.jar:\
lib/httpclient-4.0.1.jar:\
lib/httpcore-4.0.1.jar:\
lib/httpmime-4.0.1.jar:\
lib/xercesImpl.jar:\
lib/xml-apis.jar:\
PhoenixJobProcessor.jar
case "$1" in
start)
#
# Start Phoenix JobProcessor
#
cd $PHOENIX_JOB_PROCESSOR_HOME
$DAEMON_HOME/jsvc \
-user $JOB_PROCESSOR_USER \
-home $JAVA_HOME \
-Djava.io.tmpdir=$TMP_DIR \
-outfile
$PHOENIX_JOB_PROCESSOR_HOME/phoenix_job_processor.out \
-errfile '&1' \
-cp $CLASSPATH \
com.Certara.phx.process.ProcessRunnerDaemon
#
# To get a verbose JVM
#-verbose \
# To get a debug of jsvc.
#-debug \
;;
stop)
#
# Stop Phoenix JobProcessor
#
PID=`cat /var/run/jsvc.pid`
kill $PID
;;
*)
echo "Usage startup.sh start/stop"
exit 1;;
esac
The RPS Queue is a Web Archive that is deployed to a servlet container. The following instructions describe how to deploy the RPS Queue to Tomcat.
-
Stop Tomcat.
-
Copy PhoenixServer.war to %TOMCAT_HOME%\webapps.
-
Start Tomcat.
A few configuration options are available by editing the file %TOMCAT_HOME%\webapps\PhoenixServer\WEB-INF\web.xml. Care should be taken when editing this file, and changes should only be made to the parameter values specified. The parameter names should never be changed.
Steps for configuring:
-
Stop Tomcat.
-
Make desired changes to %TOMCAT_HOME%\webapps\PhoenixServer\WEB-INF\web.xml.
-
Save the file.
-
Start Tomcat.
|
Parameter Name |
Parameter Value |
|
logLevel |
Valid values in order of increasing detail are: CONFIG, INFO, WARNING, and SEVERE. |
|
logPath |
Relative path to the directory where logs should be written. |
|
enableAdminSecurity |
Valid values are true and false. |
|
adminUserPath |
Relative path to the XML file that contains the defined admin users. |
Example
.
.
.
<init-param>
<param-name>logLevel</param-name>
<param-value>INFO</param-value>
</init-param>
<init-param>
<param-name>logPath</param-name>
<param-value>../../logs</param-value>
</init-param>
.
.
.
<init-param>
<param-name>enableAdminSecurity</param-name>
<param-value>true</param-value>
</init-param>
<init-param>
<param-name>adminUserPath</param-name>
<param-value>AdminUsers.xml</param-value>
</init-param>
.
.
.
Admin users are managed by editing the file AdminUsers.xml. The location of the file is configurable, but the default file location is %TOMCAT_HOME%\webapps\PhoenixServer\AdminUsers.xml.
By default, an example user “admin” is in the shipped file.
<adminUsers>
user name="admin" password=" "/>
</adminUsers>
Notice that the password attribute is empty. The password attribute should always be left empty when adding a new user. The user will be prompted to create a password the first time they login. The password will be encoded when it is saved.
For instance, to define two administrators with user names johndoe and janedoe, the file would look like this:
<adminUsers>
<user name="johndoe" password=" "/>
<user name="janedoe" password=" "/>
</adminUsers>
Once the user has been added to the file, navigate to the Job Viewer.
Example address: http://myhost:8080/PhoenixServer
-
Click the Login as administrator link.
-
Enter user name and leave the password blank.
-
Click Submit.
-
Enter the password twice and click Submit.
Phoenix Job Viewer showing “Login as administrator” link
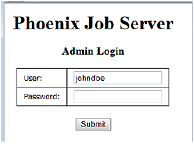
Administrator login page
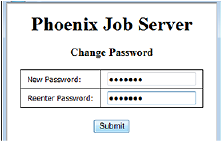
Change password page
Now, if the AdminUsers.xml file is opened, the an encoded password is listed for the user johndoe.
<user name="johndoe" password=" am9obmRvZQ=="/>
To reset a password, delete the password text so that the password attribute is empty, and the user will once again be prompted to enter a password the next time they login.
Add and delete users by editing the file as necessary.
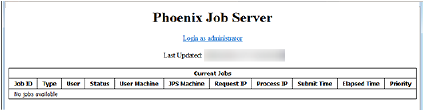
RPS jobs can be viewed by navigating to the Job Viewer in a browser. Users can get the URL from their internal IT personnel.
Example address: http://servername:8080/PhoenixServer
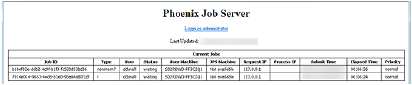
Job Viewer
When a job is processing, it is possible to view a tail of the log file provided the log file has been specified on the processing machine. When a job begins processing a View Log button is displayed next to the job as in the following image.

View Log button is added in last column of a running job
Clicking View Log will take the user to the Log Viewer window. The Log Viewer only displays the last several lines of the log. The number of lines displayed is configurable on the processing machine.
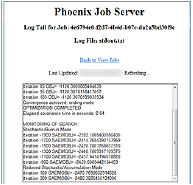
Log Viewer for a running job
Administrators can login by clicking the link Login as administrator, entering their user name and password, and clicking OK. Once a user is logged in as administrator, they are able to kill jobs and update priorities for jobs that are waiting to process.
Jobs are processed first by priority and then by submit time. So, if two jobs are changed to High priority, the one that was submitted first will be the first job processed. All jobs are assigned the default priority of Normal when they enter the queue.
The Kill option should only be used as a last resort. Users should first attempt cancel jobs using the Phoenix Job Viewer. Theoretically, it should never be necessary to use the Kill option. However, if for some reason a job becomes stuck in the queue or cannot be canceled from the client, the Kill option can be used to cancel and clear the job from the queue.
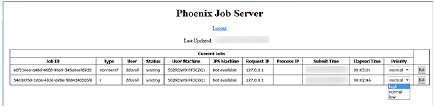
Options on the Priority pull-down menu.
