PK Submit supports the automatic generation of a complete electronic PK regulatory submission package, including all necessary CDISC domains, during the normal process of setting up and executing an NCA. This example uses the input of a PC.xpt and an EX.xpt file. Using PK Submit, a full set of CDISC domains in SEND 3.1 format will be generated and an NCA project will be created and set up to use the domains. At the end of the example, you will have a complete set of files for the study that are ready for electronic submission.
The major steps in this example include:
•Export domains as SAS Transport files
Specify the dataset for the PC domain
-
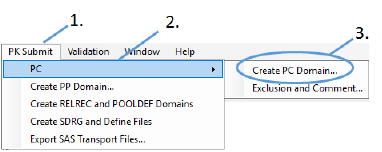
Select PK Submit > PC > Create PC Domain from the Phoenix menu.
-
In the PK Submit dialog, make sure the Standard and Version menus are set to SEND and 3.1, respectively.
-
Select PC.xpt as the FileType.
-
Click Browse, navigate to <Phoenix_install_dir>\application\Examples\PK Submit\Supporting files and select PC.xpt.
-
Click Next.
Map the variables
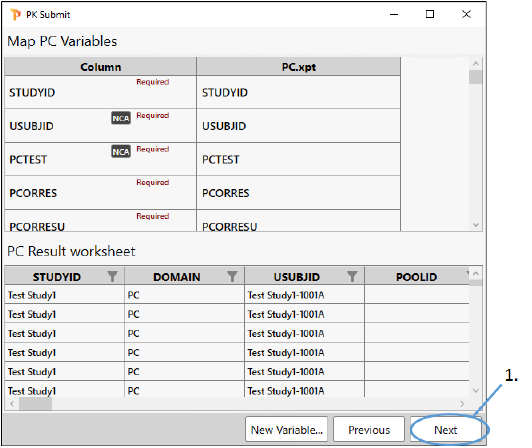
The next step in the process involves lines the up variables in the input dataset with those in the PC domain. The variables are marked as either being required for the PC domain creation or optional. The example PC.xpt file we are using includes variables that are recognized by PK Submit as PC variables and, therefore, they are automatically mapped. There is no need for us to perform any manual mapping of the dataset variables to the PC variables.
Variables that are not required for the PC domain but are needed for the NCA can also be mapped at this point, such as Dose Amounts, Dose Units, and Routes of Administration. For this example, we will map these items in a later step.
Note:If a variable is manually mapped, the database installed with the application will remember the mapping and automatically map that variable the next time it is encountered.
All required variables must be mapped to complete the process. Our example input file contains all of the variables that are required for the PC domain so we can proceed to the next step.
-
Click Next.
During the PC domain creation process, PK Submit checks the data and will warn you of errors that will occur during the validation step. For example, if the USUBJID does not contain the studyID string, which is required for compliant PC domain, you will see a message and be given the option to have the PK Submit concatenate the study ID with the USUBJID to bring it into compliance.
Merge dosing with concentration information
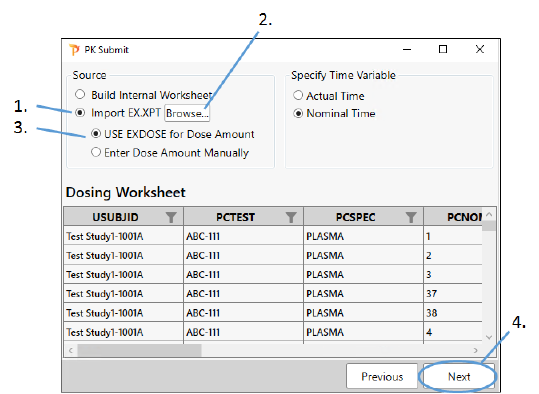
Dosing and concentration information can be merged by mapping the appropriate variables in the previous step, by entering values directly in the table, or by loading an EX.XPT file. For this example, we will load an example file.
-
Select the Import EX.XPT option.
-
Select the Use EXDOSE for Dose Amount option.
-
Click Browse, navigate to <Phoenix_install_dir>\application\Examples\PK Submit\Supporting files and select EX.xpt.
-
Click Next.
If the merge is performed successfully, PK Submit will tell you the number of rows of data were imported. Click OK.
Exclude data
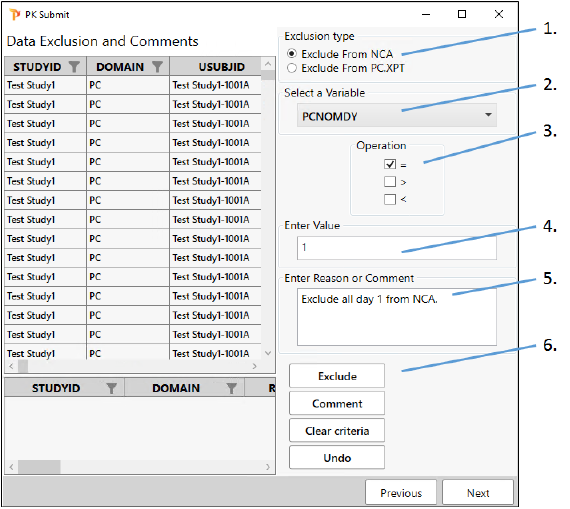
Set up a filter to exclude all day 1 data from the NCA analysis.
-
Select the Exclude from NCA option.
-
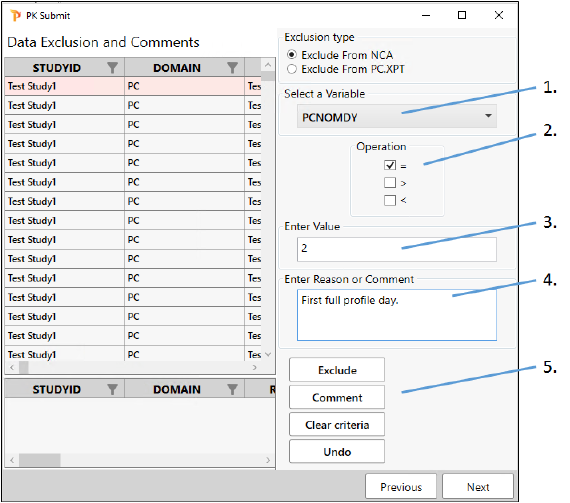
From the Select a Variable pulldown, scroll down the list and choose PCNOMDY.
-
Check the box for = under Operation.
-
In the Enter Value field, type 1.
-
Type the following in the Enter Reason or Comment field:
Exclude all day 1 from NCA. -
Click Exclude.
Rows that meet the criteria will be shaded pink to indicate that they are marked for exclusion.
Add a comment
On the same page in the PK Submit dialog where we set up the exclusion criteria, add a comment about the data collected on day 2.
-
From the Select a Variable pulldown, scroll down the list and choose PCNOMDY again.
-
Check the box for = under Operation.
-
In the Enter Value field, type 2.
-
Type the following in the Enter Reason or Comment field:
First full profile day. -
Click Comment.
-
Click Next.
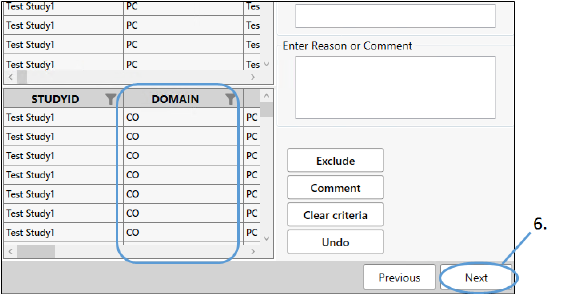
Adding comments generates a CO domain.
Finish setting up NCA
-
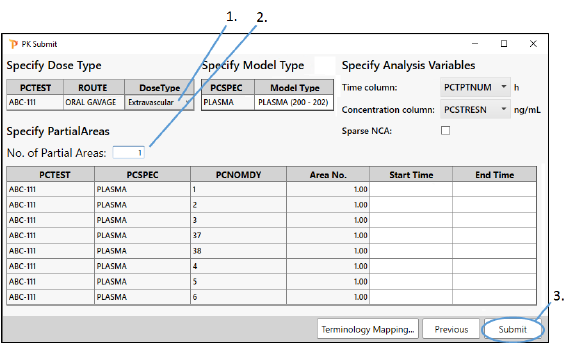
Select Extravascular from the Dose Type pulldown.
-
Leave the No. of partial areas field set to 1.
-
Click Submit.
The Terminology Mapping button will show how the terminology for specimen and units are being mapped. As mentioned earlier in the example, this mapping is remembered by the database and only needs to be mapped once. However, the complete terminology list is always available through the Controlled Terminology Mapping dialog for you to select from.
The PC domain is complete and a Phoenix project is automatically created, with a workflow that has an NCA object preconfigured according to specifications made in PK Submit.
The PP domain can be generated from an NCA, typically the Final Parameters output worksheet. The NCA object set up by PK Submit is ready to execute. Unless you want to review the slope selector, you can simply run the NCA.
Specify the data for the PP domain
-
Execute the NCA object.
-
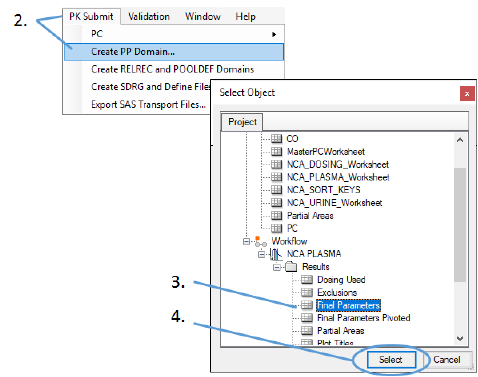
Select PK Submit > Create PP Domain from the Phoenix menu.
-
In the Select Object dialog, choose Final Parameters under NCA PLASMA > Results.
-
Click Select.
Exclude parameters
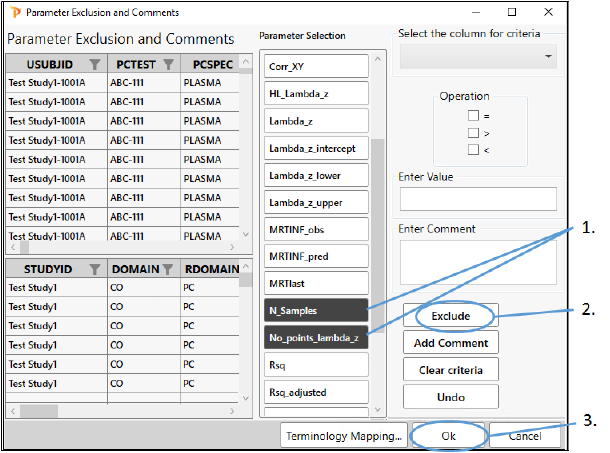
-
In the Parameter Exclusion and Comments page, scroll down the Parameter Selection list and click N_Samples and No_points_lambdaz.
-
Click Exclude.
-
Click OK.
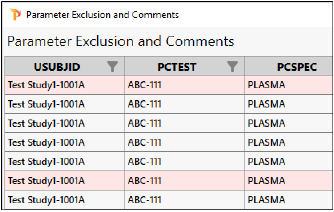
Notice the rows on the left that are now highlighted in pink. These will be excluded from the domain.
The PP domain is created.
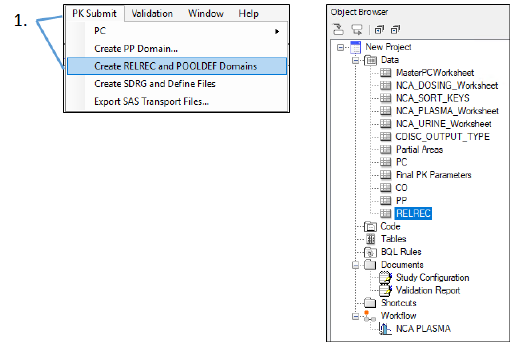
-
Select PK Submit > Create RELREC and POOLDEF Domains from the Phoenix menu.
Since this was not a sparse study, there will not be a POOLDEF domain.
-
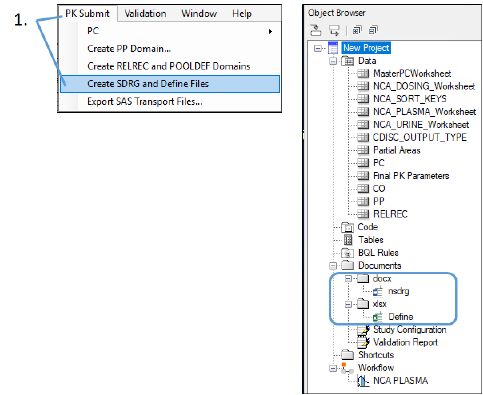
Select PK Submit > Create SDRG and Define Files from the Phoenix menu.
The Study Data Reviewer’s Guide is created and stored in the Documents > docx subfolder of the Object Browser. The template for this document is available on the PhUSE website. PK Submit automatically populates the document with most of the information needed for submission.
The Define file is created and stored in the Documents > xlsx subfolder. This Excel-formatted file contains all of the information you would find in a define.xml file for the study.
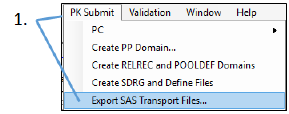
Export domains as SAS Transport files
-
Select PK Submit > Export SAS Transport Files from the Phoenix menu.
-
In the file browser, select the location in which to save the files and click OK.
The study information is ready for electronic submission and the process is completed.
