Note:The ODBC user interface is only available when using the 32-bit version of Phoenix.
Phoenix can exchange data with Open Database Connectivity (ODBC) compliant databases such as Oracle and SAS. For example, Phoenix can read rows of PK data from an ODBC-compliant database, and save analysis output back to a table in that database. This is done using the ODBC import and export functionality in Phoenix.
This section contains the following topics:
The first step in an ODBC import or ODBC export is to establish a connection to a specific database.
Creating a new connection string creates a new connection string, defining the database type and location. This connection string may be saved as part of an import or export settings file for re-use.
Loading a saved connection extracts the connection string from a previously-saved import or export file. This establishes a link to the database, to be used with a new or saved query or export.
Creating a new connection string
To define the database type and location for ODBC import or export
Select File > ODBC > Import (or Export) > Legacy Wnl.
Select the Create a new Import (or Export) option button in the ODBC Import (or Export) dialog.
Click Next.
Select the Create a new connection option button and click Next.
Click New to set up new File or Machine data sources.
See Microsoft Windows documentation for details on creating new data sources.
Or select a data source from one of the two tabs in the Select Data Source dialog.

The File Data Source tab lists all file Data Source Names (DSNs) and subdirectories on the system. These are file-based data sources that can be shared among all users who have the same ODBC drivers installed. The data sources do not need to be dedicated to a single user or local to a specific computer.

The Machine Data Source tab uses information stored in Window’s registry, which provides the majority of the connection string information.
Click OK.
If a log in dialog appears, enter the appropriate login ID and password for the data source and click OK.
ID and password are set up by the Database Administrator or Information Technology personnel.
A connection string may be saved along with a import query or export definition in an import (*.imp) or export (*.exp) settings file for re-use. This is done at the conclusion of building the import query or export definition. A connection string can also be saved by itself and loaded separately during the import/export setup process.
The next step is to set up a query (see “Specifying the Query”) to pull the desired data from the database, or create an export definition (see “Creating a new export”) to map Phoenix data columns to database fields.
Once a connection string is saved in an import (*.imp) or export (*.exp) file, it can be loaded for use with different import queries or export definitions.
Select File > ODBC > Import > Legacy Wnl or File > ODBC > Export > Legacy Wnl.
Select the Create a new Import (or Export) option button in the ODBC Import (or Export) dialog and click Next.
Select the Load an existing connection option button and click Next.
In the Open dialog, select the import file (*.imp) or export definition file (*.exp) containing the connection string for the desired database and click Open.
Proceed with the import or export, as detailed under “Specifying the Query” for imports or “Creating a new export” for export.
Use ODBC Import to load data from an ODBC-compliant database directly to a worksheet. An import involves establishing a connection to the database, then defining a query to draw specific fields and records from it.
Database connection: Both ODBC import and export use a connection string that defines the database type and location. This string can be created by pointing to the database type and file, or loaded from a previously-saved import or export as detailed under “Establishing a connection”.
Query: Once the database connection is established, an import requires a query to set which data table, field(s) and records to import. The query can be created in the or loaded from a previously-saved import as described under “Specifying the Query”. Phoenix translates the query into Structured Query Language (SQL), which can be edited before executing the import.
The query settings can be saved with a connection string to an import specifications file (*.imp), for later re-use. The query settings can also be saved without the connection string and loaded for use with other databases via different connection strings.
Phoenix also provides a Custom Query Builder for creation of dynamic link library (DLL) files that can access additional data source types, including Watson version 7.x DMLIMS. See “Using the custom query builder”.
Note:If an error is encountered when using ODBC Import, try setting the permissions of the C:\Windows\SysWOW64\comdlg32.ocx file (C:\Windows\SysWOW64\comdlg32.ocx for 32-bit systems) to Read-Execute and Read for Everyone user.”
Once a database connection string is established (see “Establishing a connection”), ODBC import requires a query specifying the data table, field(s) and records to be imported. There are two ways to specify a query:
Select File > ODBC > Import > Legacy Wnl.
Select the Create a new Import option button in the ODBC Import dialog and click Next.
Create a new or load a saved connection string, as detailed under “Establishing a connection”.
Select the Build a Query option button and click Next.
The Phoenix Query Builder accesses the database, and loads a list of the available tables. If the appropriate ODBC drivers are available, the Schema Filter dialog is displayed. It provides a means to filter the available database tables by schema, a metadata organizational tool. The schema are created by the database administrators.
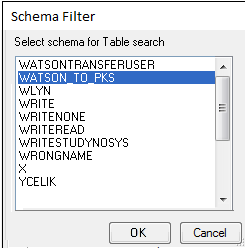
If the Schema Filter dialog is displayed, select the schema to use in filtering the list of data tables, then click OK.
In the Source Table list, select a table from which to import data.
Click Next to continue with selecting the fields to import or click Done to load all fields in the table.
To select a field(s) to import:
Click a field in the list to select it for import. (Clicking a field a second time, deselects it.)
Click Select all to select all fields. (Click De-Select all to clear all field selections.)
Click Next to continue with filtering the records or click Done to import all records in the selected fields.
To create the record filter:
In the Field Name menu, select a field name used to filter queries.
In the Operator menu, select a comparison or logical operator.
Note:The logical operator like means true if the operand matches a pattern.
Enter a value in the Field Value field or click List Distinct Values to select from all existing values for the selected field.
Click Add to set the filter.
To apply more than one filter, select the And or Or option buttons and return to create another filter. Filters are applied in the order they are created.
Click Done when all filters are entered.
In the ODBC Import: Final Settings dialog, confirm/edit the connection string and query SQL.
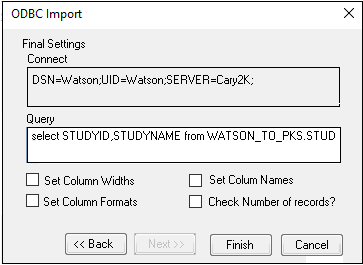
Check the Set Column Widths checkbox to adjust the destination worksheet's columns to match the widths of the fields in the database.
Check the Set Column Names checkbox to adjust the destination worksheet to have the same column names as the source fields.
Check the Set Column Formats checkbox to apply the appropriate number formats to columns containing times, currency, and dates.
Check the Check Number of records? checkbox to provide a count of filtered records prior to the import, and the option to return and edit the query if needed.
Click Finish to import the selected data to a Phoenix worksheet.
If Check Number of Records? is checked, a message is displayed that states the number of records returned by the query. Click Yes to continue.
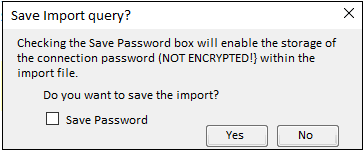
In the Save Import query? dialog, check the Save Password checkbox to save the database username, password, and connection string in the import file.
Saving all three pieces of information in the import file allows users to connect to a database.
Caution:The import file is not encrypted, so the saved password is not secure.
Click Yes to save the import file.
In the Save As dialog, select a directory in the Save in field, type a file name in the File name field, and click Save.
If a user clicks Cancel in the Save As dialog the worksheet is still imported into Phoenix, but the import file is not saved.
The size of the worksheet Phoenix can import depends on the amount of memory in the computer running Phoenix. The table below lists memory requirements and cell limitations. ODBC drivers might impose additional limits.
|
Memory Requirements |
Cell Limitations |
|
1 gigabyte of RAM |
2 million worksheet cells |
|
2 gigabytes of RAM |
4 million worksheet cells |
|
3 gigabytes of RAM |
6 million worksheet cells |
A saved import specifications file (*.imp) may or may not contain the connection string, depending on what options were specified during saving.
Select File > ODBC > Import > Legacy Wnl.
In the ODBC Import dialog, select the Load an existing Import option button and click Next.
In the Open dialog, select the import (*.imp) file and click Open. The ODBC Import: Final Settings dialog appears with all settings for that import loaded.
Makes changes as needed in the Import: Final Settings dialog or by using the Back button.
When the settings are correct, click Finish. The data from the database are then loaded into a Phoenix worksheet.
Be aware that, once a connection string (new or existing) is established, any saved query can be loaded so long as it uses the tables, fields, and record types in the database to which Phoenix is connected.
Using the custom query builder
The Custom Query Builder provides a means to build custom dynamic link library (DLL) files that access additional data source types, including Watson version 7.x DMLIMS. Further, Phoenix provides templates for creating the DLL files to access custom data sources.
Select File > ODBC > Import > Legacy Wnl.
Select Use Custom Query Builder and click Next.
The Select a Builder dialog is used to set the data resources to access. If the Custom Query Builder has not been used before, this dialog may be empty.
To add resources to the Query Builder, click Add, then double-click the appropriate DLL file such as WatsonLIMS.dll.
To configure the Watson DMLIMS custom resource to make sure that data are imported correctly:
Select that item and click Edit.
In the Configuration dialog, enter the name of the Watson LIMS tables’ owner.
Enter the full directory path for the Watson templates or click Browse to locate the directory on your local machine or on a network server.
Click OK to close the Configuration dialog.
Highlight Watson DMLIMS (or another custom query builder) in the Select a Builder dialog and click OK.
The dialog asks whether to load a query.
To load a saved query, click Yes. In the Open File dialog, select an existing query (file type *.wts for Watson LIMS) and click Open.
If no query has been saved for this builder, click No and proceed with the following steps.
In the log in dialog, enter user name, password, and database alias, and click OK.
Note:The user name, password, and alias for any custom database system (such as the Watson DMLINS) are set by the database administrator or IT personnel. Request this information from that person or department.
In the Study Selection dialog, select a study by clicking on the row and then click Next.
Use the Order Study By field to sort any category, such as study number or ID, study director, etc., in order to find a listing more quickly.
Note:If no projects are listed in this dialog, contact your IT department.
In the Import Data Variables dialog, select the desired variables.
If all available variables are desired, click Select All.
For a subset, drag each variable to the Selected Variables field.
A particular combination of variables can be saved as a template. To create a new template drag the variables for the template to the Selected Variables field and click New. Then enter a name for the template.
The fields will be imported in the order shown in the Selected Variables list.
Click Next to continue with data filtering or click Done to import all data in the selected fields.
Define a filter in the Filter dialog:
Select the field to filter on from the Field box.
Choose an operator.
Either enter a value in the Field Value field or click List Distinct Values to select from all existing value for the selected field.
Click Add to set the filter.
Use the And/Or operators to create compound filters such as Age>12 and Gender=Male.
Click Done to load the data into a Phoenix worksheet. If Check # of rows returned checkbox was selected, Phoenix reports a count of records returned.
Phoenix can export selected worksheet columns to specific fields within a table in any ODBC-compliant database. Like ODBC import, the export requires a connection string defining the database type and location. It also requires an export definition to map columns in the source worksheet to fields in the target database table.
Database connection: Both ODBC import and export can use the same connection string to define the database type and location. This string is created in the ODBC Export wizard or loaded from a previously-saved import or export as detailed under “Establishing a connection”.
Export definition: Once the database connection is established, an export requires a mapping of columns from the Phoenix worksheet to fields in the target database table. This export definition may be created in the ODBC Export wizard or loaded from a previously-saved export as shown under “Creating a new export”.
The export definition can be saved with a connection string to an export definition file (*.exp), for later re-use. The export definition can also be saved without the connection string and loaded for use with other databases via different connection strings.
See the following topics for more information:
In the Data folder, select a worksheet to export.
Select File > ODBC > Export > Legacy Wnl.
In the ODBC Export dialog, select the Create a new Export option button and click Next.
Create a new or load a connection string as detailed in “Establishing a connection”.
In the ODBC Export Definition dialog, select the Build a Definition option button and click Next.
As with the ODBC import, the schemas used to select the data variables can be specified. The Schema Filter dialog displays available schemas, if any were created by the database administrators.
If the Schema Filter dialog is displayed, select a schema and click OK.
Using schema filters can speed up export operations by using saved export files.
In the Table Name menu of the Field Selection dialog, select the database table to receive the exported data.
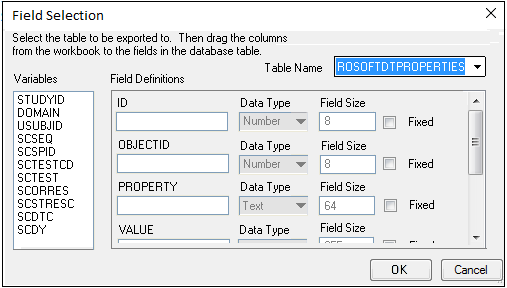
Drag the variables from the Variables list to the appropriate database fields under Field Definitions.
To export one constant value for all records in a given field, check the Fixed checkbox for a variable and enter a value in the field name.
This method can be used to differentiate one export from another. The data type and field size are set by the database administrator.
Click OK.
In the Save Export? dialog, check the Save Password checkbox to save the database username, password, and connection string in the export file.
Saving all three pieces of information in the import file allows users to connect to a database. The export definition file contains all information needed to reproduce the same export, excluding any constants in fixed fields.
Note:The import file is not encrypted, so the saved password is not secure.
Click Yes to display the Save As dialog for specifying the location and file name.
If you click Cancel in the Save As dialog, the worksheet is still exported into the database, but the export file (*.exp) is not saved.
A saved export file (*.exp) may or may not contain the connection string, depending on what options were specified during saving. The field mappings in any ODBC export definition can be re-used with any database connection, assuming the field and table names in the export file exactly match a table in the selected database.
Select the dataset to export in the Data folder.
Select File > ODBC > Export > Legacy Wnl.
In the ODBC Export dialog, select the Load an Export option button and click Next.
In the Open dialog, select the export file (*.exp) and click Open. (Log on to the data source, if necessary.)
If the Schema Filter dialog is displayed, use the Schema Filter option to narrow the set of available data tables (optional) and click OK.
Users can select All schemas in the Schema Filter dialog.
Make any adjustments needed in the Field selection dialog and click OK to complete the export.
