Data Link is an operational object that allows adding/removing/renaming of required columns so the user can use datasets with different column names, without having to do a specific column rename. This facilitates reuse of workflows by standardizing the column names of input.
What happens if data links are not used? If a workflow template is saved without using data links, when it is applied to another workflow, all of the links from the external sources will be missing. The more complex the workflow, the harder it is to establish new links to replace those that were lost. If data links are included in the template being applied, simply connect the source data to the data links themselves. Each data link distributes the data to where it is needed in the workflow.
When creating a Data Link, by default all the columns in the original dataset are shown as a requirement. The user must map a column to each of the listed columns. If a new dataset does not have one of the columns listed in the Data Link, the user must remove that column from the Data Link or add the data to the dataset and map it before the Data Link can be executed. If columns in an existing Data Link do not match all the columns of the input, then when the feature to Connect External Source to Data Links is used (available on the right-click menu for the Diagram), the existing Data Link will not be used. Phoenix will create a new Data Link to match all of the columns exactly. The Connect External Source to Data Links features allows the user to create a data link object for every worksheet coming into the workflow. It is a way of making place holders in the workflow so someone using the template can see where external data are needed.
To add a Data Link object to a workflow
Use one of the following to add a Data Link object to a Workflow:
Right-click menu for a Workflow object: New > Data > Data Link.
Or Main menu: Insert > Data > Data Link.
Or right-click menu for a worksheet: Send To > Data > Data Link.
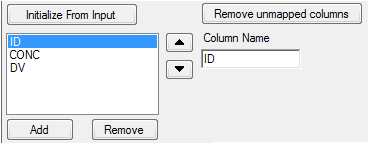
Click Initialize From Input to list only columns in the input dataset. Any columns that have been added by the user are removed from the list.
To add a column, click Add and the enter the name in the Column Name field.,
To remove a column(s), select the column name(s) from the list and click Remove.
To rename a column, select the column name from the list and enter a new name in the Column Name field.
Use the up and down arrows to reorder the columns.
Click Remove unmapped columns to delete all columns that are not mapped to the input data.
