CDISC Navigator supports the importing and exporting of CDISC data in either the SDTM (Study Data Tabulation Model) or the SEND (Standard for Exchange of Nonclinical Data) format.
•CDISC SDTM is a unified way of transmitting information in drug studies with precise column names and a common file format. The CDISC STDM implementation in CDISC Navigator is compliant with the standards in the SDTM Implementation Guide 3.1.1.
•CDISC SEND is an implementation of SDTM for nonclinical studies and specifies a consistent format for presenting and exchanging nonclinical data. The CDISC SEND implementation in CDISC Navigator is compliant with the standards in the SEND Implementation Guide 3.0.
For further information, please visit the Clinical Data Interchange Standards Consortium Web site at www.cdisc.org.
A typical workflow using CDISC Navigator tools begins by obtaining the SEND files from the labs, then using CDISC Preparer to generate the data and format needed for the NCA analysis. The NCA analysis will generate the necessary PK parameters and SEND columns, which in turn can be exported to a PP SEND file.
CDISC Navigator includes support for the following domains:
|
Abbrev. |
Domain name |
Description |
|
DM |
Demographics |
A set of essential standard variables that describe each subject in a clinical study. |
|
SC |
Subject Characteristics |
Subject-related data not collected in other domains. |
|
EX |
Exposure |
A subject’s exposure to protocol-specified study treatment. |
|
PC |
PK Concentration |
Concentrations of drugs/metabolites in fluids or tissues as a function of time. |
|
PP |
PK Parameters |
Pharmacokinetic parameters derived from pharmacokinetic concentration-time (PC) data. |
|
VS |
Vital Signs |
Subject records related to height, weight, and frame size. One row per subject per vital signs measurement per visit. |
CDISC datasets are saved as SAS Version 5 transport files (.xpt). Datasets exported from CDISC Navigator are automatically saved as SAS transport files.
This section contains the following topics:
Note:Although the images in this section show the SDTM Export Wizard, the options are identical to those in the SEND Export Wizard.
-
Select File > CDISC > SDTM > Export for SDTM formatted datasets.
Or select File > CDISC > SEND > Export for SEND formatted datasets.

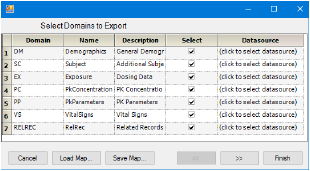
Selection of domains for export
-
Clear the Select checkbox beside a domain to exclude it from the export.
To specify a file outside of Phoenix as the source
-
Click in the Datasource cell beside the domain.
-
Select File System and click OK.
-
In the file browser, locate and select the .xpt file and click Select.
-
Click Finish to export the data.
Upon export, the original .xpt file from the file system is overwritten. Because of this, there is no need to do any mapping for the domain.
To specify a Phoenix object as the source
-
Select Phoenix Project and click OK.
-
Select a worksheet in the Select Object dialog and click Select.
Each domain has its own set of study variables that must be mapped. Users can map columns in a dataset to domain variables. -
If a map file exists of the selected domains and data sources, click Load Map to load the file. Otherwise, click >> to proceed with the mapping.
The Variable column contains the CDISC variable names. The column headers in the data source are not required to match the variable names.

Example mapping — DM domain
Note:When exporting a PP domain, an additional checkbox is shown above the table, Include RELREC. Turn on to include related records. See “Exporting related records” for more information.
-
In the Filter field, type a column name followed by a condition to filter the input for the current domain.
For example, if a user retrieves data from Certara Integral that contains dosing and sample data, entering Type=‘Dose’ in the Filter field only exports the dosing data. Note that the Filter field is case sensitive. -
Use the Map Column menus to select a column in the data source to map to each CDISC variable.
-
Select the Use Column Unit checkbox to remove the units from a column header and place them in their own column during export.
-
In the Static Value field, enter a static value for a CDISC variable.
Note that the Map Column selection supersedes any static value. -
Select the Sequence checkbox if a column contains the order of the output, or the treatment sequence in a crossover study.
-
Click >> to continue mapping for each selected domain.
-
Optionally save the mappings for future use once the mapping is complete by clicking Save Map to save the mappings to an XML file.
Every selection in the export wizard, including domains, static values, etc., is saved in the map file. -
To export the data, click Finish and, in the Browse for Folder dialog, select an export directory.
The exported data is placed in a directory with date and time stamps included in the name. A message is displayed telling users when the export is complete. If a required field is missing, the export continues, but an alert is presented to the user.
Exporting related records provides a link between parameter calculations and the data in the original data source that went into the calculation.This is accomplished by creating a RELREC worksheet in the output that stores the connection information.
There are some limitations/considerations when exporting related records:
-
The original dataset must have a PCSEQ column.
-
The datasource for the PP domain must be an NCA result.
-
Some of the Final Parameters are calculated based on the points from which the regression line was fitted. For these parameters, the RELREC information should only contain the PC data that was used for Lambda Z calculations.
The CdiscRelRecLZParams.xml configuration file (located in <Phoenix_install_dir>\application\Plugins\CDISC) lists these Lambda Z-based parameters. Parameters specified in this file will have records in the RELREC table that link to a RELID defined as the profile number plus the suffix “LZ”.
Assume that CDISC DM, EX, and PC domains are imported into Phoenix using the CDISC Data Preparer object.
-
Using the imported CDISC data as input, set up and execute an NCA object.
-
Map PCSEQ as a Carry column so that it appears in the Summary Table. The PCSEQ column enables referencing to the original sequence number in the source data.
The Summary Table and Final Parameters table can be used to determine which entries from original PC dataset were used to calculate the profiles in the NCA analysis. -
In the Final Parameters table (stacked), identify the sort key for the parameter of interest.
-
Go back to the Summary Table and find that sort key. Each associated sequence number that went into this calculation is listed as a separate row with the same sort key.
-
To export the Final Parameter Results back to CDISC, select File > CDISC > SDTM > Export.
-
Click in the Datasource cell for one of the domains to export.
The user is able to pick datasources for the domains being exported that are either located in the file system or are part of the Phoenix project. For exporting related records, the datasource for the PC domain must be the original dataset.
Note:Selecting the dataset that was imported into the Phoenix project instead of the original dataset is not recommended. During import, modifications to the data have occurred (e.g., different date and time formations, relative time calculations, etc.) and the purpose of exporting related records is to be able to track the data that went into a calculation back to the original CDISC dataset.
-
Select File System, click OK.
-
Locate and select the original dataset.
-
Repeat for each of the domains to export.
-
For the PP domain, click in the Datasource cell.
The PP domain datasource must be the Final Parameters worksheet from the NCA analysis. -
Select Phoenix Project, click OK.
-
Locate and select the Final Parameters worksheet for the NCA analysis.
-
When finished mapping the domains to data sources, click the >> button at the bottom of the dialog.
-
For each domain being exported, make adjustments as needed to the column mappings in the corresponding page and click the >> button.
-
For the PP domain, turn on the Include RELREC checkbox above the table to create the RELREC.xpt file of related records.

Checking the “Include RELREC” box creates the RELREC.xpt file
-
Continue through the Export Wizard and click Finish.
-
Select the folder in which to export the domains.
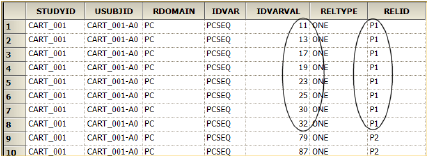
The image below shows a portion of an exported RELREC.xpt file. For the rows where IDVAR=PCSEQ, each sequence has an identifier listed in the IDVARVAL column. The RELID column lists the NCA profile identifier. Thus, PCSEQs 11, 13, 17, 19, 23, 25, 30, and 32 all were included in calculating profile P1.

Example RELREC.xpt file (sequence and NCA profile identifier columns circled)
Looking further down in the RELREC.xpt file, where IDVAR=PPSEQ, each row reflects a different parameter. Each sequence number (IDVARVAL) can be tracked back to a parameter that was calculated.

Tracking sequence number back to calculated parameter in RELREC.xpt file
-
Select File > CDISC > SDTM > Import for SDTM formatted datasets.
Or select File > CDISC > SEND > Import for SEND formatted datasets. -
In the Open dialog, choose the file format from the pull-down menu next to the File name field (.xpt domain file or define.xml file).
The define.xml file specifies all of the domains that are part of the CDISC dataset. Selecting this file will result in all of the specified domains being imported. -
Locate and select the CDISC domain file(s) or define.xml file and click Open.
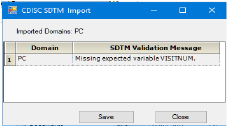
A message is displayed that lists any validation errors encountered during import. Users are alerted if a required field is missing but the import is not stopped.

CDISC SDTM Import dialog
-
Click Save to save the error messages to a file for later review or Close to close the dialog.
The imported dataset is added to the Data folder in the Object Browser.
Below are some important notes regarding the time formats used in CDISC.
-
All the date, time, and collection time fields are in ISO 8601 format as defined by the CDISC standards.
The format of CDISC data after import may differ depending upon the default local/regional ISO format for the environment in which Phoenix is running. The mm/dd/yyyy ISO date format may not be the default and may not even be an option in some regions. -
CDISC Navigator selects the highest time unit when importing datasets.
-
When relative time values are exported, CDISC Navigator creates the 8601 format based on the values in the relative time column.
