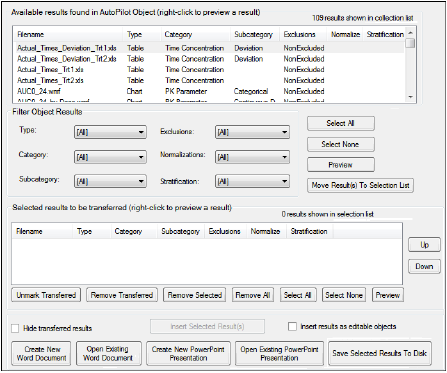
AutoPilot File Explorer, which is located in the Reporting tab, loads the graphs and tables from AutoPilot Toolkit project output files and exports them as pictures into Microsoft Word documents and PowerPoint presentations. File Explorer also allows users to insert files as editable objects. This section contains the following topics:
•Steps to insert and save files
Caution:Close Microsoft Word and Excel before using AutoPilot File Explorer.
-
After an Automation or Comparison run is complete, select the Reporting tab in the AutoPilot Toolkit object.
Reporting tab
The Reporting tab several groups of options to help select the output files to insert into Word documents or PowerPoint presentations, or to save to the file system.
•Available results found in AutoPilot Toolkit object
•File selection and previewing options
Available results found in AutoPilot Toolkit object
All available jpg, emf, wmf, and xls files created during the execution of the AutoPilot Toolkit object selected in the hierarchical list are displayed in this table.
-
Click on the Filename, Type, Category, Subcategory, Exclusions, Normalize, and Stratification column headers to sort the file list by the different fields.
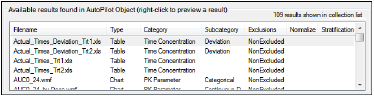
List of files created during execution
-
Choose from the options in the pull-down menus to filter the files shown in the Available Results list.
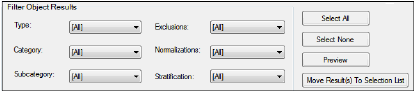
Filter Object Results section of Reporting tab
|
Filter |
Function |
|
Type |
Show All file types, only Chart types, or only Table types. |
|
Category |
Show files for All categories, or only those for a particular category (e.g., Time Concentration, PK Parameter. |
|
Subcategory |
Show files for All subcategories, or only those for a particular subcategory (e.g., Summary, Individual) |
|
Exclusions |
Show All files, only those involving exclusions (Excluded), or only those created with no exclusions (NonExcluded). |
|
Normalization |
Show All files, or only those involving normalization by a particular demographic variable (e.g., Age, Height). |
|
Stratification |
Show All files, or only those involving stratification using a particular criteria (e.g., Gender, Race). |
File selection and previewing options
Use the file selection and file preview buttons underneath the Available Results list to preview files and select files to be transferred to Word or PowerPoint.
-
Click Select All to select all available result files.
-
Click Select None to deselect all selected result files.
-
Click Preview (or right-click a file) to preview selected jpg/emf/wmf files in Microsoft Word and xls files in Microsoft Excel.
-
Click Move Result(s) To Selection List to move the selected files to the selection list.
The selected files are displayed in the Selected Results to be Transferred list.
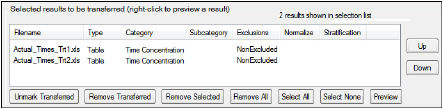
Selected Results section of Reporting tab
-
Click any of the column headers to sort by the values in that column.
-
Select a file and click Up and Down to modify the file order.
The following buttons are available below the Selected files list:
•Unmark Transferred: Remove the asterisk that identifies files as having been successfully transferred.
•Remove Transferred: Remove transferred files from the Selected files list.
•Remove Selected: Remove the selected file(s) from the Selected files list.
•Remove All: Clear the Selected files list.
•Select All: Select all files in the Selected files list.
•Select None: Deselect all selected files in the Selected files list.
•Preview: Load selected jpg/emf/wmf files into a Microsoft Word document and xls files into a Microsoft Excel spreadsheet. Right-clicking a selected file also previews the file.

Export section of Reporting tab
The bottom portion of the Reporting tab contains a number of options for handling the files in the Selected file list.
Note:AutoPilot File Explorer allows only one document/presentation to be open at a time.
-
Hide transferred results: Check this box to remove files from the Selected files list after they have been transferred (the Unmark Transferred Files and Remove Transferred Files buttons also become unavailable).
Uncheck to add transferred files back in the list (the Unmark Transferred Files and Remove Transferred Files buttons become available again).
-
Insert Selected Result(s): Insert the selected file(s) into an existing Word document or PowerPoint presentation. This button becomes available only after the Open Existing Word Document or Open Existing PowerPoint Presentation button has been used to select and open a document or spreadsheet.
-
Insert results as editable objects: Check this box if post-insertion editing such as adding titles or footnotes is needed.
-
Create New Word Document: Insert the file or files into a new Microsoft Word document. AutoPilot File Explorer automatically inserts a caption above each table or graph image when a new document is created. The caption is based on the type of table or graph that was inserted.
-
Open Existing Word Document: Display the Select Document Source dialog to choose whether the Word document is located in the File System or within the current Phoenix Project.
•File System: Display the Open dialog for navigating and selecting a Word document from the file system.
•Phoenix Project: Display the Select Object dialog for selecting a Word document that is part of the current project.
-
Create New PowerPoint Presentation: Insert the file or files into a new PowerPoint presentation.
-
Open Existing PowerPoint Presentation: Display the Select Document Source dialog to choose whether the PowerPoint presentation is located in the File System or within the current Phoenix Project.
•File System: Display the Open dialog for navigating and selecting a PowerPoint presentation from the file system.
•Phoenix Project: Display the Select Object dialog for selecting a PowerPoint presentation that is part of the current project.
-
Save Selected Results to Disk: Display the Browse for Folder dialog for selecting the file system folder in which to save the selected file(s).
-
If a table is too wide to fit on a single page, File Explorer resizes the table before it is inserted into Microsoft Word or PowerPoint. However, tables too wide to fit on one page ARE NOT automatically resized if they are inserted as editable objects. This retains font sizes and other characteristics in their original format.
-
If a very wide table is inserted as an editable object, then the table flows over the page margins. To insert a very wide table as an editable object, do the following:
•Create an AP Automation or AP Analyte Comparison project and select the Display tab.
•Select the Display Options tab, and select the Automatic Splitting checkbox in the Table column.
-
Any changes made to tables or charts inserted as editable objects are only reflected in Word and PowerPoint. The source files that were created by AutoPilot Toolkit and inserted into Word or PowerPoint are not affected.
For this reason the source files are not required to be located on the same computer that is to be used to edit the objects. However, Excel and SigmaPlot are required on any computer used to edit table and chart objects, respectively.
-
When inserting AutoPilot Toolkit templates, executing the node prior to saving it as a template can prevent the template from being exported to Word. Create the template before executing the node.
Steps to insert and save files
Inserting files into a new Word document
-
Select the files to insert into a Word document.
-
Click Create New Word Document to insert the selected file(s) into a new document.
Successfully transferred files are marked with an asterisk.
Inserting files into an existing Word document
Note:When inserting Automation or Comparison results into an existing Word document, it is recommended that only one document is open at the time.
AutoPilot File Explorer allows only one document to be opened at a time.
-
Select the files to insert into a Word document.
-
Click Open Existing Word Document to insert the selected file(s) into an existing Word document.
-
In the Select Document Source dialog, choose the source where the document is located and click OK.
•If File System is selected, the Open dialog is displayed. Select the Word file and click Open.
•If Phoenix Project is selected, the Select Object dialog is displayed. Select a Word file and click Select.
-
In the Reporting tab, select the file or files in the order they are to be inserted into the specified Word document and click Insert Selected Result(s).
The file(s) are imported into the Word document and inserted in the order in which they are listed in the Selected files list. The insertion point in the Word file is determined by the cursor location.
A message is displayed that confirms the file export.
-
Click OK to continue.
Successfully transferred files are marked with an asterisk.
Inserting files into a new presentation
Note:Close any open presentations before creating a new one.
-
Select the files to insert into a Microsoft PowerPoint presentation.
-
Click Create New PowerPoint Presentation to insert the file or files into a new Microsoft PowerPoint presentation.
AutoPilot File Explorer automatically inserts a caption above each table or graph image when a new presentation is created. The caption is based on the type of table or graph that was inserted.
Successfully transferred files are marked with an asterisk.
Inserting files into an existing presentation
AutoPilot File Explorer allows only one presentation to be opened at a time.
-
Select the files to insert into a PowerPoint presentation.
-
Click Open Existing PowerPoint Presentation to insert the selected file(s) into an existing PowerPoint presentation.
The Select Document Source dialog is displayed.
-
Choose the source where the document is located and click OK.
•If File System is selected, the Open dialog is displayed. Select the PowerPoint file and click Open.
•If Phoenix Project is selected, the Select Object dialog is displayed. Select a PowerPoint file and click Select.
-
In the Reporting tab, select the file or files in the order they are to be inserted into the specified PowerPoint presentation and click Insert Selected Result(s).
The file(s) are imported into the PowerPoint presentation and inserted in the order in which they are listed in the Selected files list. The insertion point in the PowerPoint file is determined by the cursor location.
A message is displayed that confirms the file export.
-
Click OK to continue.
Successfully transferred files are marked with an asterisk.
-
Click Save Selected Results To Disk.
-
In the Browse for Folder dialog, select a folder and click OK.
If the folder contains any files, then the following message is displayed:
-
Click Yes to continue.
The selected results are saved in the folder.
Note:If you want to save a Word 2010 document to disk, it is recommended that you first save the Word document to Phoenix, then export the document to disk.
When all desired files are selected, they can be exported into a Microsoft Word document or a Microsoft PowerPoint presentation.
By default, inserting tables and charts into Microsoft Word or PowerPoint creates image objects in those applications. The image objects are easy to insert and create a relatively small document size, but there are limits as to what can be done with the output after it has been created.
If post-insertion editing such as adding additional titles or footnotes is necessary in the output document, select the Insert results as editable objects checkbox prior to inserting the files.
Using this feature allows AutoPilot File Explorer to embed copies of the files into Microsoft Word or PowerPoint so that they can be edited using the original application that created the object. Tables are inserted as Microsoft Excel objects and charts are inserted as SigmaPlot chart objects.
The same editing options are available in Microsoft Word and PowerPoint.
There are two options for editing a table that has been inserted as editable: edit directly in Word or open an instance of Microsoft Excel and edit the table using Excel.
Edit Directly in Microsoft Word
-
Click anywhere in the table object in Microsoft Word to directly edit the table.
Table being edited in Microsoft Word
-
When the edits are complete, click anywhere in the Microsoft Word document other than in the table. The table automatically updates in Word.
Edit in Microsoft Excel
-
Right-click the table and select Worksheet Object > Open in the context menu.
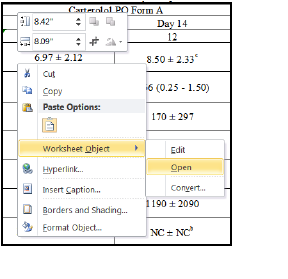
Right-click menu option to edit a table in Microsoft Excel
A new instance of Microsoft Excel opens and the selected table loads into Excel.
-
Edit the table within Excel.
-
When the edits are finished, close Excel. Any changes made to the table are reflected in the Word document.
The same editing options are also available in Microsoft PowerPoint.
The same methods used to edit tables can be used to edit charts and the same editing options are available in Microsoft Word and PowerPoint.
There are two options to edit a chart that has been inserted as editable: edit directly in Word or open an instance of SigmaPlot and edit the table using SigmaPlot.
Edit directly in Microsoft Word
-
Click anywhere in the chart object in Microsoft Word to directly edit the chart.
During in-place editing, full access to SigmaPlot context menus and dialog boxes is available by right-clicking on any object within the chart. In the example above the legend text has been selected for editing within the SigmaPlot Edit Text dialog.
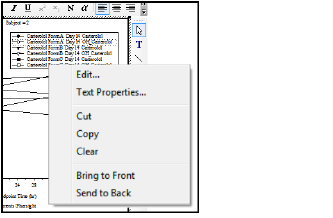
Right-click menu options when editing a chart in Microsoft Word
-
When the edits are complete, click anywhere in the Microsoft Word document other than in the chart. The chart automatically updates in Word.
Edit in SigmaPlot
-
Right-click the chart and select SPW xx Graph Object > Open from the context menu (xx: the SigmaPlot version number).
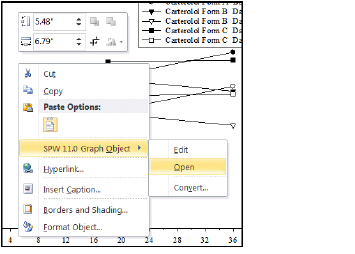
Right-click menu option to edit a chart in SigmaPlot directly
A new instance of SigmaPlot opens and the selected chart is loaded.
-
Edit the chart in SigmaPlot.
-
When the edits are finished, close SigmaPlot. Any changes made to the chart are reflected in the Word document.
Note:Due to a known issue in SigmaPlot 12.x, graphs may not completely get exported from SigmaPlot as editable objects into Word or PowerPoint.
To undo any unwanted changes made to a table or chart, select Undo Object from the Word or PowerPoint Edit menu. This reverts the last change or set of changes that were made to the object during editing. Microsoft Word and PowerPoint keep track of all changes and allows multiple undo operations.
