Example of setting up permissions for an external partner on a project
For this example we will be setting up permissions for an external partner, named Tester Smith. Tester Smith will need the ability to create/read/edit data, create/read/edit documents, and read analyses for all projects to which the Clinical_BA group is given access.
Assign the role of Partner to the user
Assume that Tester Smith has been granted an account by Certara Support.
Click ![]() to display the Users tab.
to display the Users tab.
Locate and select Tester Smith in the left list.
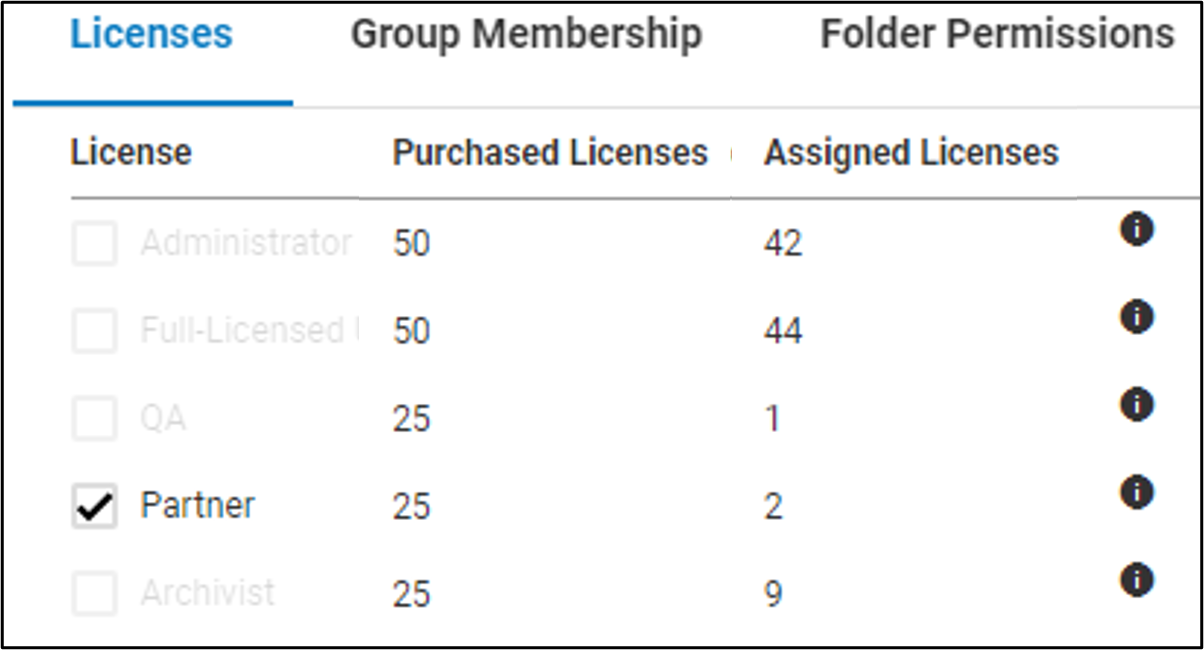
With the Licenses tab selected on the right, check the box for the Partner license to assign it to Tester Smith.
Partner licensed users can create, read, edit, delete, view, and blind any folder, except the Root folder, which they cannot delete, view, or blind. However, Tester Smith must first be granted access to some folders before any of these permissions can take effect. Access can be granted by Group membership or specifically at the folder level, or by a combination of both.
Create a new group
Set up a Clinical_BA group. Later, we will assign Tester Smith as a member of this group.
Click ![]() and select the Groups tab.
and select the Groups tab.
Click ![]() at the top of the left list.
at the top of the left list.
In the pop-up, enter Clinical_BA as the name of the new group and click Add.
We will add a rule for the Clinical_BA group that will define the criteria that must be met for certain permissions to be granted to its members.
All information that the Clinical_BA group needs access to are in folders that are of the Project type and have the Group property set to Clinical_BA. Therefore, a rule can be set up as follows:
Select Clinical_BA in the left list.
With the Rules tab selected on the right, click ![]() .
.
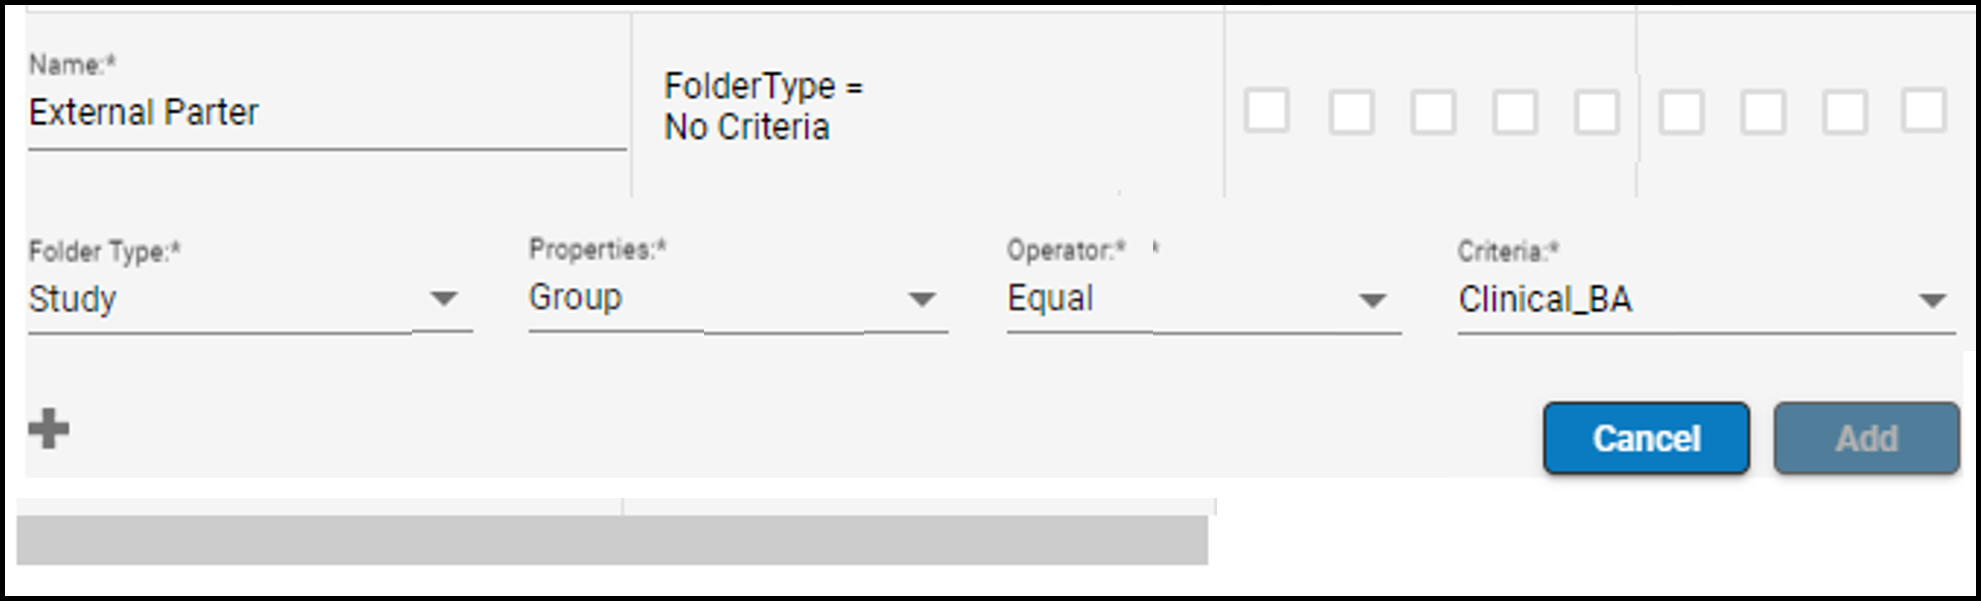
Type External partner as the name of the rule.
Set the Folder type to Project, Properties to Group, Operator to Equals, and Criteria to Clinical_BA.
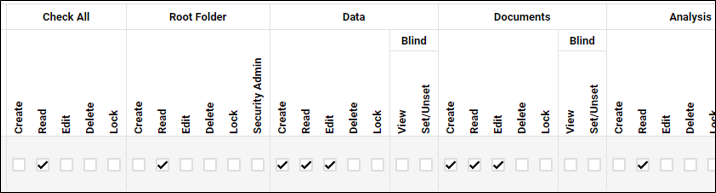
Check the Read box under Check All.
In the Data and Documents sections, check the Create and Edit boxes.
Click Add.
With this rule defined, members of the Clinical_BA group will be able to read all items and to create and edit data and document items within project folders that have the Group property set to Clinical_BA.
(Members could now be added to the new group, using the Members tab. However, this step will be skipped for this example.)
Add the user to the group
Select the Group Membership tab.
Check the Clinical_BA checkbox to add Tester Smith as a member.

Tester Smith now has access to some folders as a member of the Clinical_BA group. Remember, as a Partner, a user can potentially create, read, edit, delete, view, and blind any folder, except the Root folder. However, the Clinical_BA group does not allow members to delete or blind a folder.
Adjust folder permissions for the user
At this point, Tester Smith has access to any Project folder where the Group property is set to Clinical_BA. Let’s say that he is only involved with the PMX02 project. To allow access to only the information relevant to this project and no other project data, Tester Smith must first be removed from the Clinical_BA Group and then permissions need to be set for the PMX02 project folder.
For this example, assume that a project folder called PMX02 exists in Integral.
Select the Group Membership tab and uncheck the Clinical_BA box.
Select the Folder Permissions tab.
Locate the PMX02 folder in the table.
Use the Search Folder field to filter the table by typing PMX.
Check the Select All box for the PMX02 row.
Notice that ![]() appears under some of the column headers to indicate that the permission required for the action is not currently granted to the user’s role.
appears under some of the column headers to indicate that the permission required for the action is not currently granted to the user’s role.
Note: The presence of the warning icon simply notifies you that the associated action will not be allowed for the user, even though the box is checked. There is no need to adjust the checkboxes in an attempt to get rid of the warning icon, as the action will be prevented regardless of the status of the checkbox.