The Update Appearance tab is the first available for LINK in PUBLISH. It is common for submission publishers to receive PDFs containing links and hyperlinks that are not in accordance with ICH and regional guidance and that are not clearly defined in the documents. Manually finding the appropriate links and modifying them to meet eCTD specifications is a tedious task. To assist in this, PUBLISH automatically identifies any existing links and bookmarks, regardless of their formatting. The Update Appearance tab allow users to format those link properties in bulk, saving time and frustration.
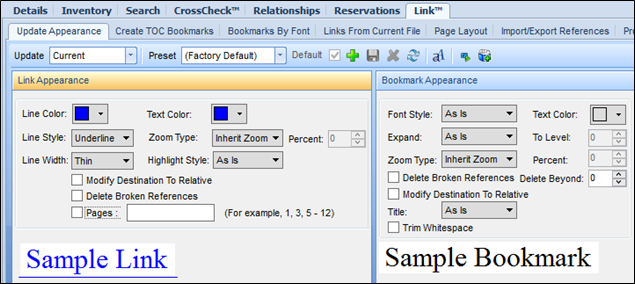
It is important to keep in mind that changes are made for both bookmarks and links. To only modify bookmarks, select As Is for any hyperlink settings that will not change, or vice versa on the bookmark tab to modify just link settings. The steps required to apply changed settings are listed below.
From the Update Appearance tab, select which files require updates from the Update dropdown.
You will have the option to select multiple files or the currently selected file in the Navigation tree.
Adjust the appearance settings using the drop down menus.
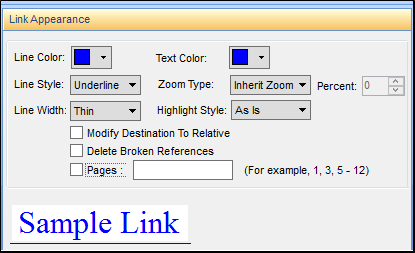
The Sample Link and Sample Bookmark preview the way links and bookmarks will appear after processing the changes.
Remember that all bookmarks AND links will be modified. Please unsure that both sections have been set to the desired formatting, or use the As Is selection as available.
Process the changes as discussed in the “Processing Changes in LINK in PUBLISH” section.
See the following sections for descriptions of specific settings:
Link Options
Bookmark Options
Title Case Bookmarks
Update Appearance Presets
Links can be modified in various ways through the LINK tab, such as:
• Appearance of hyperlink border and text
Line Color around the hyperlink
Line Style options (Underline, Box, etc.)
Line Width and Highlight Style
Text Color of the link inside of the document.
• Zoom Type: Modifies the Zoom automatically to the desired type.
• Modify Destinations to Relative: When checked, modifies any absolute links.
• Delete Broken References: Automatically deletes any references that PUBLISH confirms as broken.
• Pages: Allows a user to set the pages on which the link actions are to apply.
Bookmarks can be modified in the same fashion as hyperlinks. The following options can be modified in regards to bookmarks.
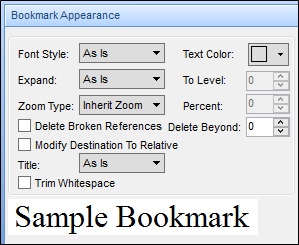
• Font Style: Allows a user to select font types for created bookmarks: Bold, Italic, Bold and Italic.
• Expand: This sets the bookmarks to be automatically collapsed, expanded, or to use the existing configuration.
• Zoom Type: eCTD specifications require PDFs be set to Inherent Zoom, therefore it is not advised to change this.
• Modify Destination to Relative: Automatically changes any absolute bookmark destination to relative.
• Title: Allows a user to choose upper, lower, or title case for bookmark titles. This option can also be set to follow the format from the document by selecting As Is.
• To Level: Used to delete any bookmarks that are in a child level lower than the selected option.
For example, by choosing 3, any bookmark that is in the fourth level of the hierarchy or lower will no longer show as a bookmark in the document.
• Trim Whitespaces: Automatically removes extraneous spaces at the beginning or end of a bookmark title.
Another available option on the Update Appearance tab is to change bookmarks to comply with title case requirements.
From the Title dropdown, select how you want the bookmarks to appear.
To view and modify the default list of words that will be title cased, click on Title Case Exclusion List icon: 
To simplify the process of modification, PUBLISH gives you the option of saving a group of settings as a Preset. Creating multiple presets saves you time by allowing you to automatically apply a specific combination of settings that have been previously used, instead of applying the same settings manually each time.
To create a preset:
Click the Add Preset icon: 
Assign a name to the preset.
Choose the options and properties applicable to the set.
Click the Save Preset icon: 
To update a preset:
Select the set to modify from Preset drop down
Choose different settings.
Click on Save Preset icon: 
To delete a preset:
Select preset from Preset drop down.
Click Delete Preset icon: 
The Reset Preset icon ( ) restores a preset’s original properties if a change was made accidentally.
Checking the Default checkbox will automatically apply the designated preset when the Update Appearance tab is chosen.